Help Center / New products
Verify your customers' identity with Slate Verify
Send a customer a link, they photograph their ID and take a selfie, and Slate tells you who passed and why. Step by step, with every screen.
15 min read · Updated November 10, 2026
Slate Verify checks that a customer is who they say they are. You send a link. They photograph an ID and take a selfie. Slate checks the document, checks the selfie is a live person, and checks the face matches the ID photo.
You'll find it under Identity verification in the menu on the left. It runs under your brand, and your customers see your logo and colours, not Slate's.
How a verification works
- You create a verification for a customer and get a link.
- You send the link. It opens on any phone or computer.
- The customer agrees to the check, photographs their ID, and takes a selfie.
- Slate runs the checks. If every check passes, the customer is Approved.
- If anything is unsure, the verification goes In review and a person at Slate looks at it. Slate never declines automatically. Only a Slate reviewer can decline.
- You see the result in the dashboard. Your developers can also get it by webhook.
A customer only needs to verify once. If you create a verification for a customer Slate has already approved, you get a message that they already passed, and no new link.
Find Identity verification
Open the menu
Select Identity verification in the menu on the left. It opens to show three pages.
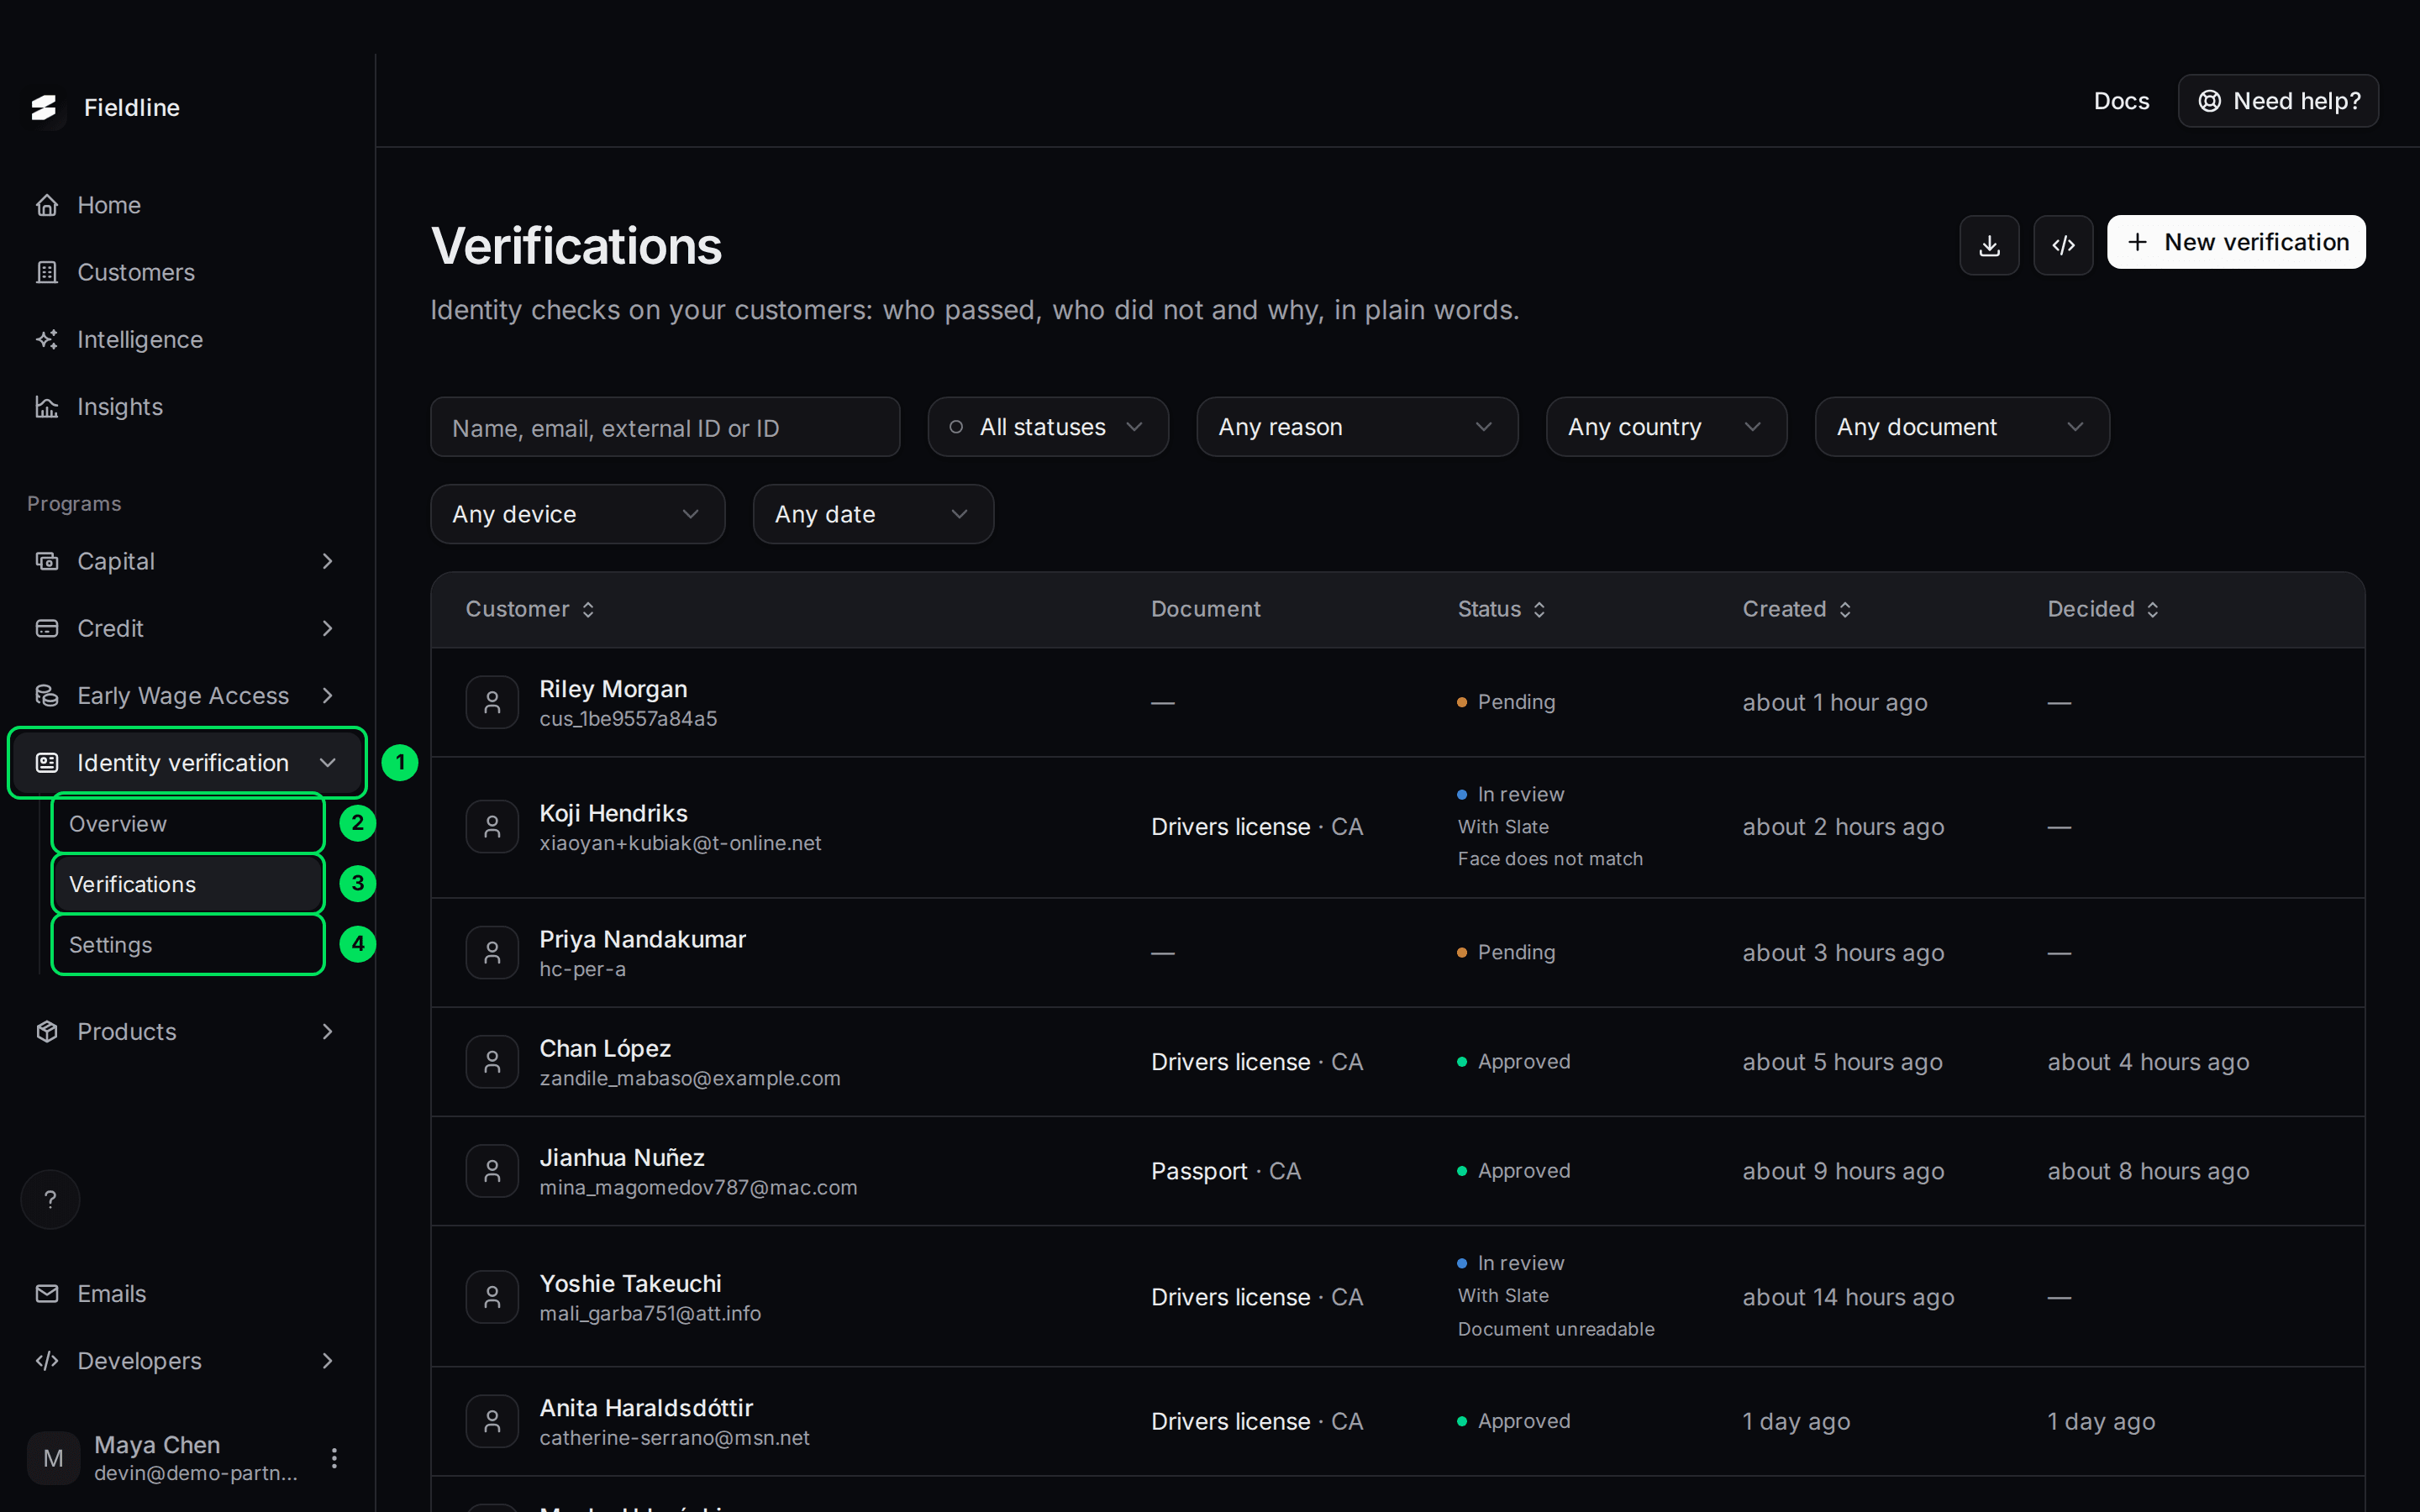
- Identity verification: the menu group.
- Overview: how verification is going, with numbers.
- Verifications: every verification, one row each. This is where you send links.
- Settings: where customers return to, and what they can verify with.
Send a verification link
Open Verifications
Select Identity verification in the menu, then Verifications.
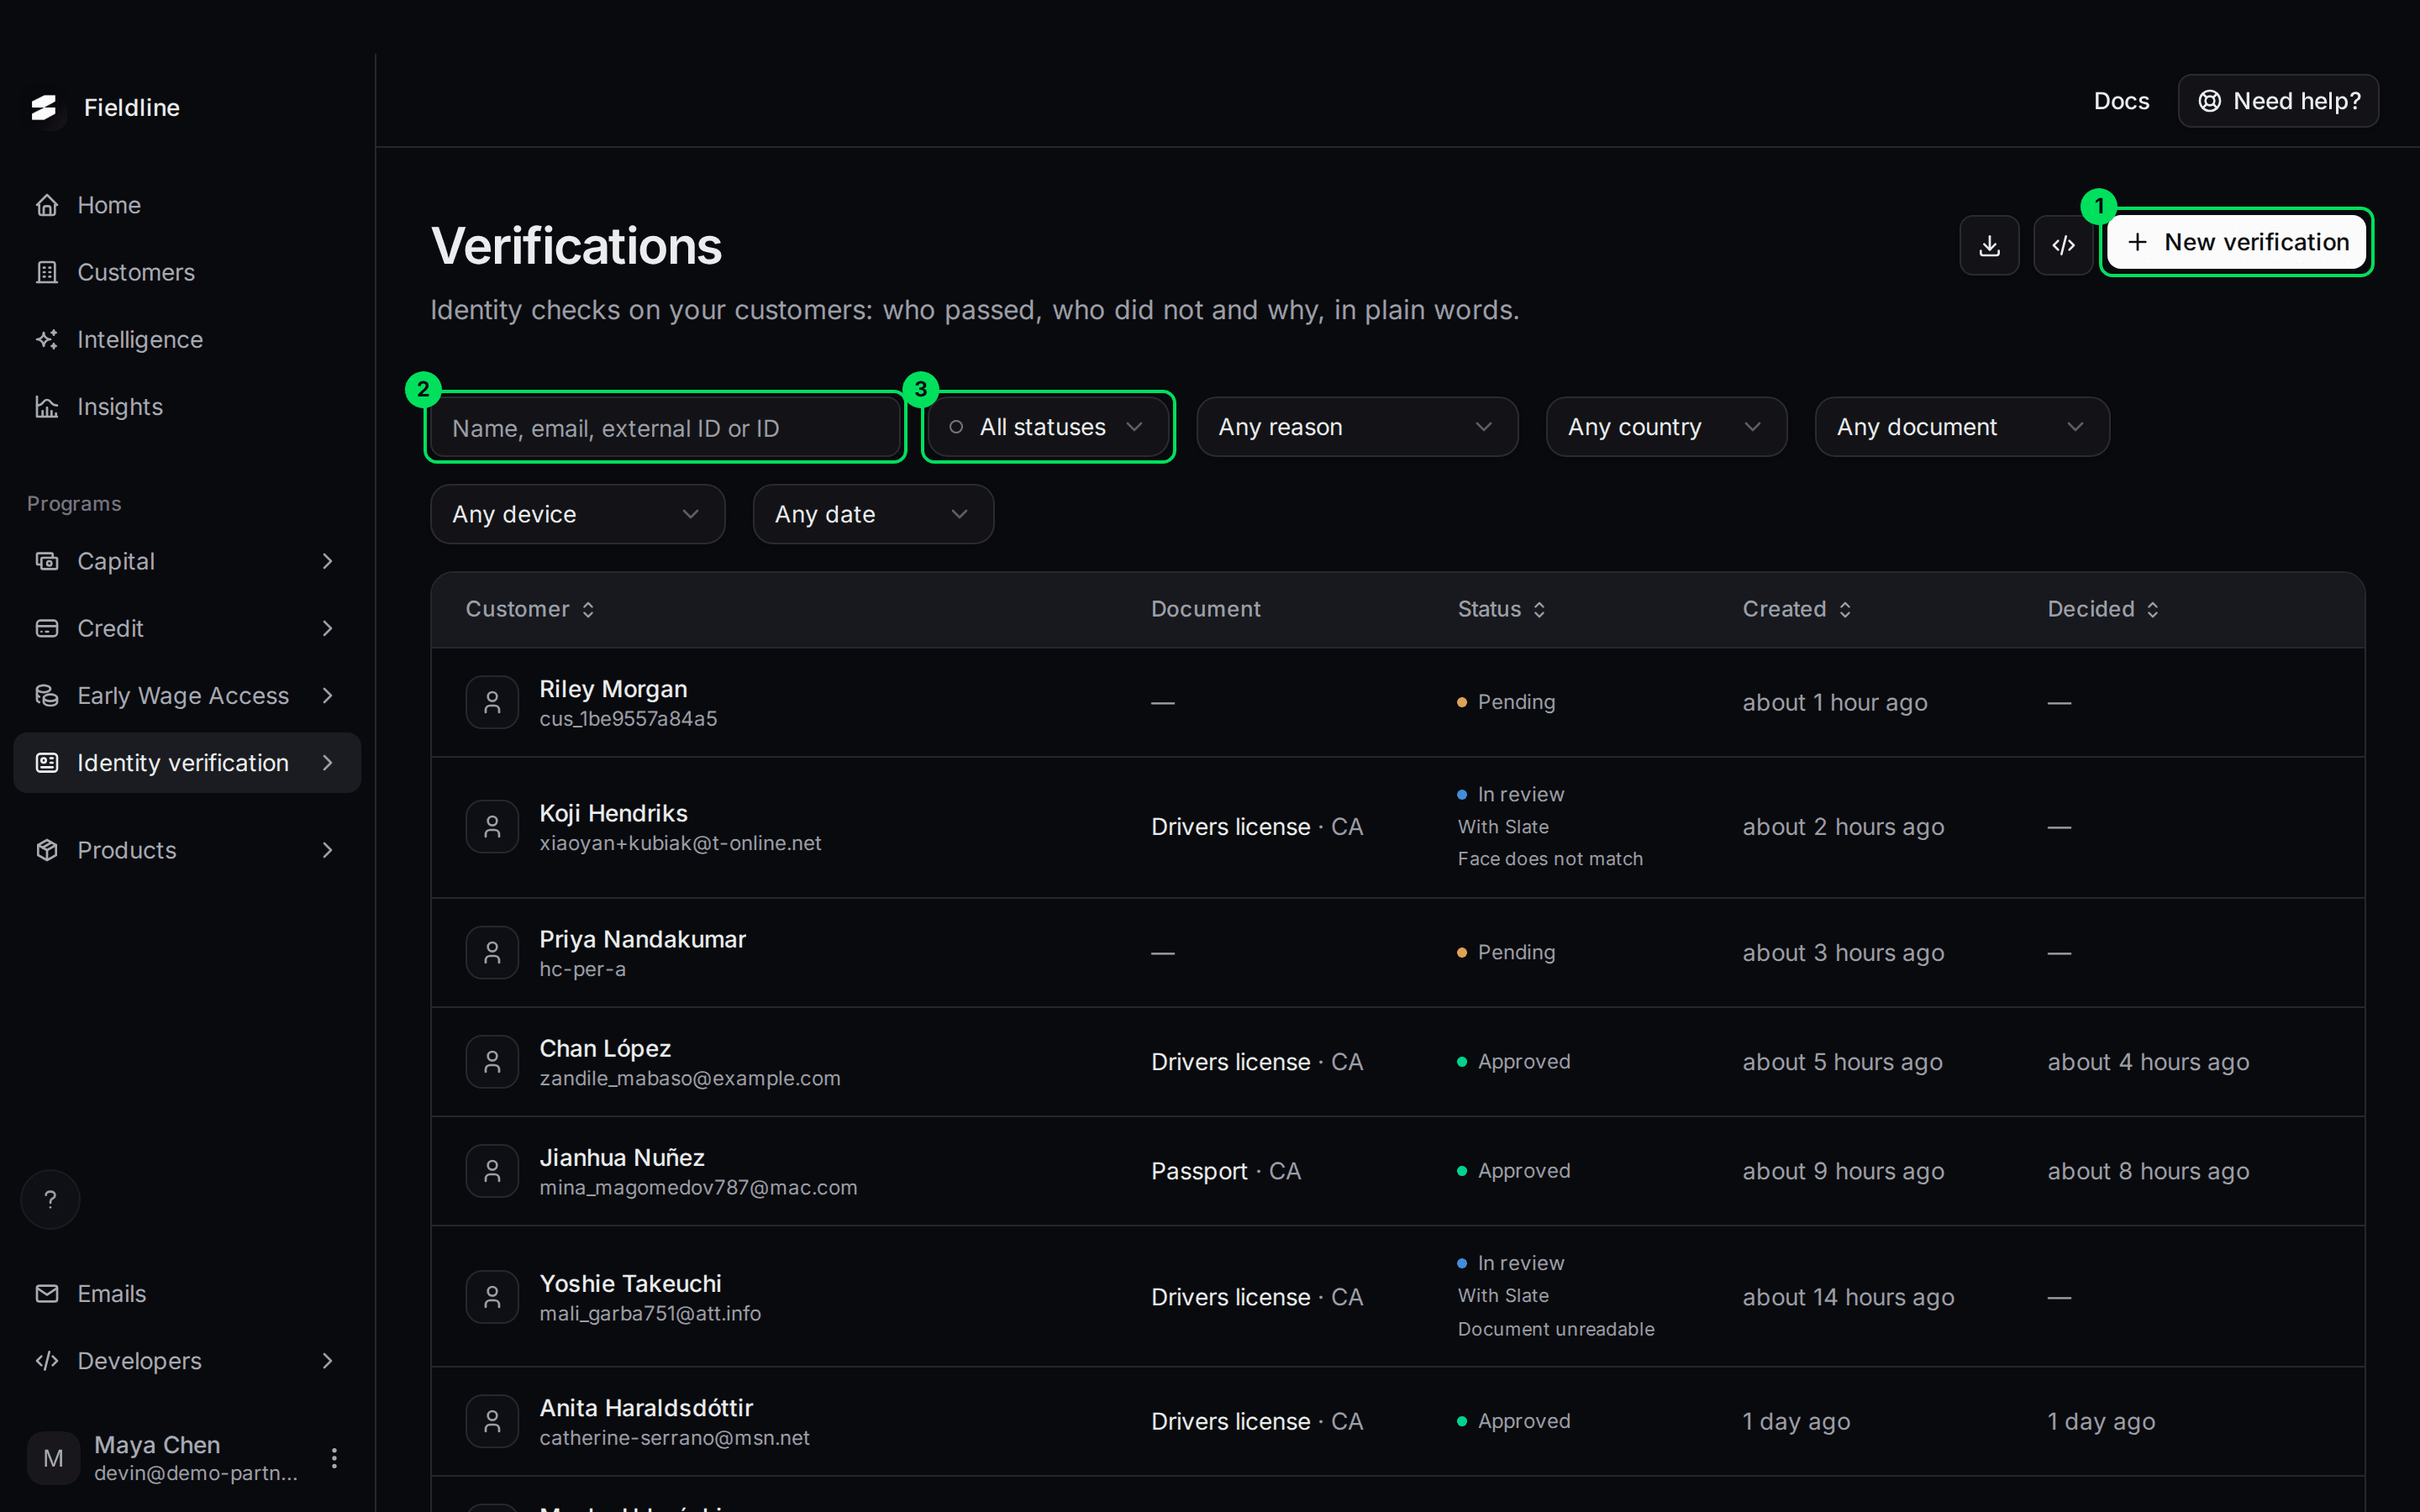
- New verification: starts a new verification.
- Name, email, external ID or ID: finds one customer.
- All statuses: shows only one status, such as In review.
Select New verification
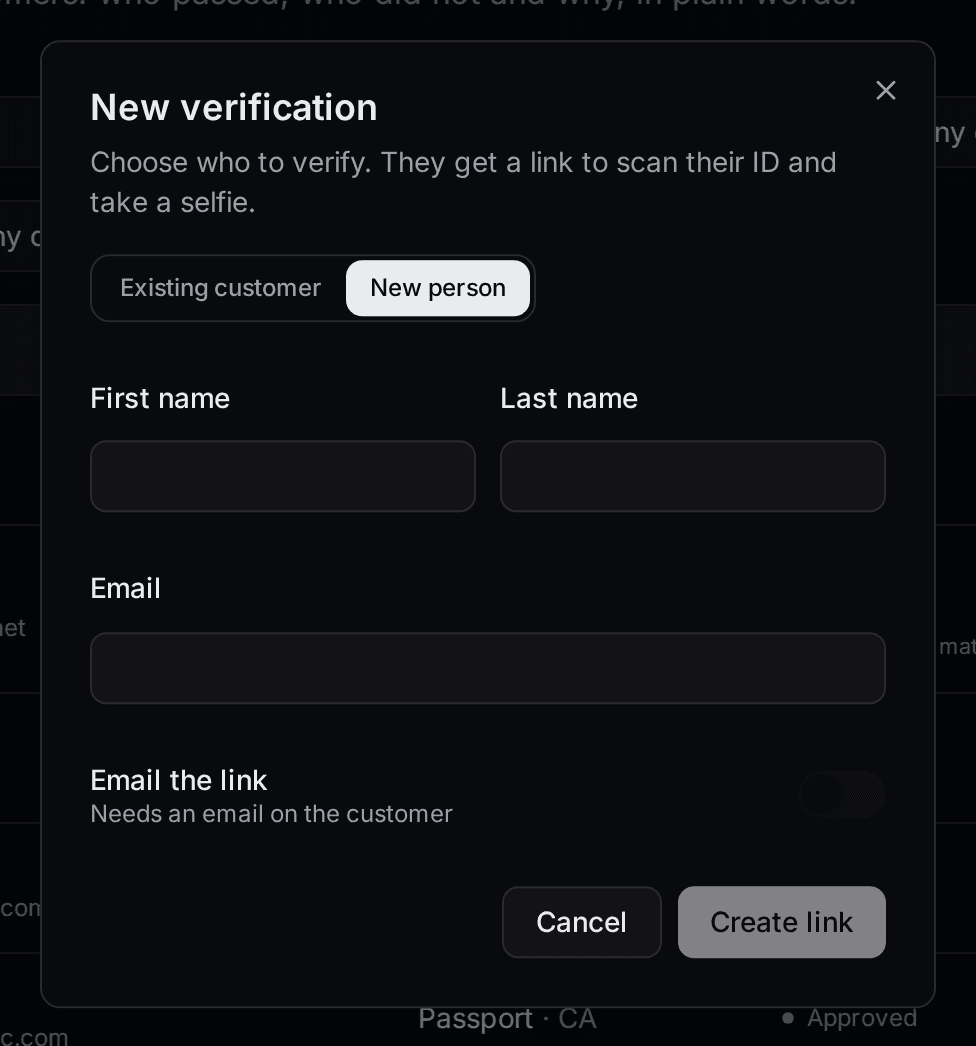
A box opens with two tabs.
- Existing customer: someone already in your Customers list.
- New person: someone you haven't added yet.
Choose the customer
On Existing customer, type a name in the search box. Select the customer from the list. For New person, type the First name, Last name and Email.
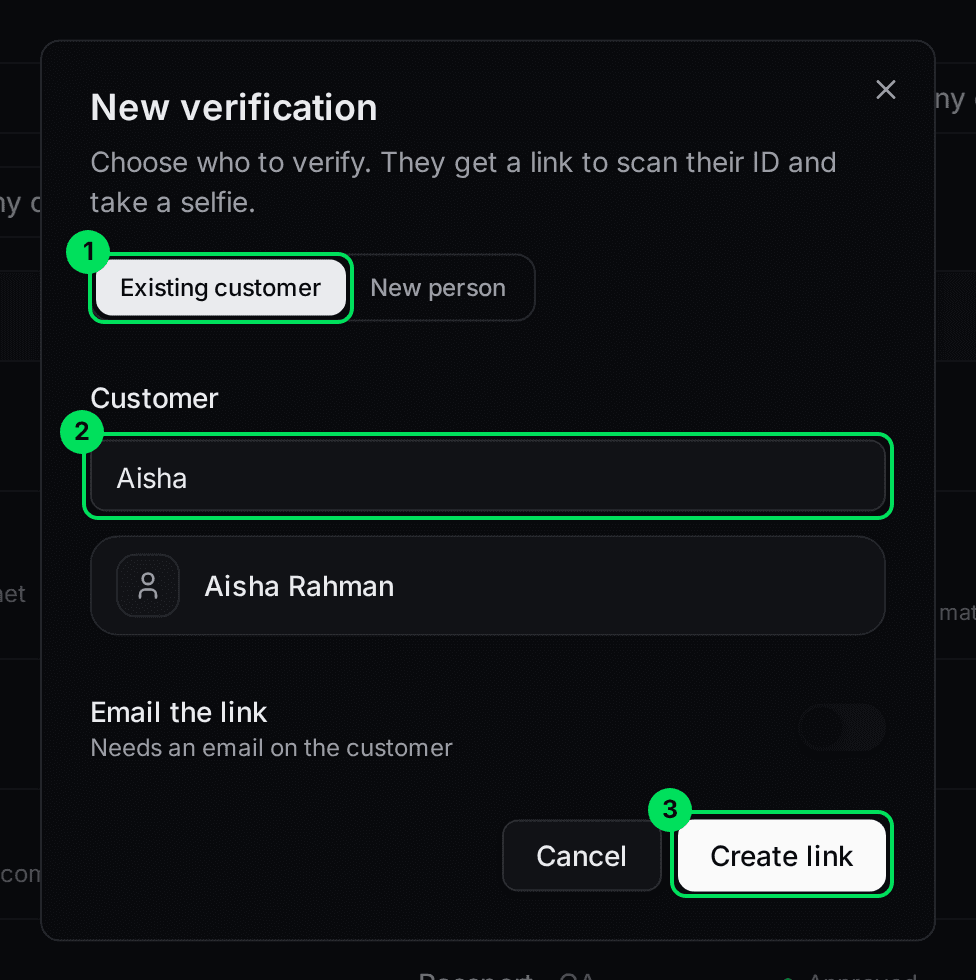
- Existing customer: the tab for people you already have.
- Customer: search and select the person to verify.
- Create link: makes the link.
Decide whether to email the link
The switch Email the link sends it for you, to the customer's email. It works only when the customer has an email address. It sends from your email domain if you have set one up. If you leave it off, you send the link yourself.
Select Create link
The box changes to Link ready. It shows a QR code and the link.
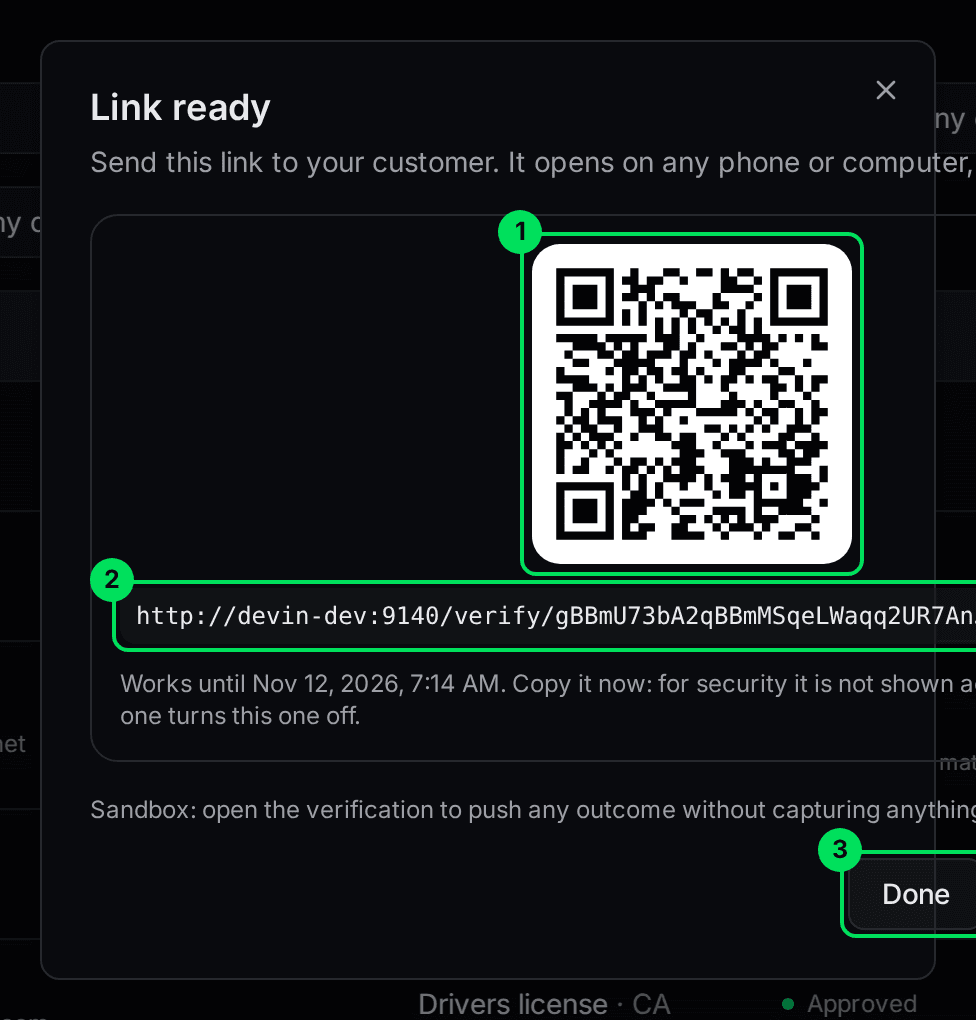
- QR code: the customer can scan it with a phone.
- The link: copy it and send it by text, chat or email.
- Done: closes the box. Open verification, next to it, opens the new verification.
What your customer sees
The customer opens the link on a phone or a computer. A computer shows a QR code to continue on a phone, because a phone camera gives sharper photos.
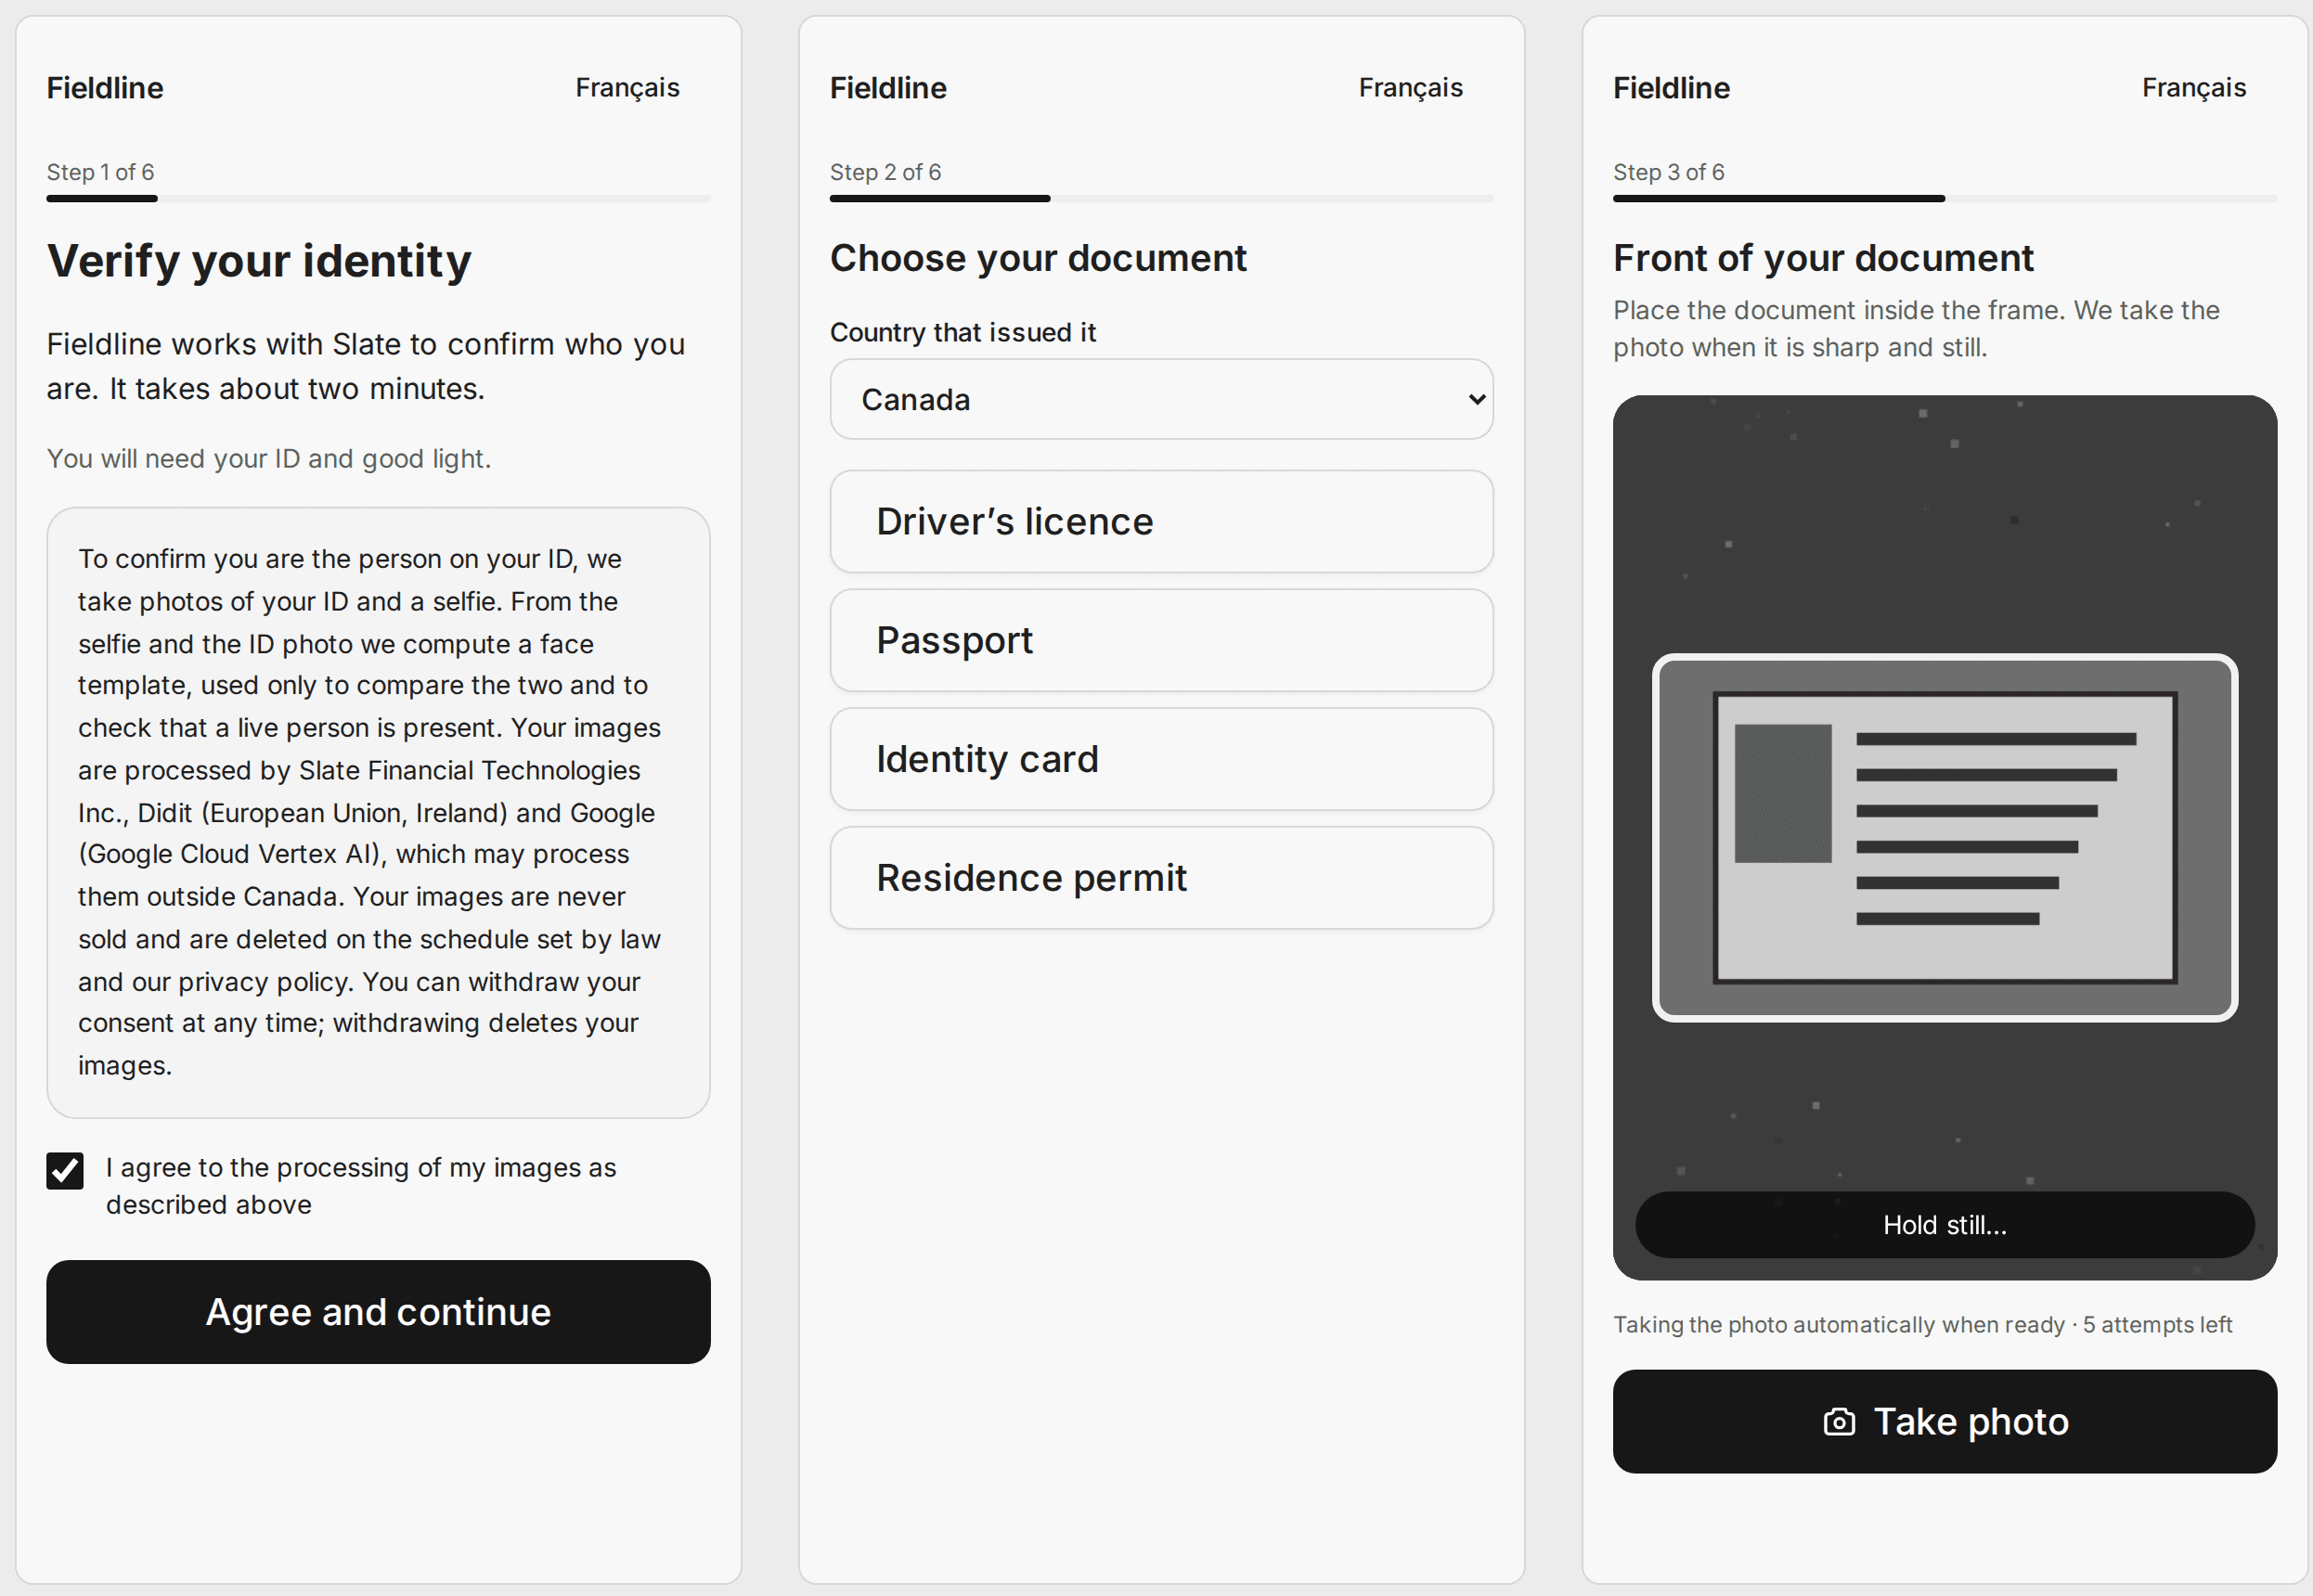
Here is the whole path on a phone. Your company's name and logo are on every screen.
They agree to the check
The first screen says your company works with Slate to confirm who they are. It takes about two minutes. They read how their images are used, tick the box, and select Agree and continue. A Français button at the top switches the screens to French.
They choose a document
They pick the country that issued it, then Driver's licence, Passport, Identity card or Residence permit.
They photograph the ID
The camera opens with a frame. Slate takes the photo by itself when the picture is sharp and still. A small message guides them, such as Find better light or Hold steady, the photo is blurry. Take photo is there if they prefer to press it. Most documents need a front and a back. A passport needs the photo page.
They take a selfie
They centre their face in the oval and look at the camera.
They check and submit
They see all their photos. Retake replaces one. Submit sends them. A Checking your photos screen usually lasts less than a minute.
They see the result
If all checks pass, they see You're verified. If a person needs to look, they see We're reviewing your information and hear back by email. If it can't be confirmed, they see We couldn't verify your identity. It tells them to try again with a valid, unexpired document, or to contact your company.
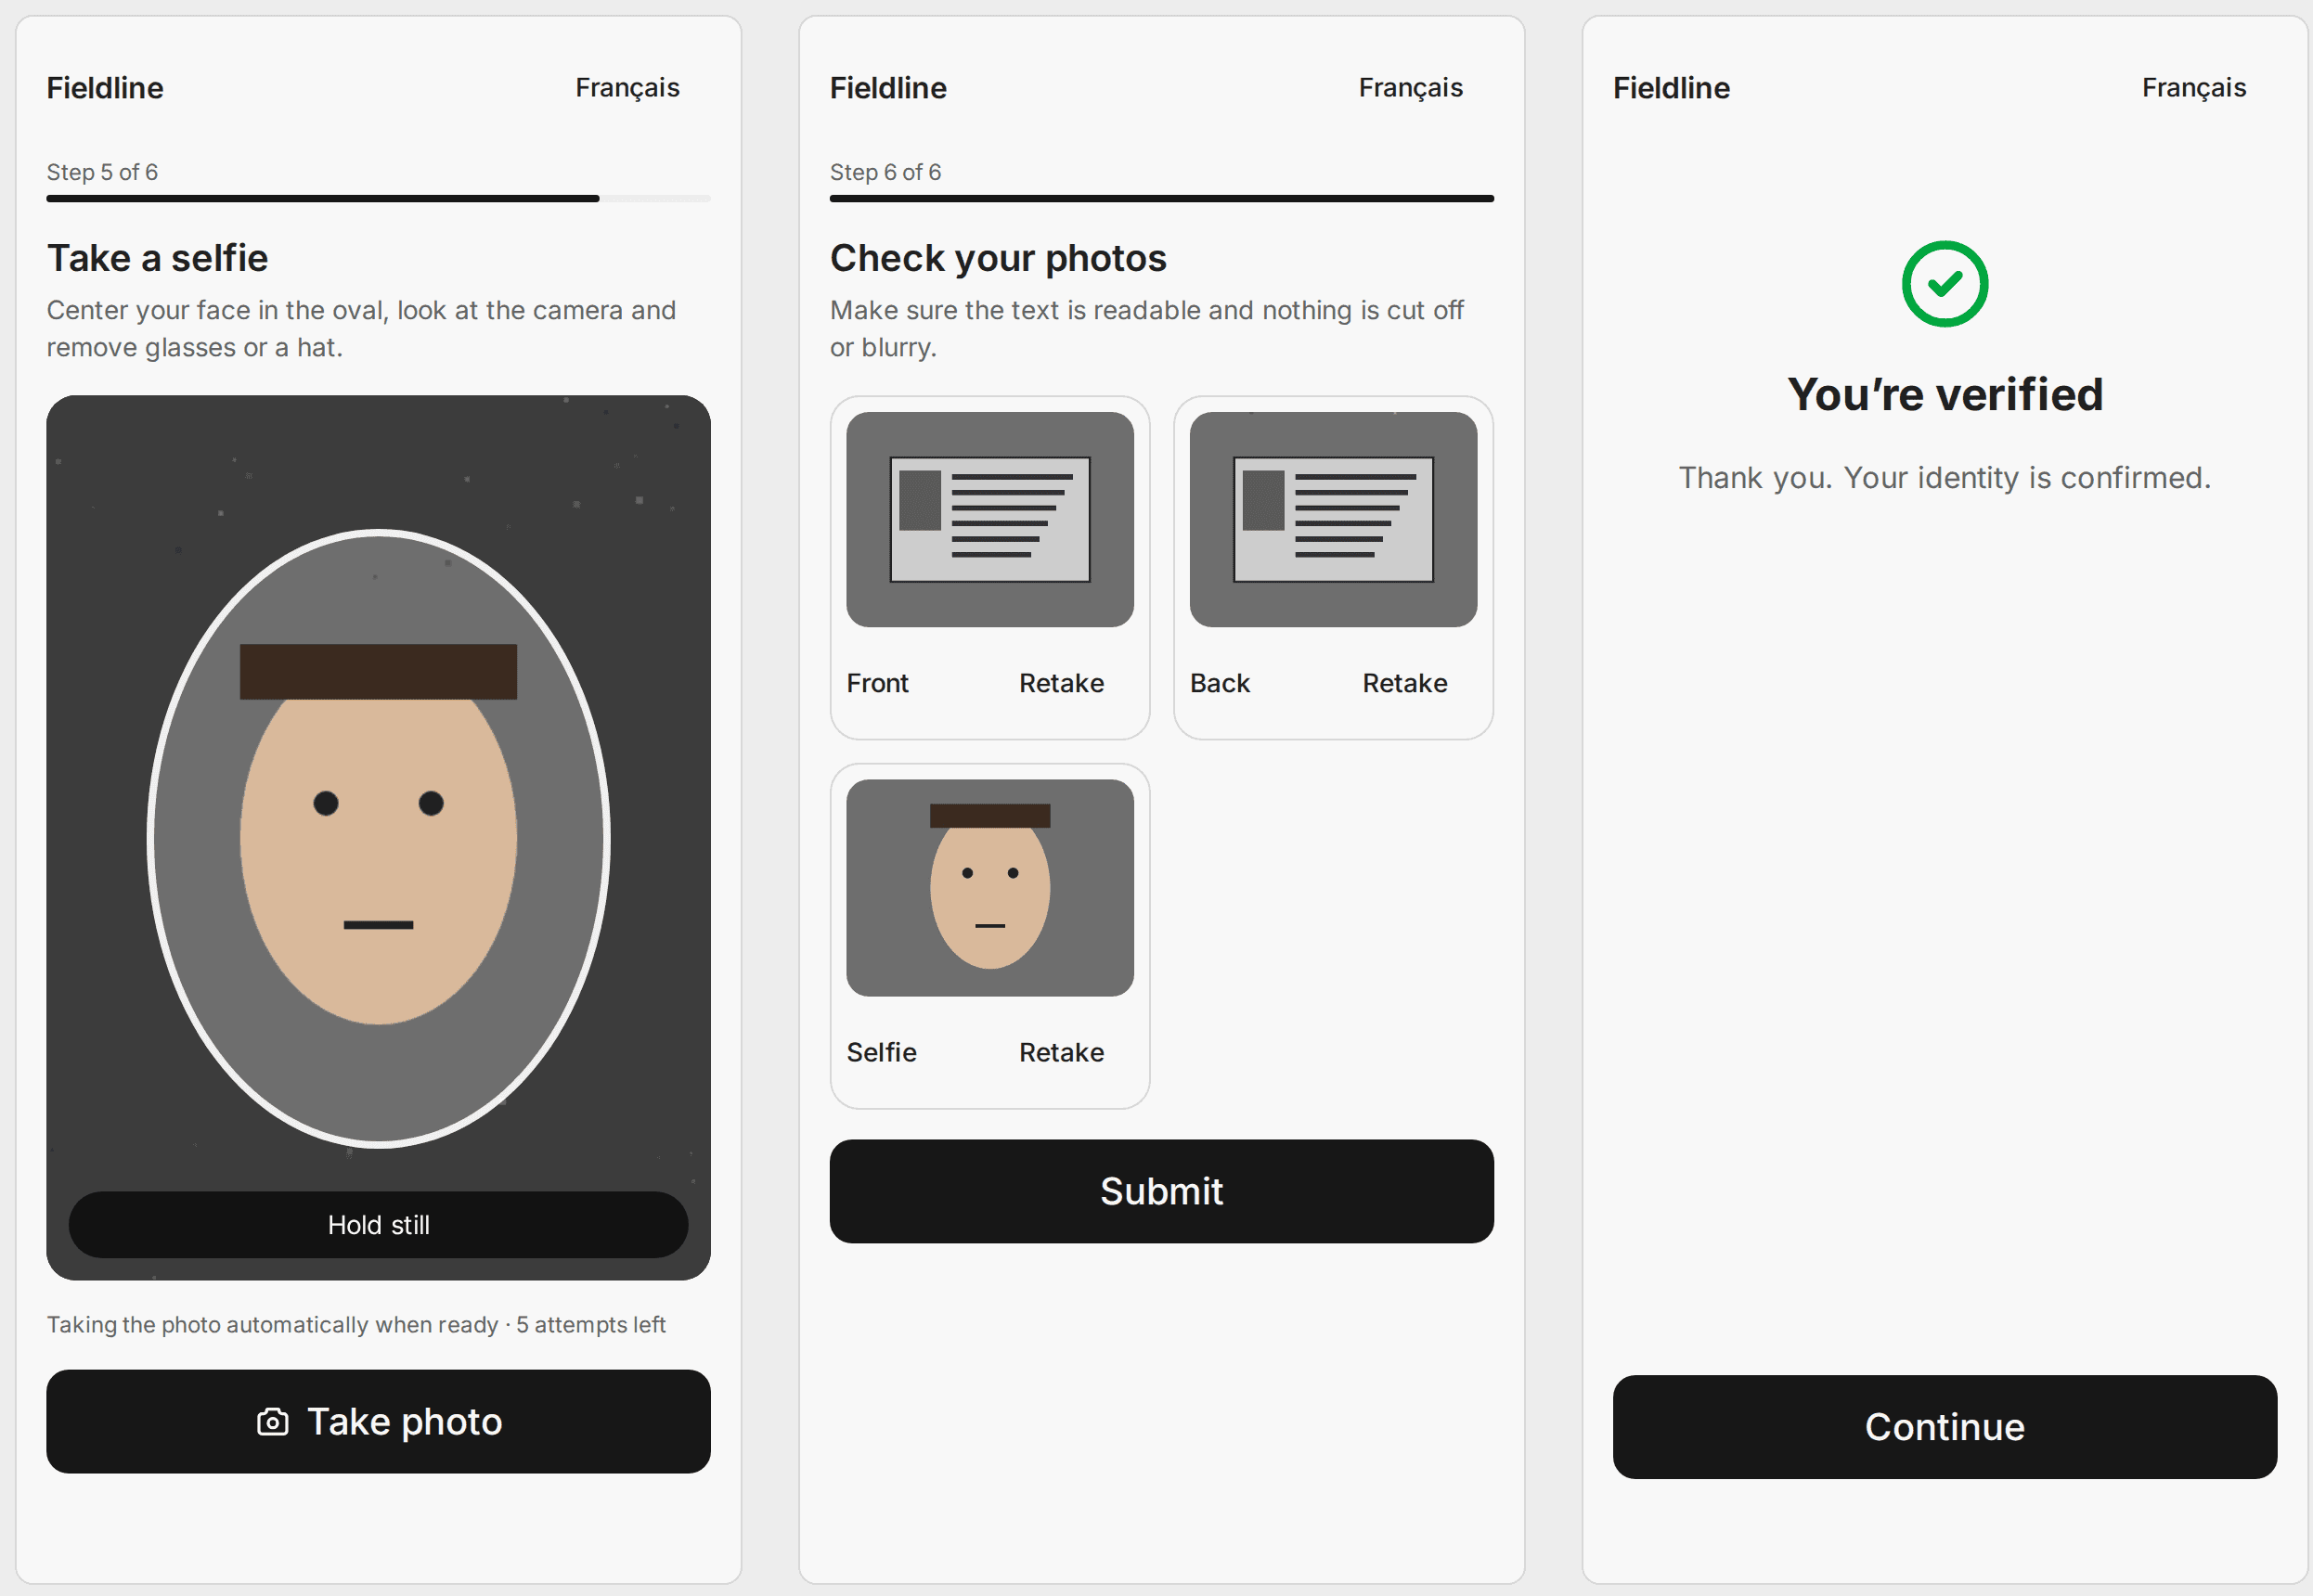
Your customers can't see scores or fraud details. They only see the result and a plain next step.
Follow your verifications
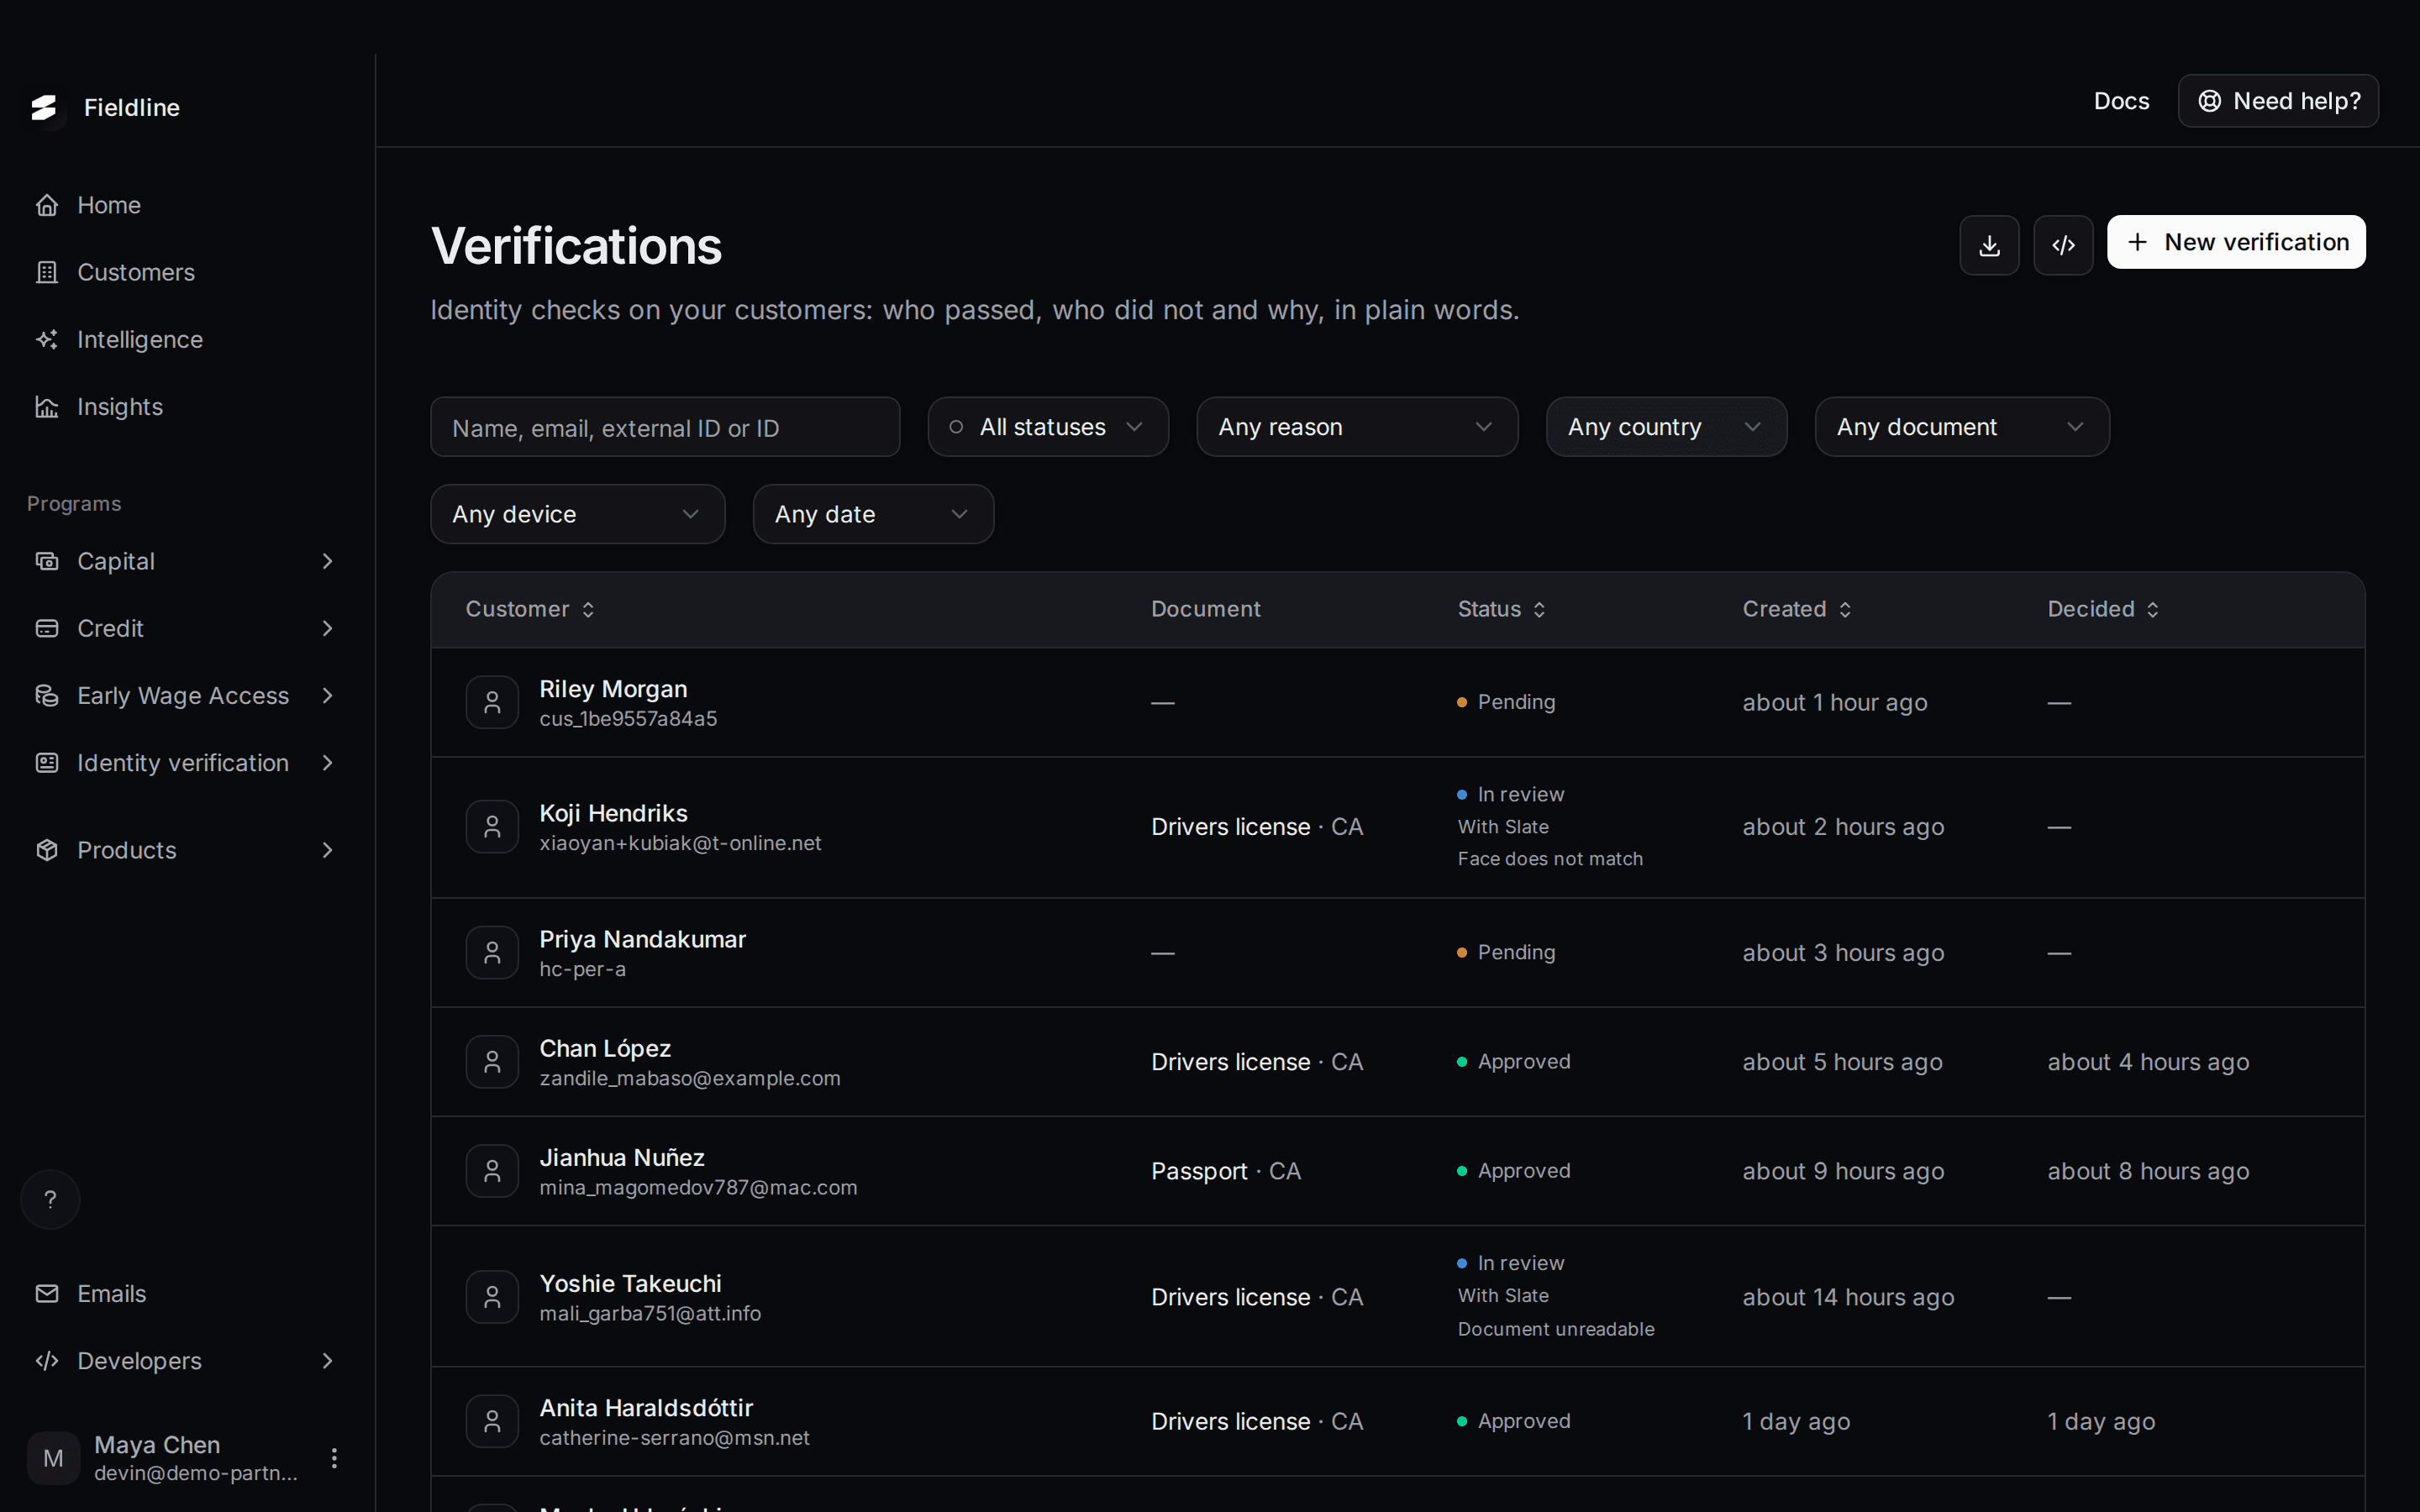
The Verifications page lists every check, newest first. Each row shows the customer, the document, the status, and when it was created and decided.
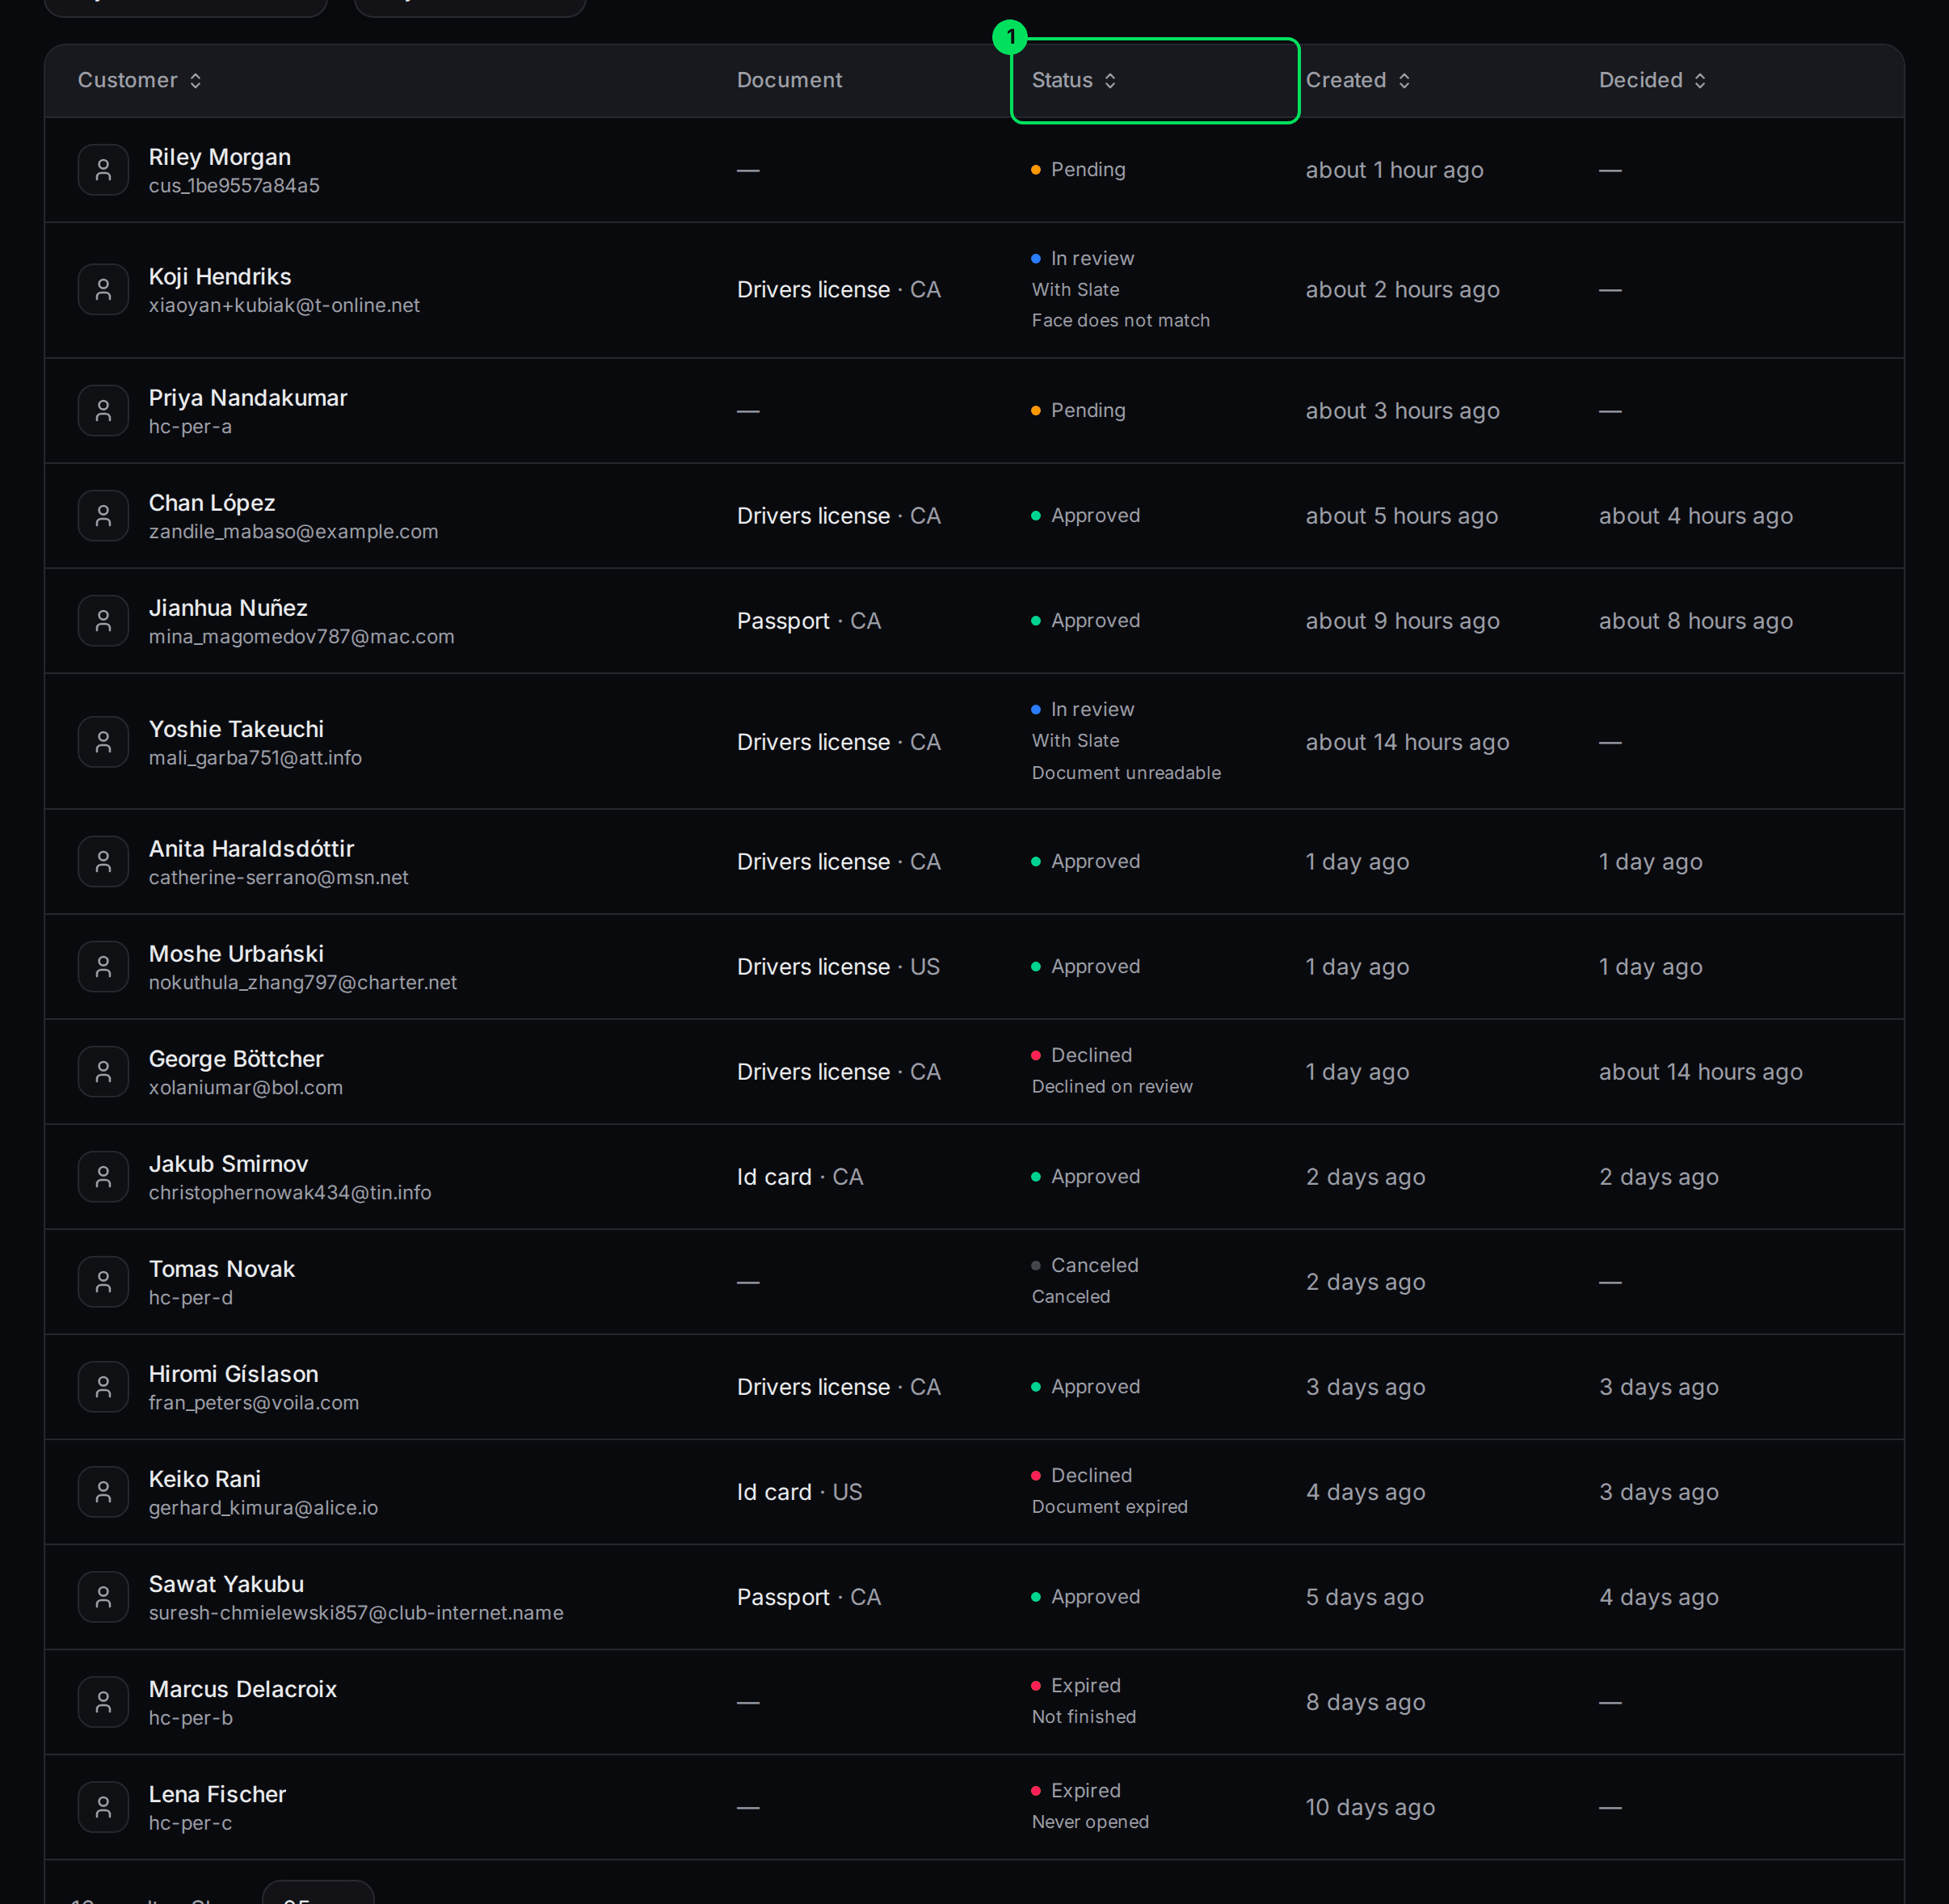
- Status: where each verification stands. Select the heading to sort.
What each status means
- Pending: waiting on the customer to finish. You can send a new link, or cancel.
- In review with Slate: a Slate reviewer is looking at it. Slate aims to review within 24 hours. You don't need to do anything.
- Approved: the identity is verified.
- Declined: the identity could not be verified. The row shows the reason.
- Expired: it ended before a decision. A verification expires if it isn't finished in time.
- Canceled: your team canceled it.
Under the status, a short line says why. For example Face does not match, Document expired or Never opened.
Filter the list
Above the table are filters: All statuses, Any reason, Any country, Any document, Any device and Any date. Use them to find, for example, every Document expired in the last 7 days.
The two buttons at the top right export the list as a file and show the API calls for the page. The export holds the rows loaded on the page, so raise the rows per page first.
Open one verification
Select a row. A panel opens on the right.
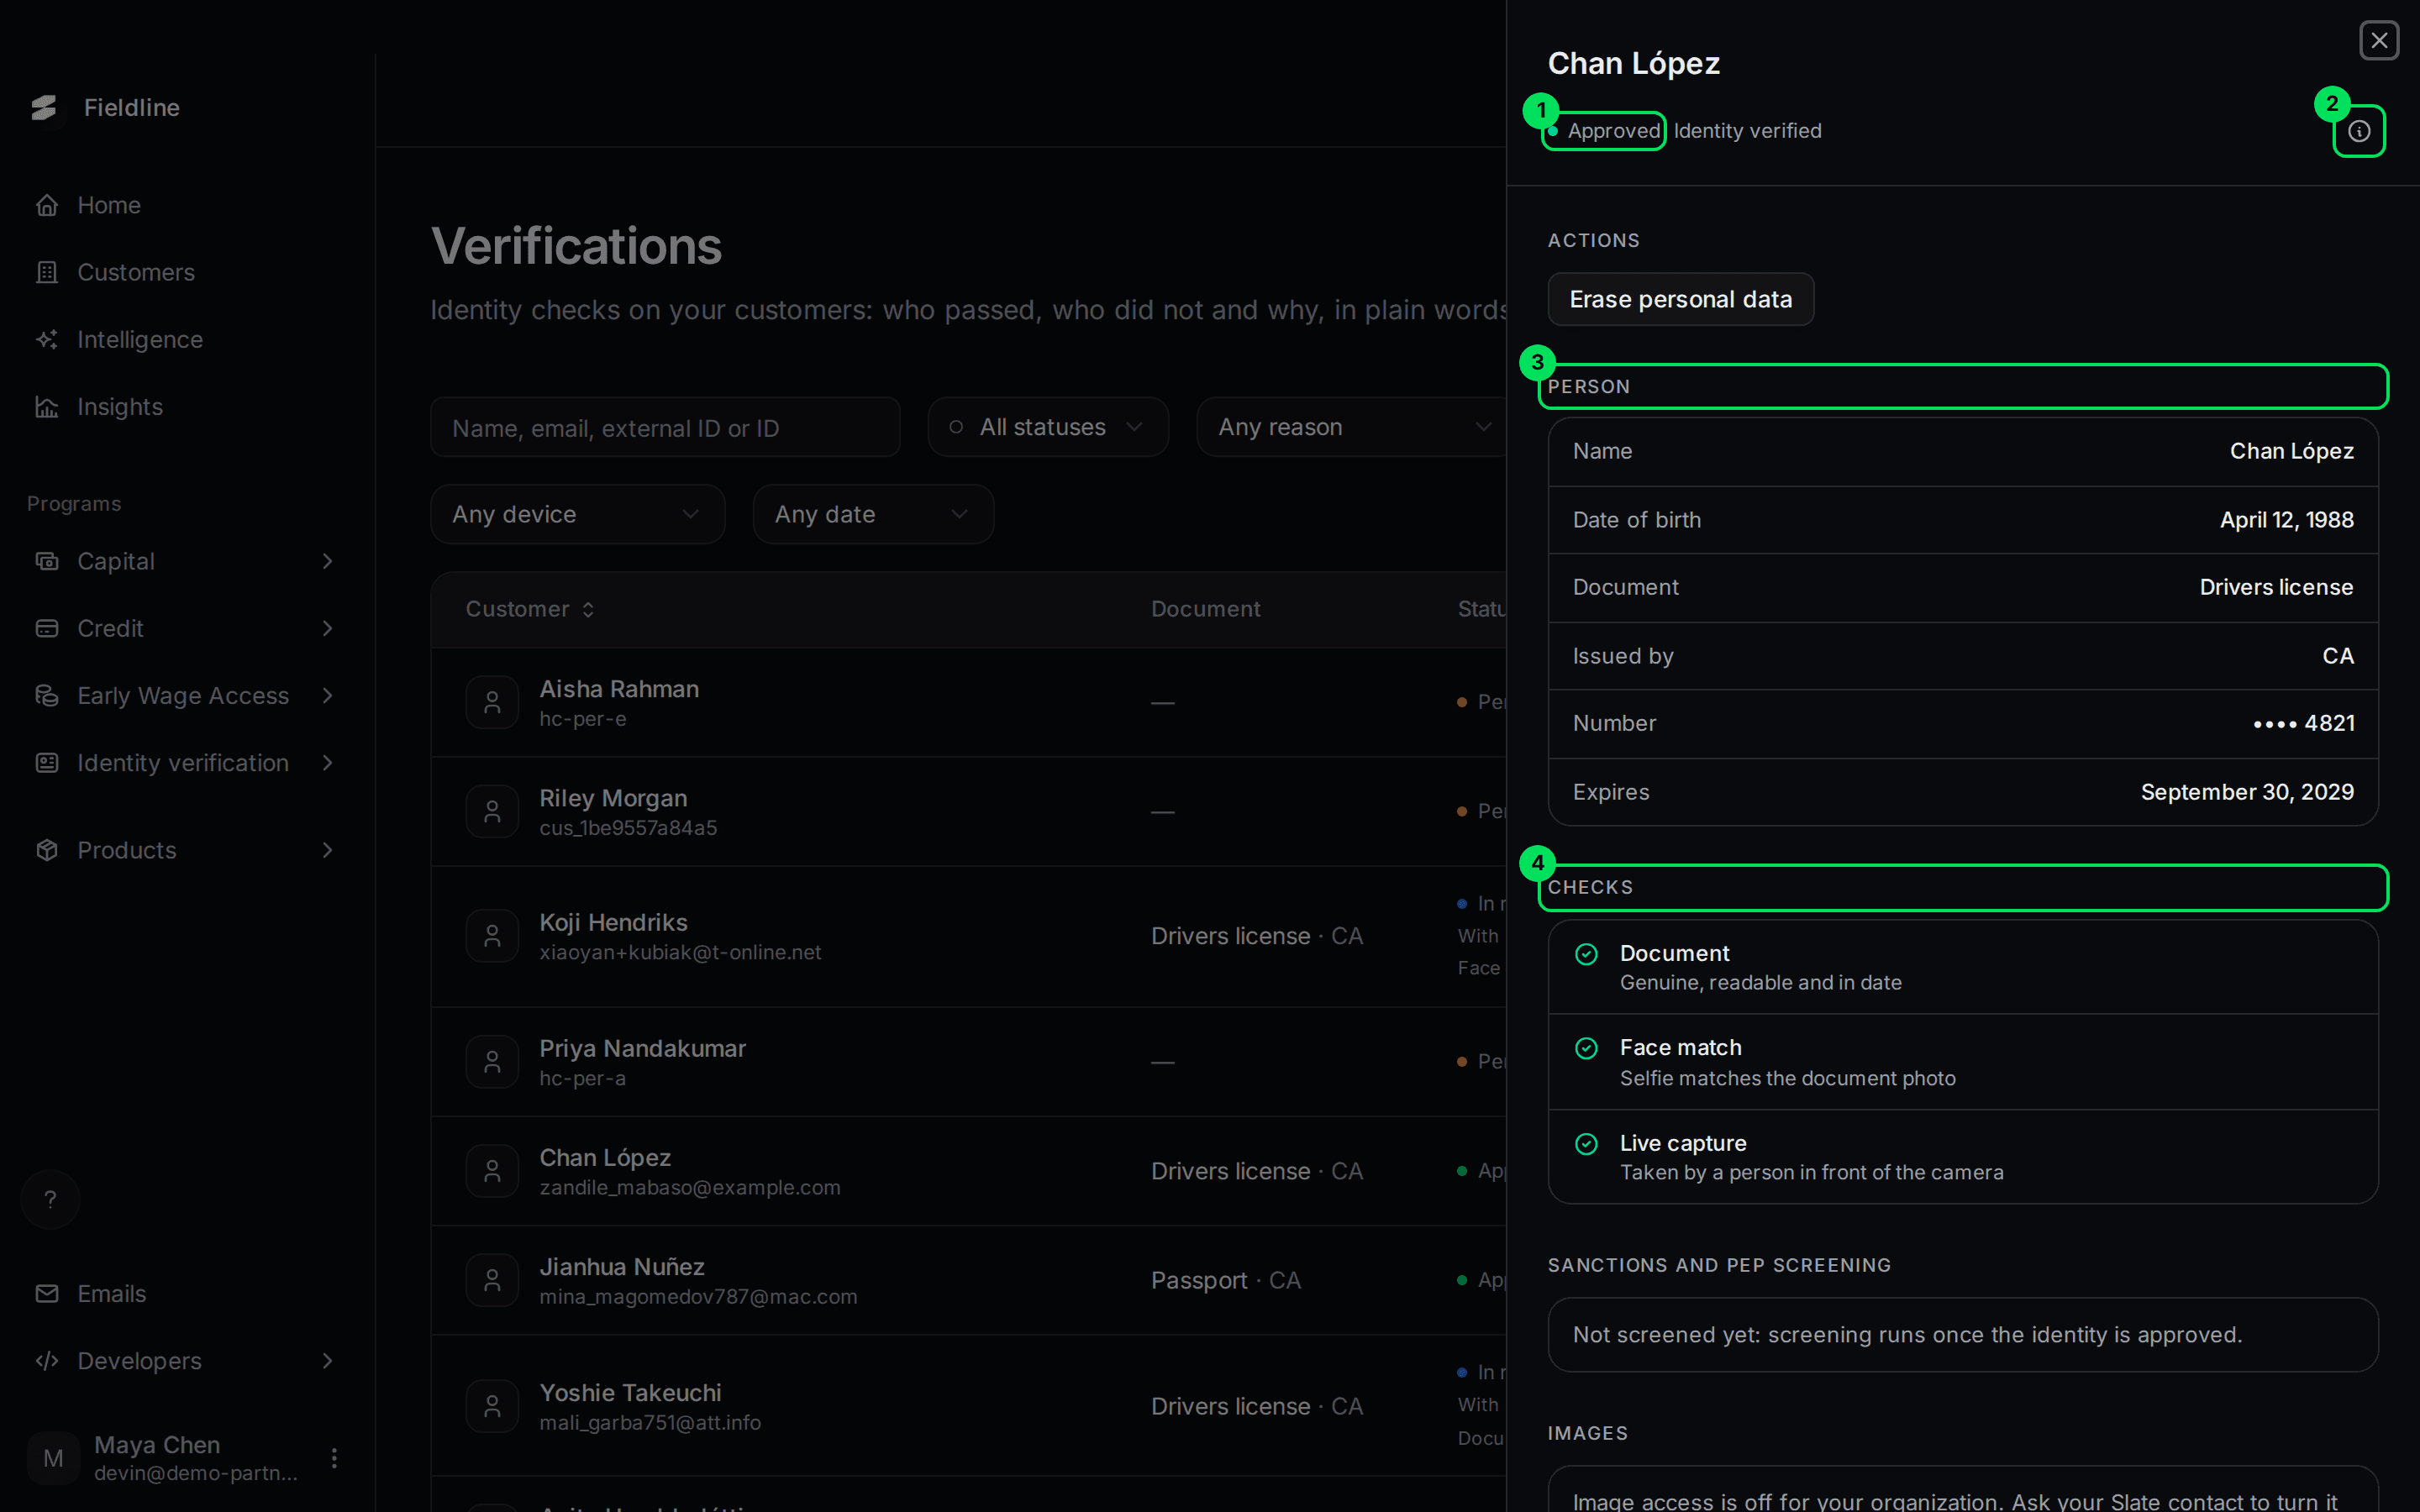
- Approved: the status, with a short summary.
- Record details: the verification ID, your external ID, the customer ID and when it was created. Copy these when you talk to Slate.
- Person: what Slate read from the document. The document number shows only its last four digits.
- Checks: the result of each check, in words. Slate shows no scores.
The three checks are:
- Document: the ID is genuine, readable and in date.
- Face match: the selfie matches the photo on the ID.
- Live capture: the selfie was taken by a person in front of the camera.
Scroll down for more.
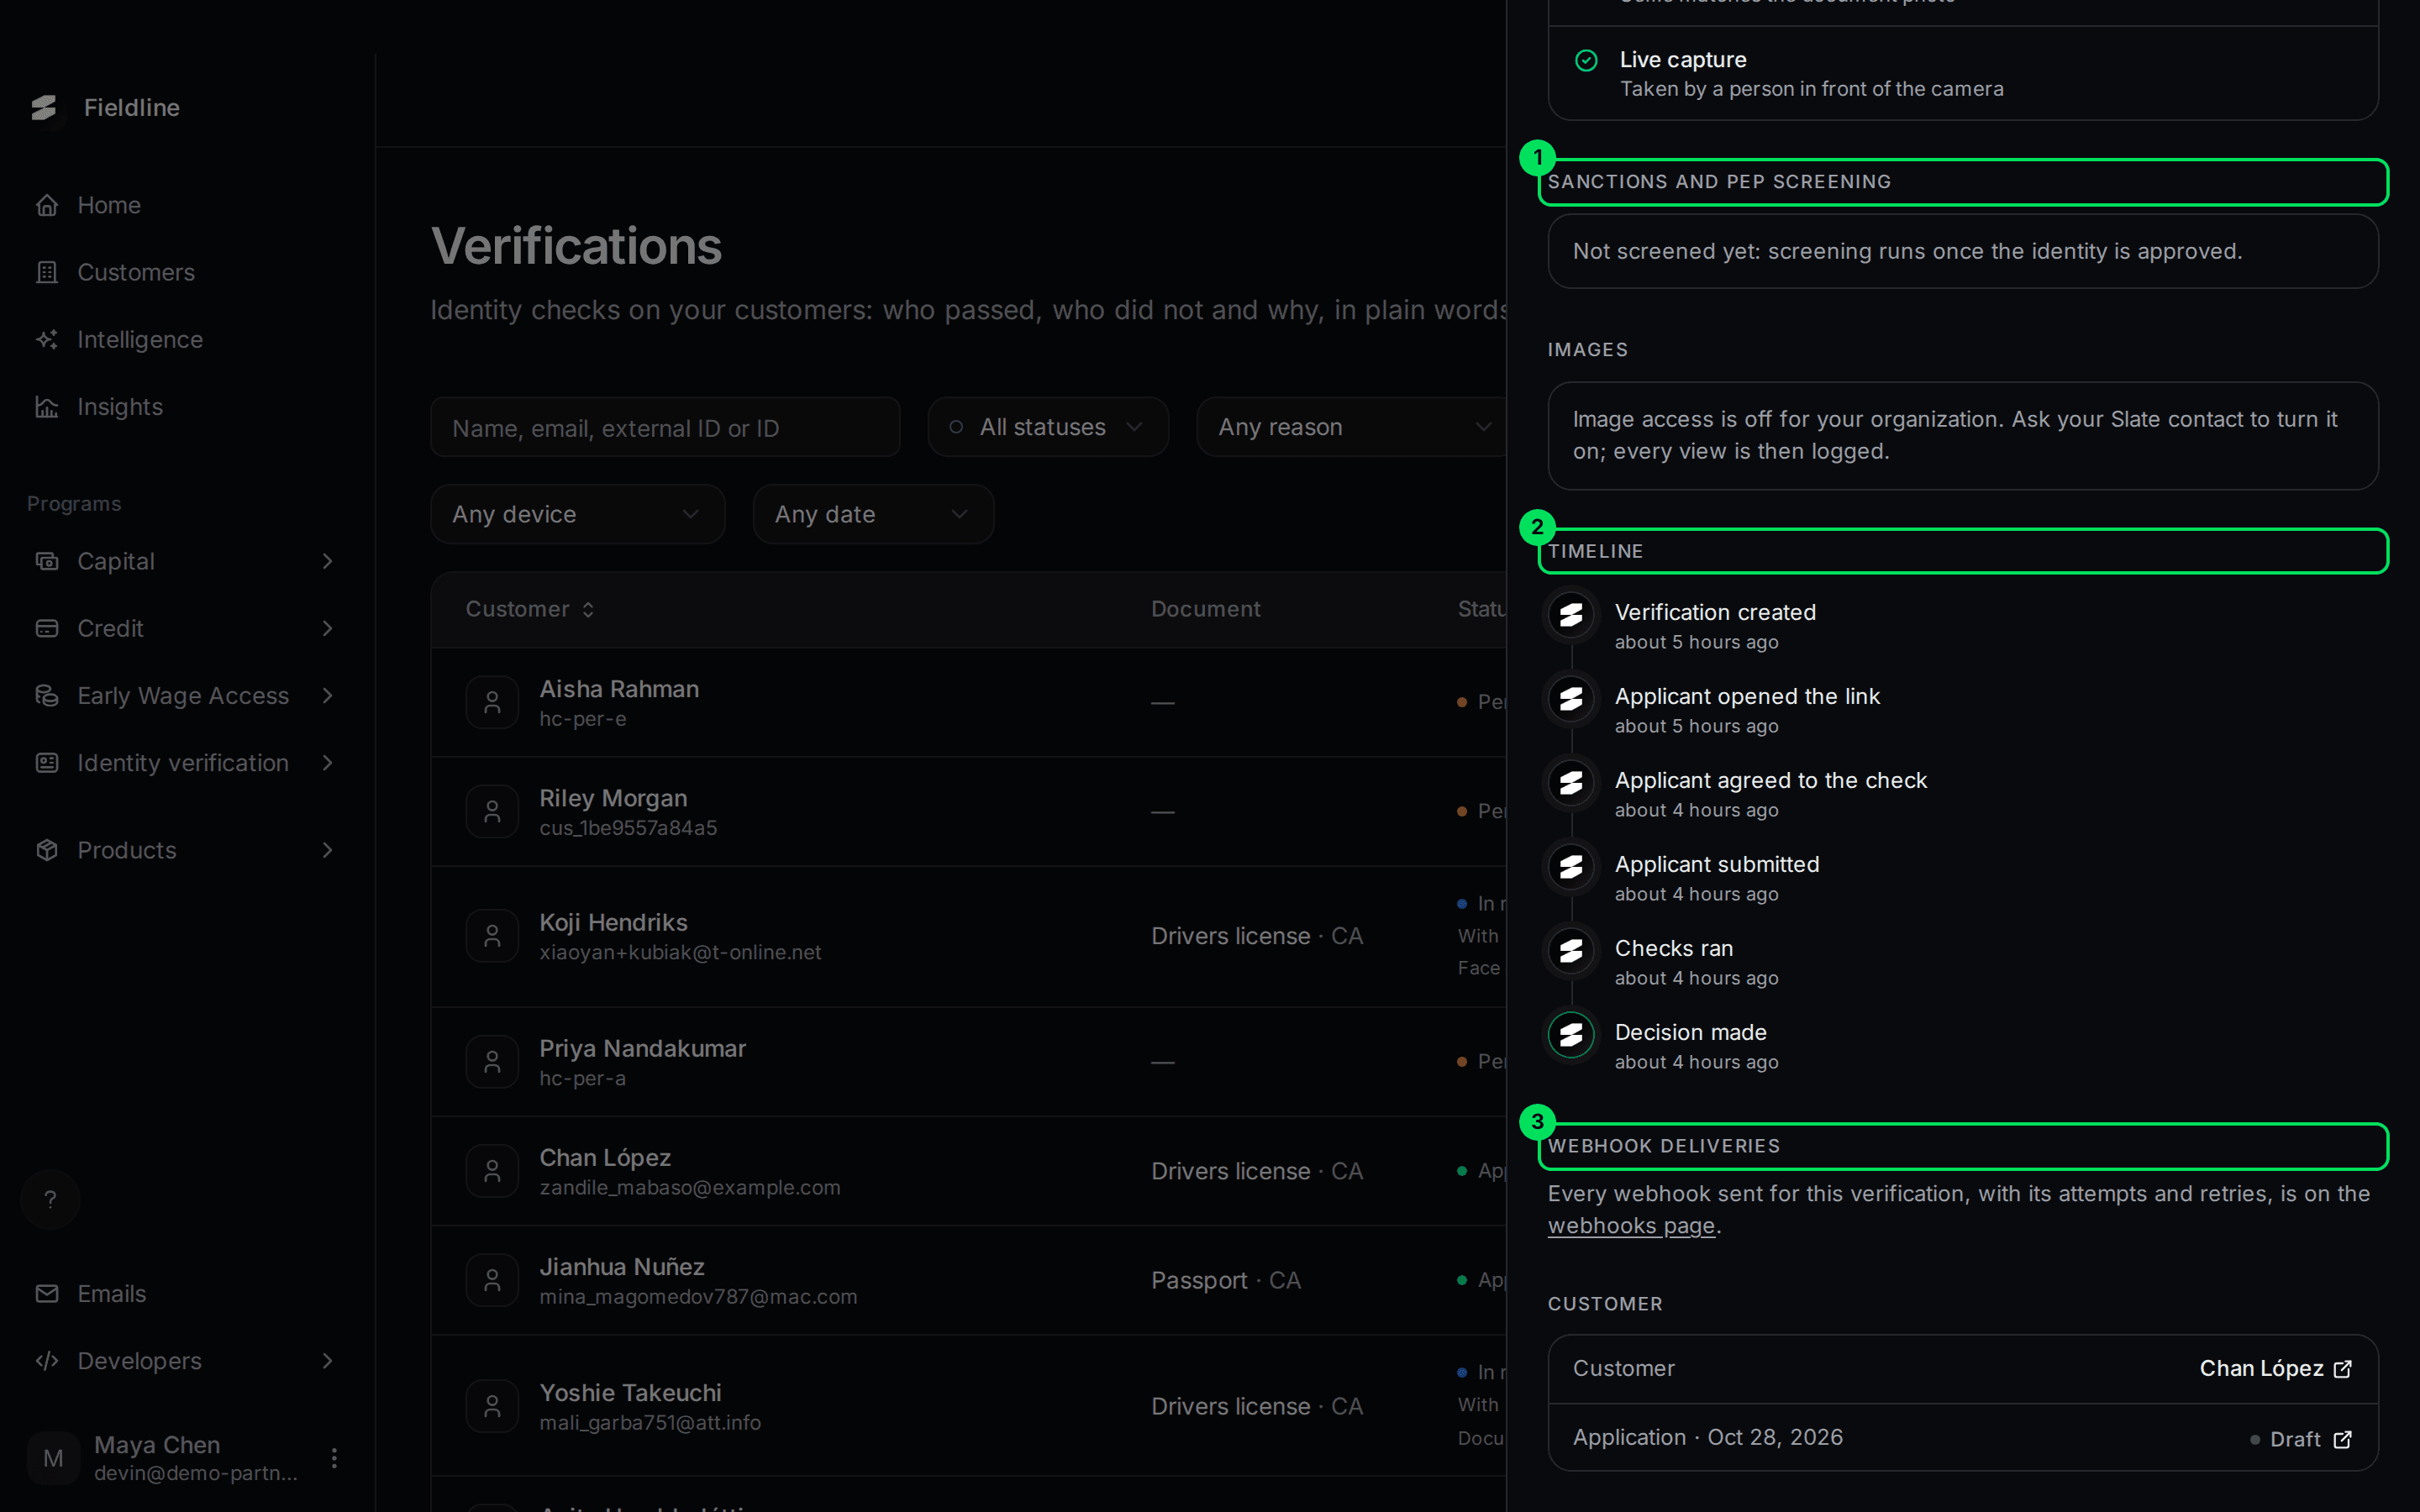
- Sanctions and PEP screening: Slate checks approved customers against official sanctions lists. It says if nothing matched, or if a possible match is with Slate for review. A possible match needs nothing from you.
- Timeline: each step, from the link being created to the decision.
- Webhook deliveries: every webhook for this verification is on the webhooks page. See Set up webhooks.
Images shows the customer's photos only if Slate has turned on image access for you. If it hasn't, the panel says so. When it is on, each photo opens on request, hides again after a minute, and every view is logged with your name.
When a verification is In review
The panel lists the Reason at the top. Each reason has a plain explanation you can repeat to your customer.
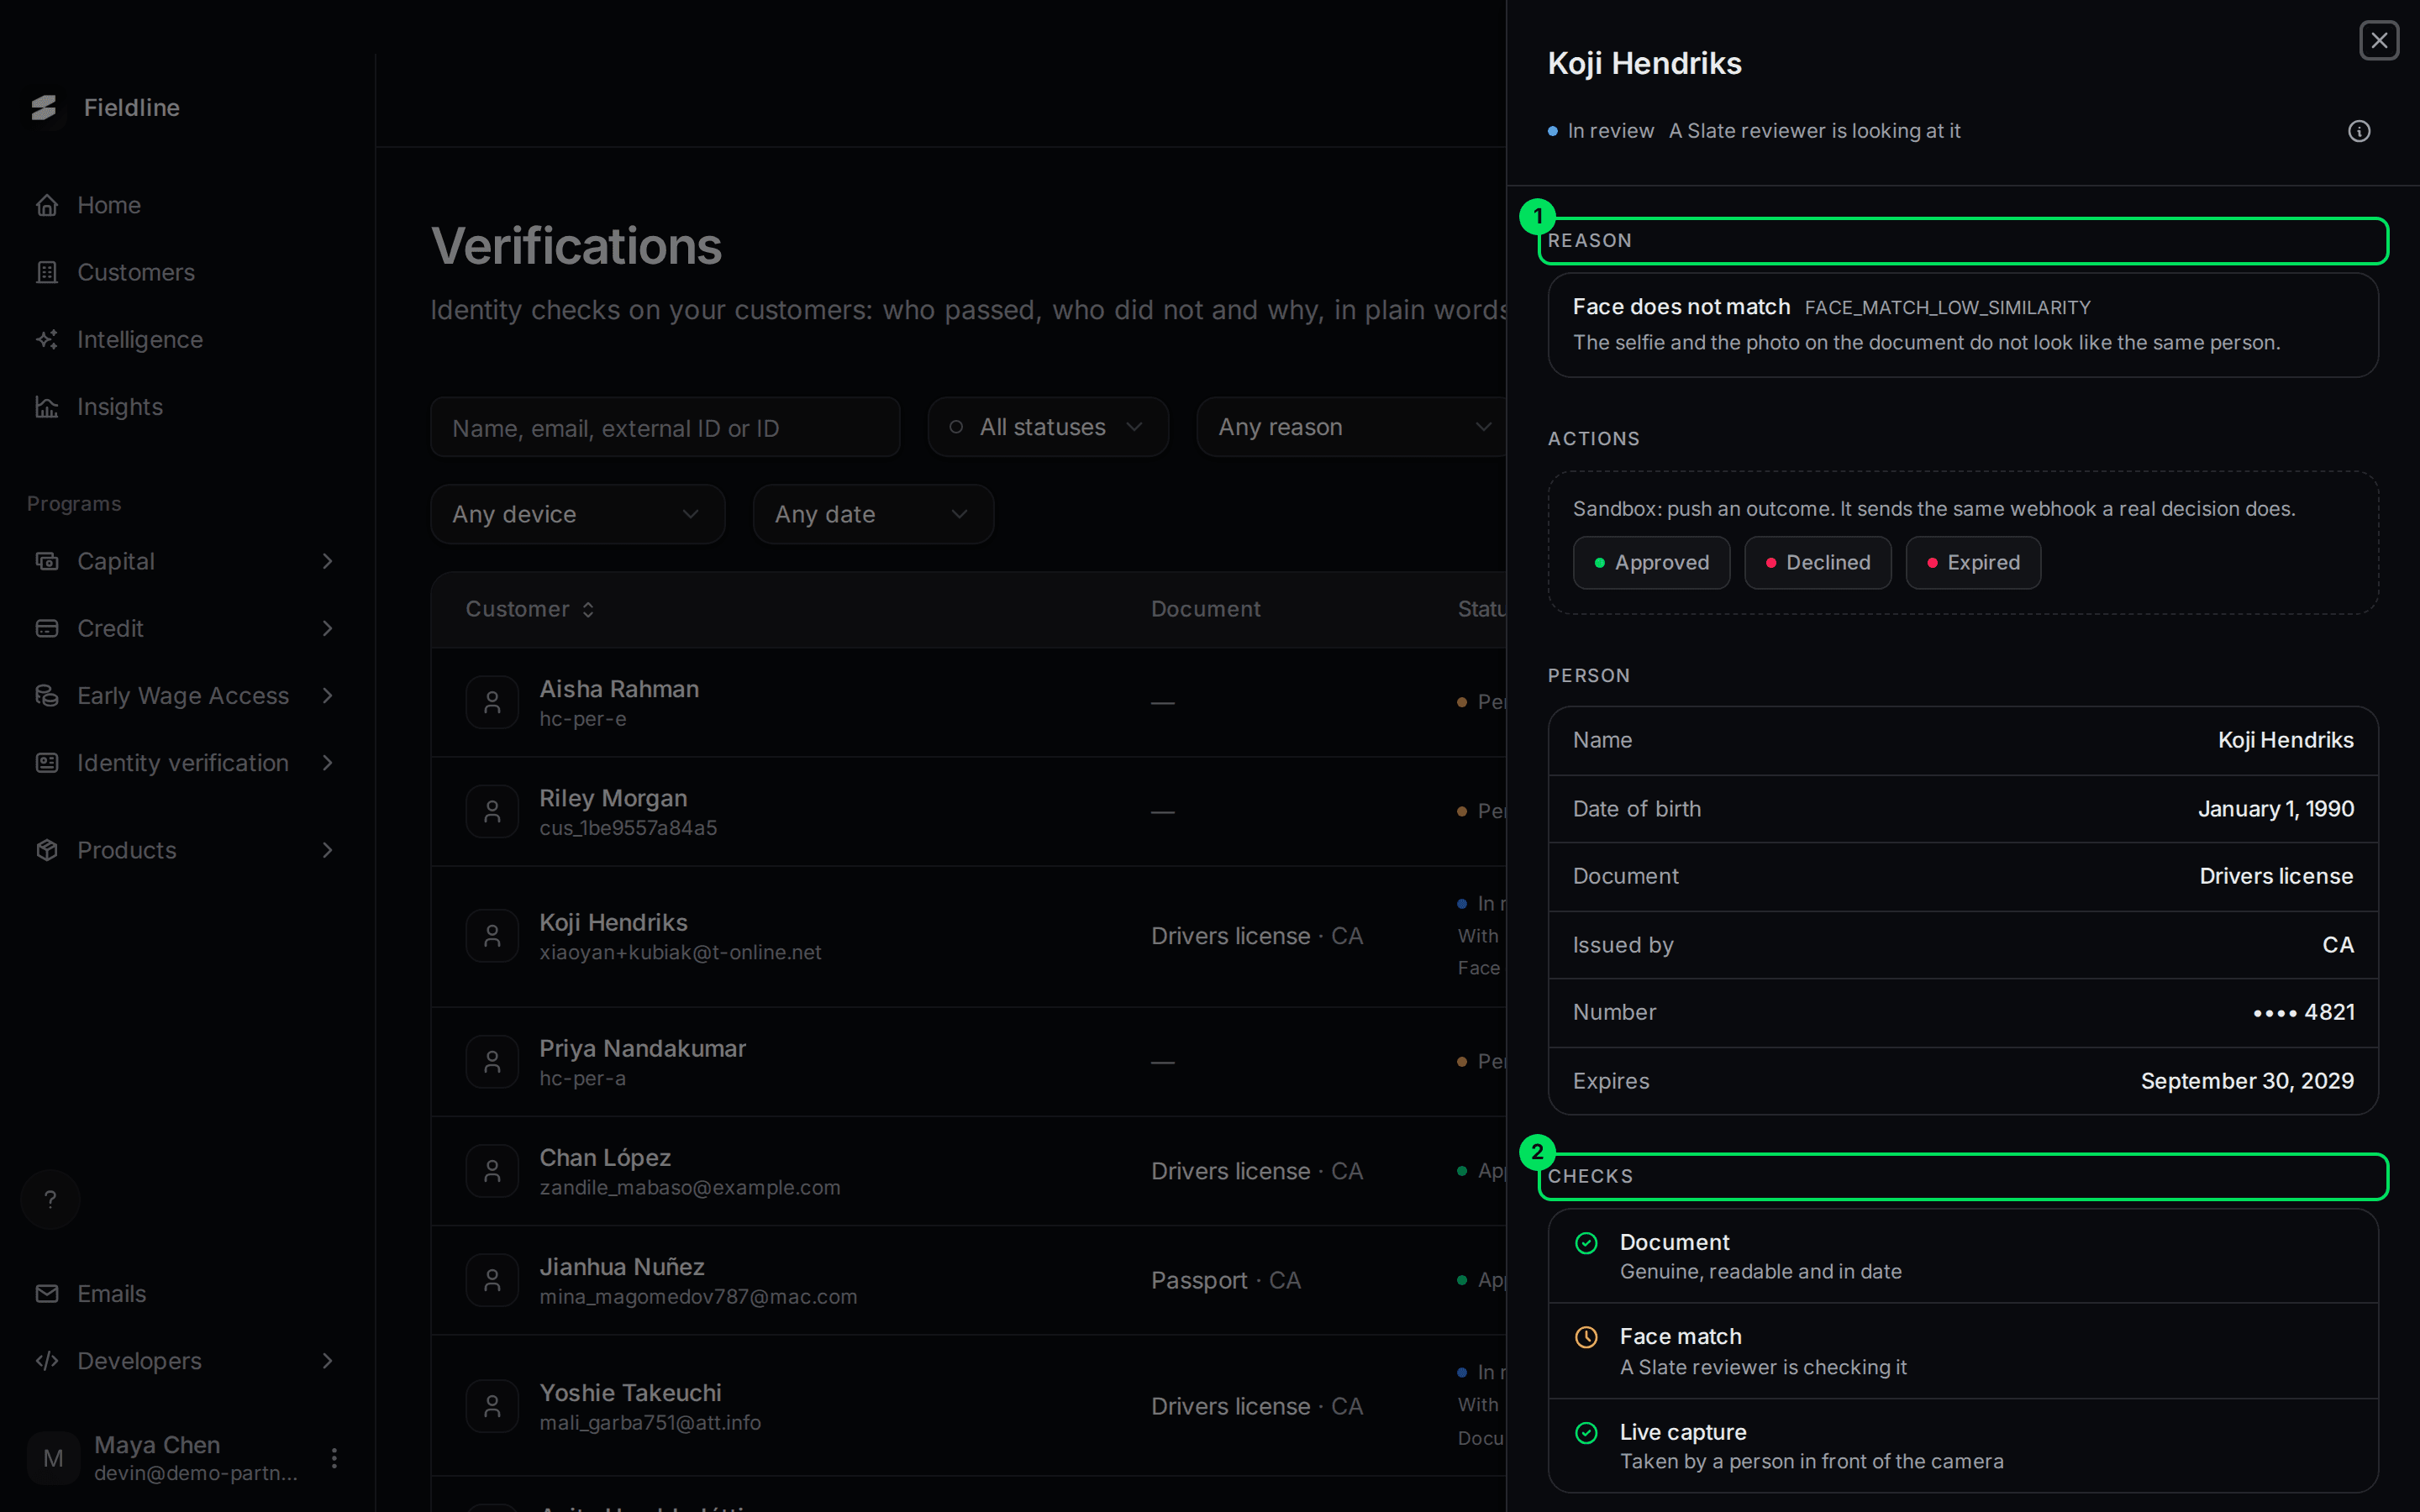
- Reason: why Slate wants a person to look. Here, Face does not match.
- Checks: the check that is unsure shows a clock and A Slate reviewer is checking it.
You don't need to do anything. When the reviewer decides, the status changes and your webhook fires.
When a verification is Declined
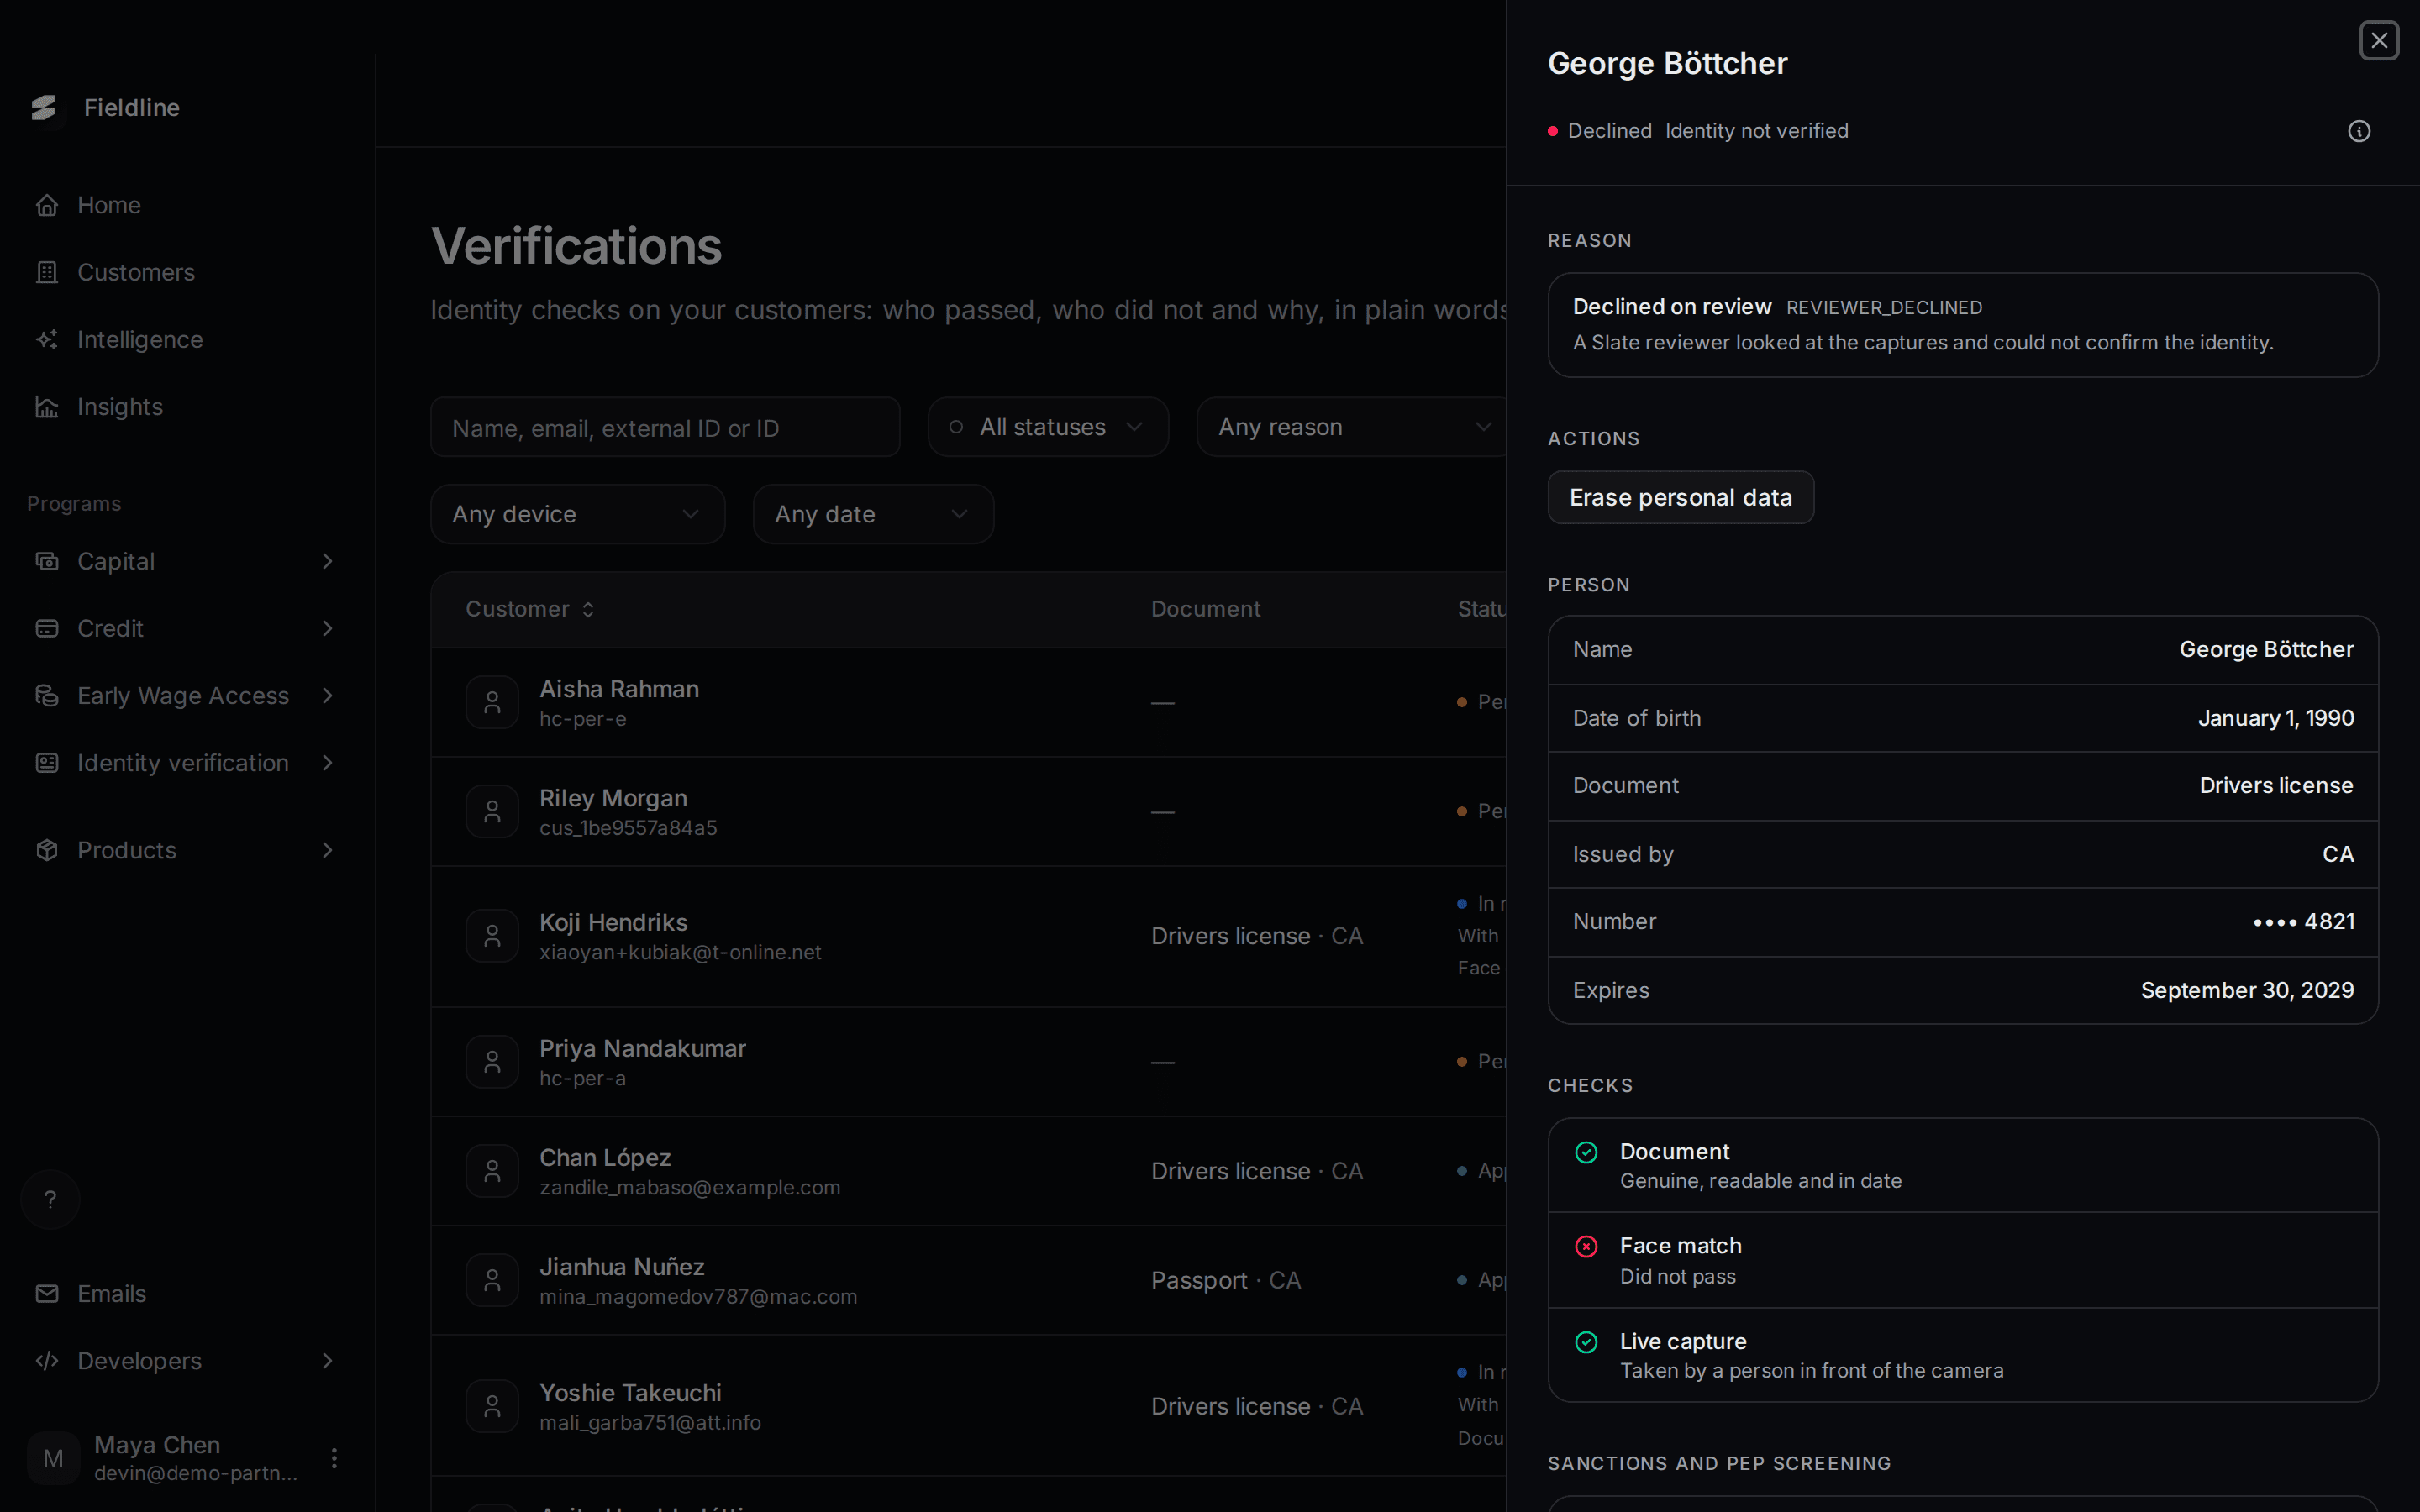
The reason tells you why, in plain words. These are all the reasons Slate shows:
- Document expired: the ID is past its expiry date. A current one will pass.
- Document unreadable: the photo was too blurry, dark or cropped to read. Another try in good light usually passes.
- Document looks altered: the document shows signs of being edited.
- Not a live capture: the selfie did not come from a person in front of the camera at the time.
- Face does not match: the selfie and the photo on the document do not look like the same person.
- Never opened: the link expired before the customer opened it.
- Not finished: the customer started but did not finish before it expired.
- Canceled: your team canceled it before the customer finished.
- Declined on review: a Slate reviewer looked at the photos and could not confirm the identity.
Slate keeps fraud reasons general on purpose. Spelling them out would teach people how to get around them.
When a verification is Pending
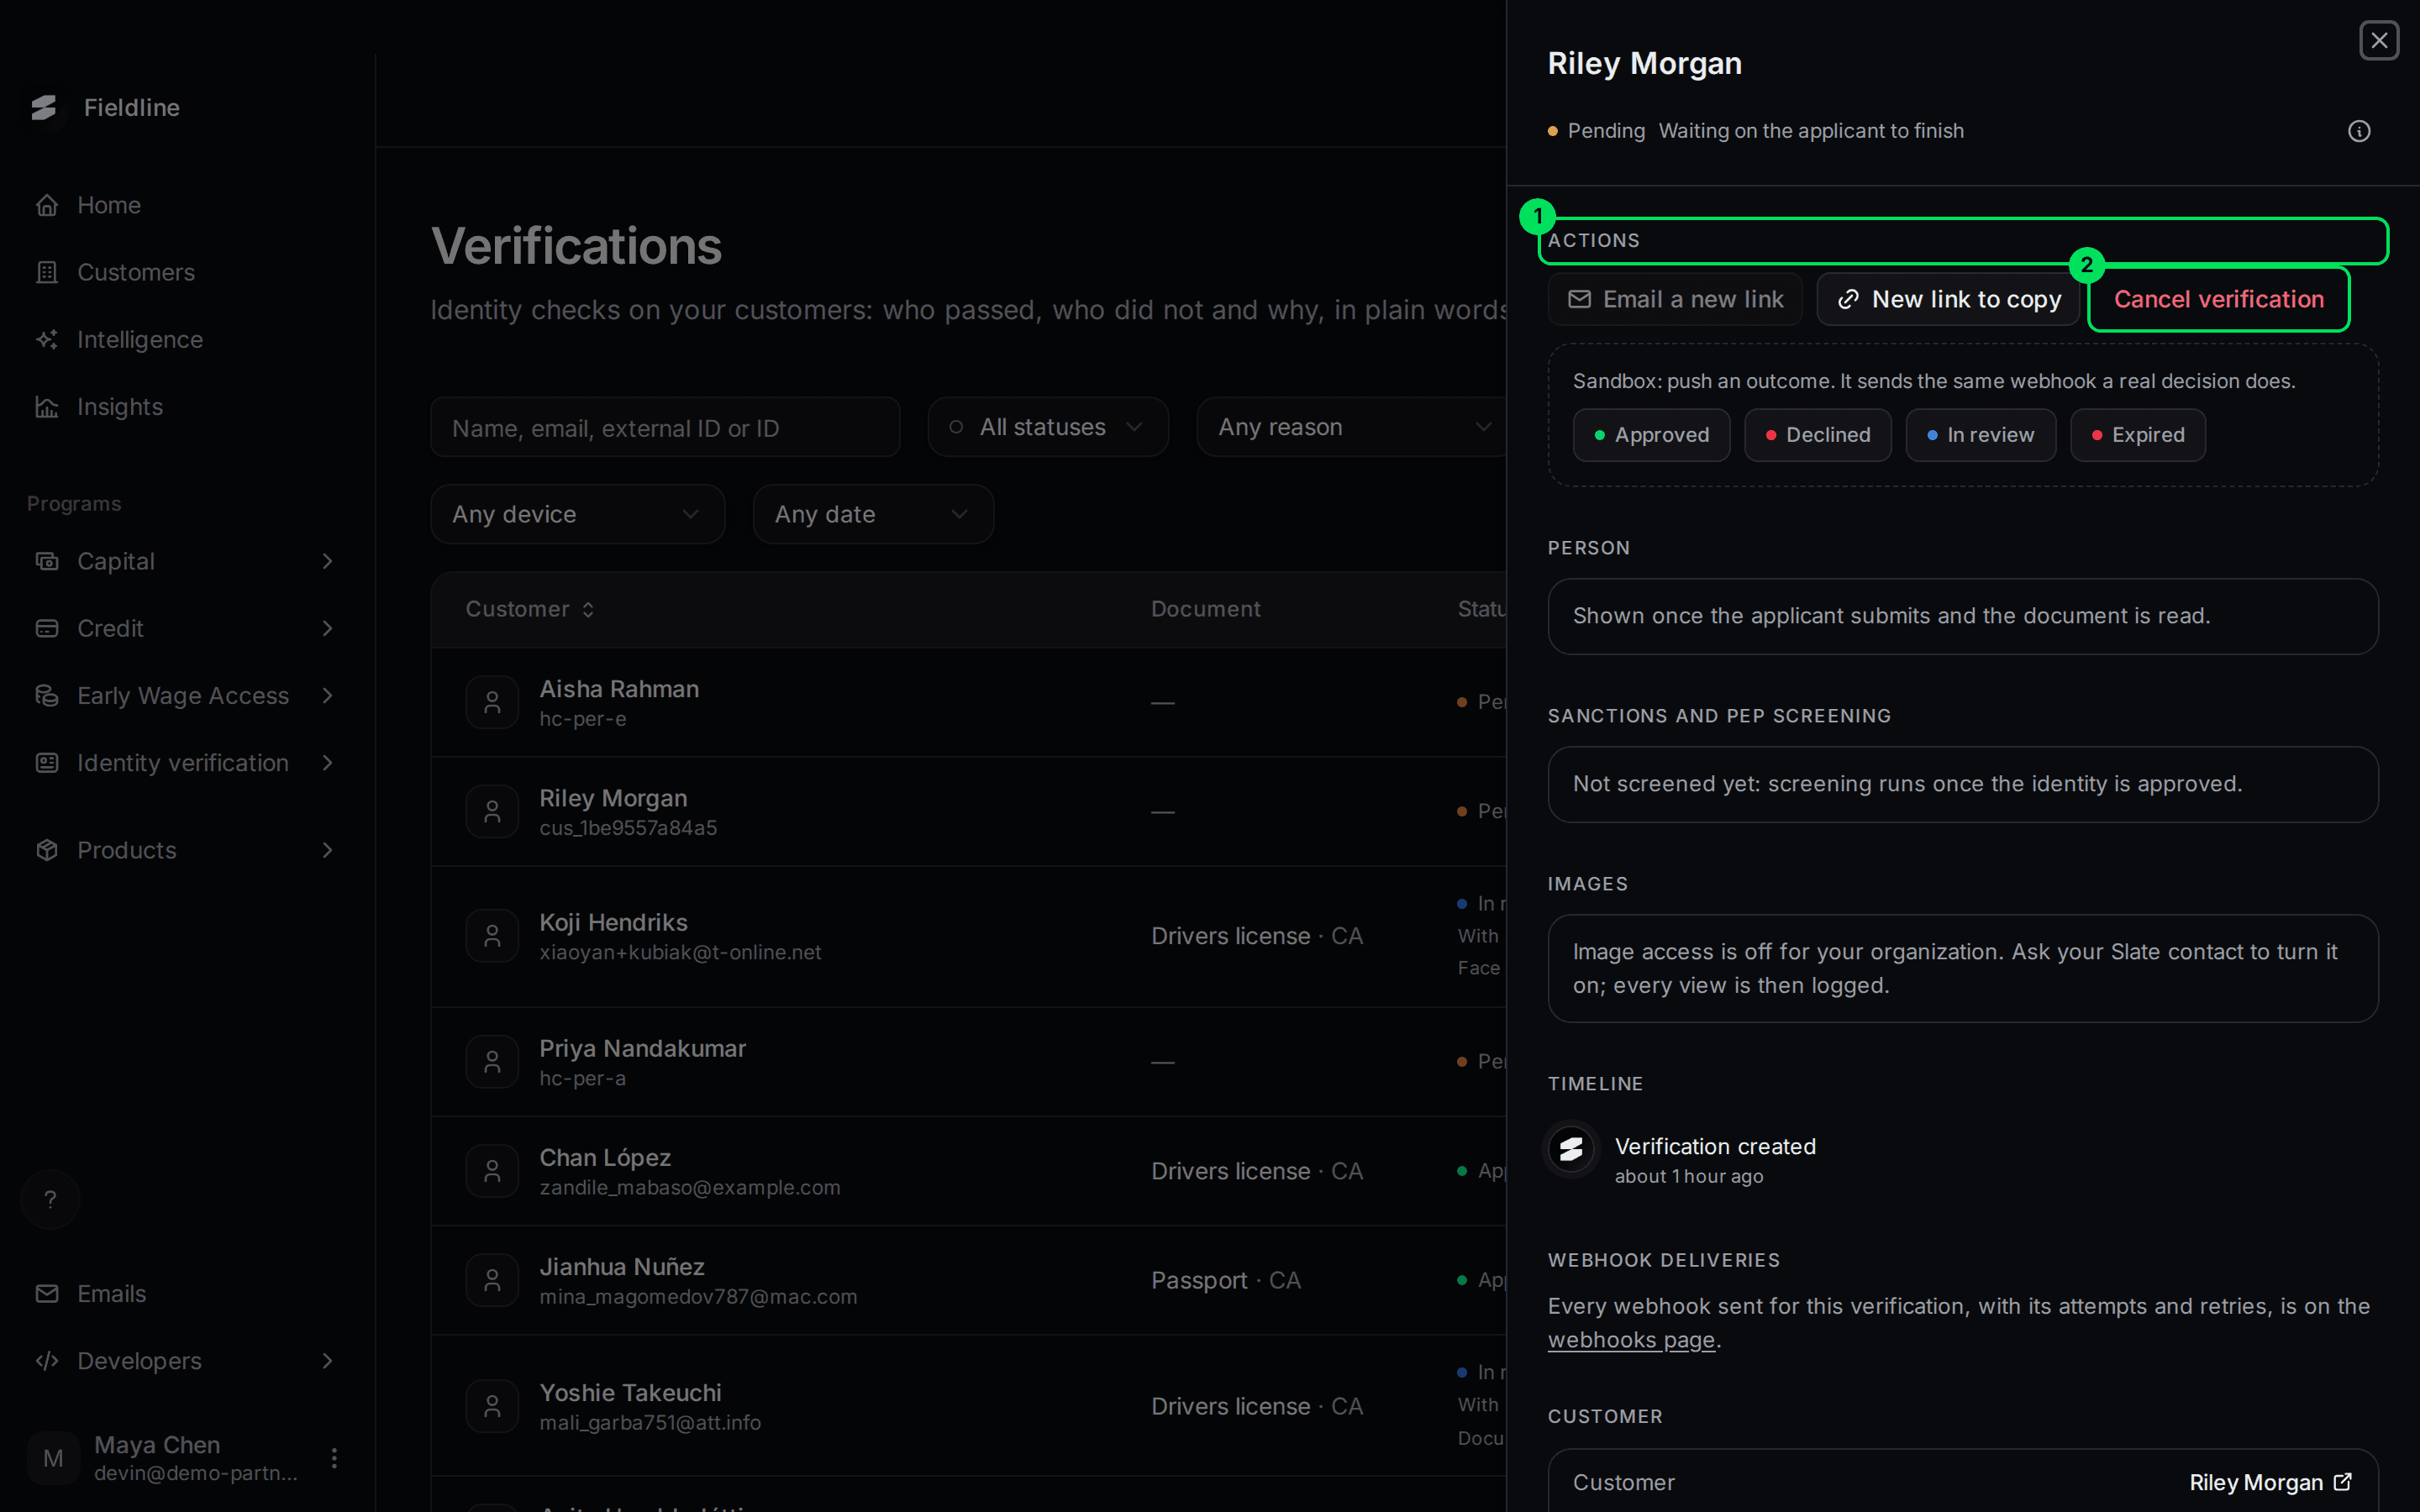
- Actions: what you can still do.
- Cancel verification: stops it. The link stops working.
- Email a new link: sends a fresh link to the customer. It is greyed out if the customer has no email.
- New link to copy: makes a fresh link for you to send yourself. The old one stops working.
- Cancel verification: ends it with the status Canceled.
In sandbox, you also see a dashed box with the buttons Approved, Declined, In review and Expired. They push that outcome without a customer taking any photos, and send the same webhook a real decision sends. This box does not appear in live.
Erase a customer's personal data
On a decided verification, the Actions section shows Erase personal data. Select it, then Erase permanently. Slate erases the name, date of birth, document details and photos for good. The decision and its reasons stay, and a webhook tells your systems. Select Keep to cancel.
See how verification is going
Select Identity verification, then Overview.
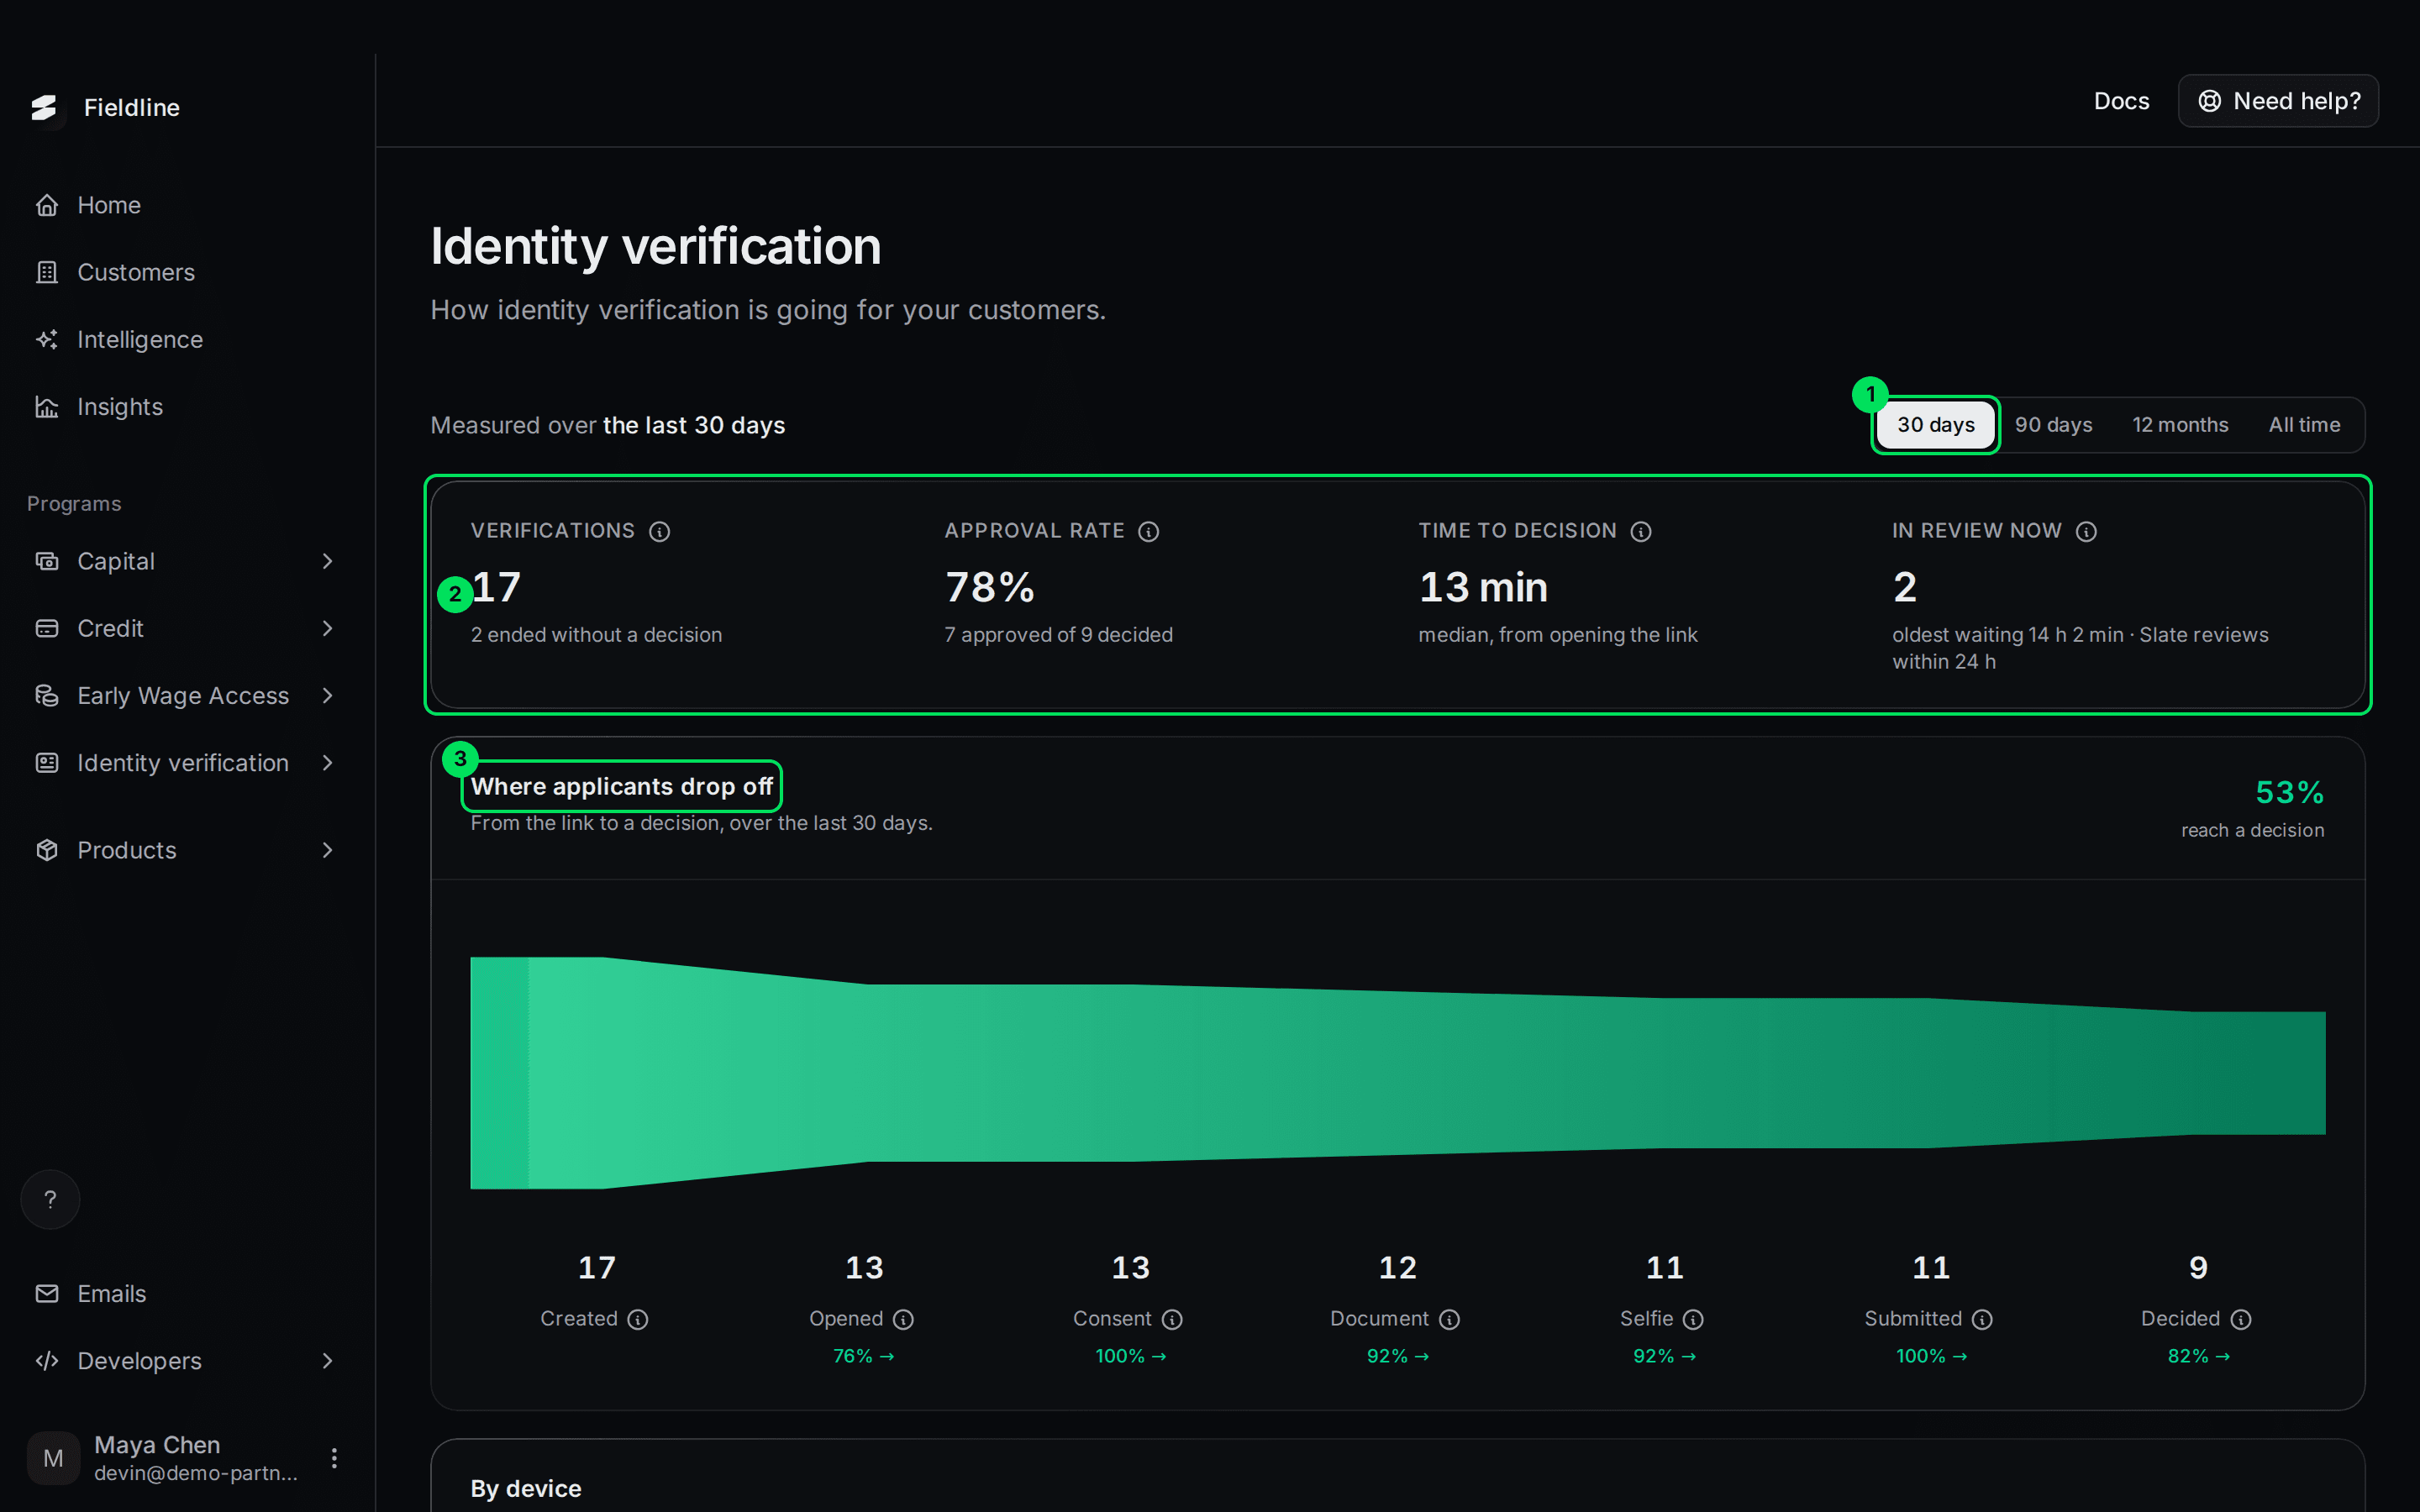
- 30 days: the period. Choose 90 days, 12 months or All time.
- The four numbers: Verifications, Approval rate, Time to decision and In review now.
- Where applicants drop off: how many customers reach each step, from the link to a decision.
- Verifications: how many you created in the period, including ones that ended without a decision.
- Approval rate: of the verifications decided, the share approved. Expired and canceled ones aren't decisions.
- Time to decision: the median, counted from when the customer opened the link.
- In review now: verifications a Slate reviewer is looking at, whatever the period. It shows how long the oldest has waited.
The funnel steps are Created, Opened, Consent, Document, Selfie, Submitted and Decided. A big drop between two steps tells you where customers give up.
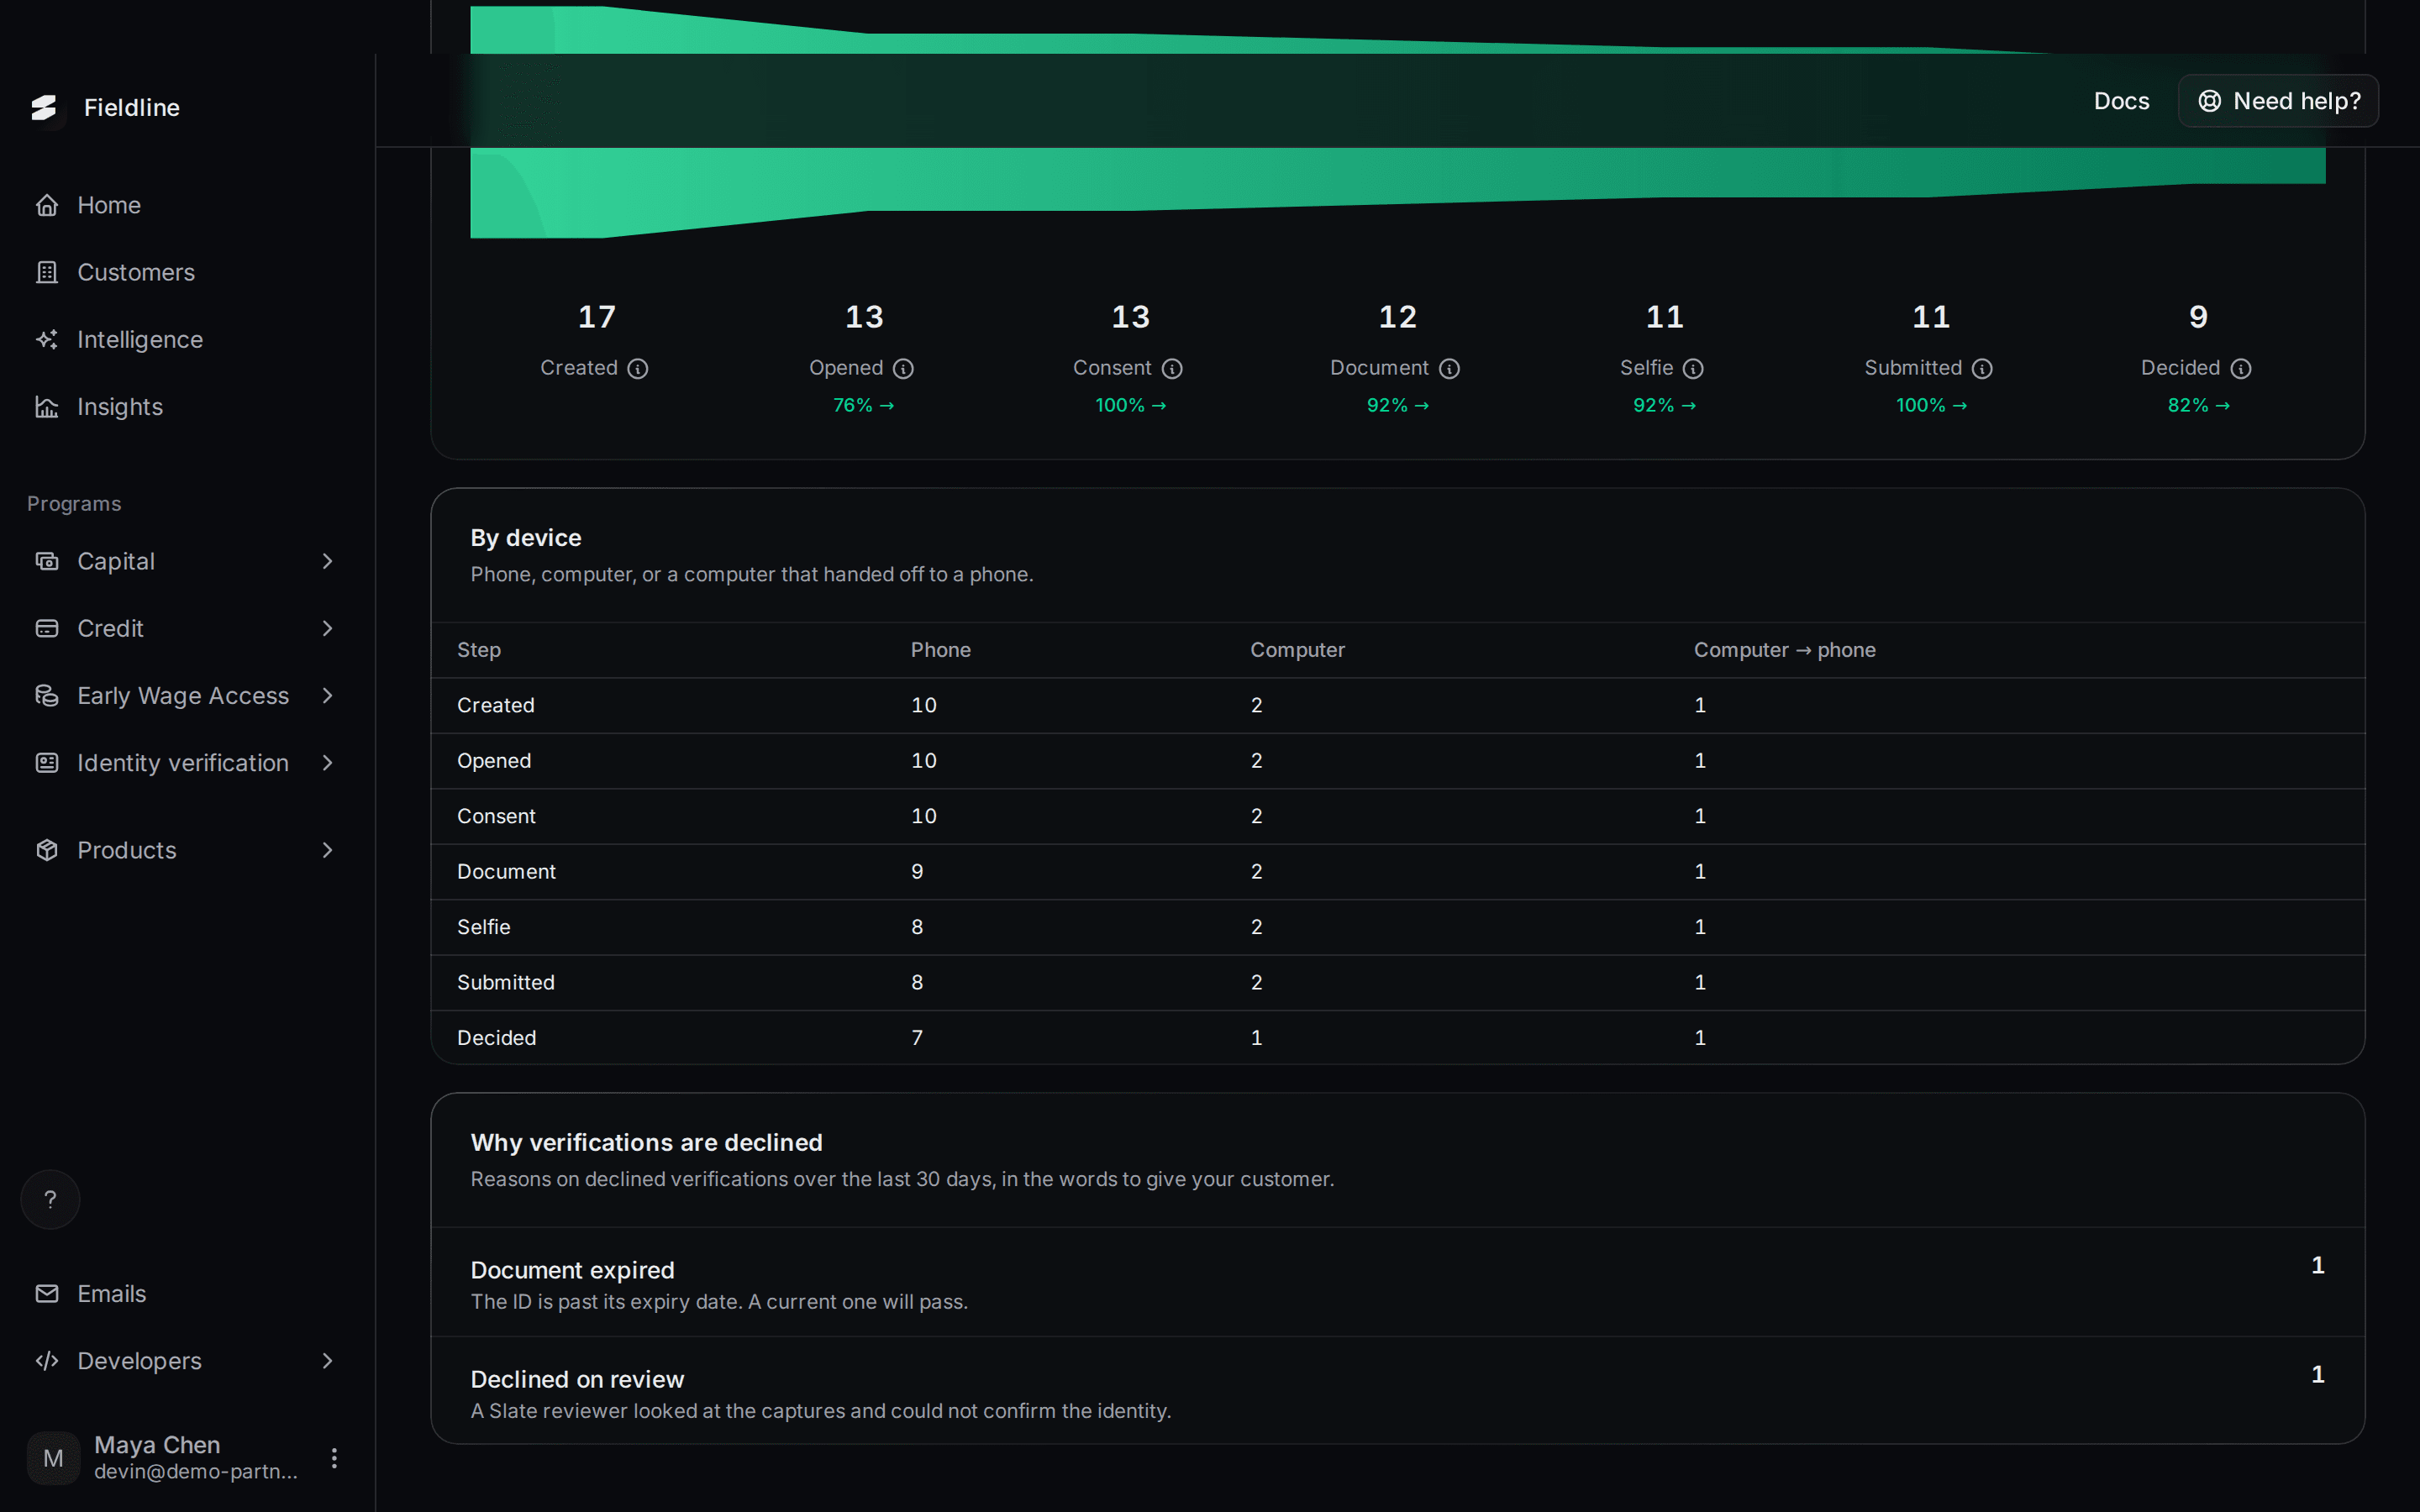
Further down you'll find By device, which splits the same steps by phone, computer, and a computer that handed off to a phone, and Why verifications are declined, which counts reasons.
Set where customers return
Select Identity verification, then Settings.
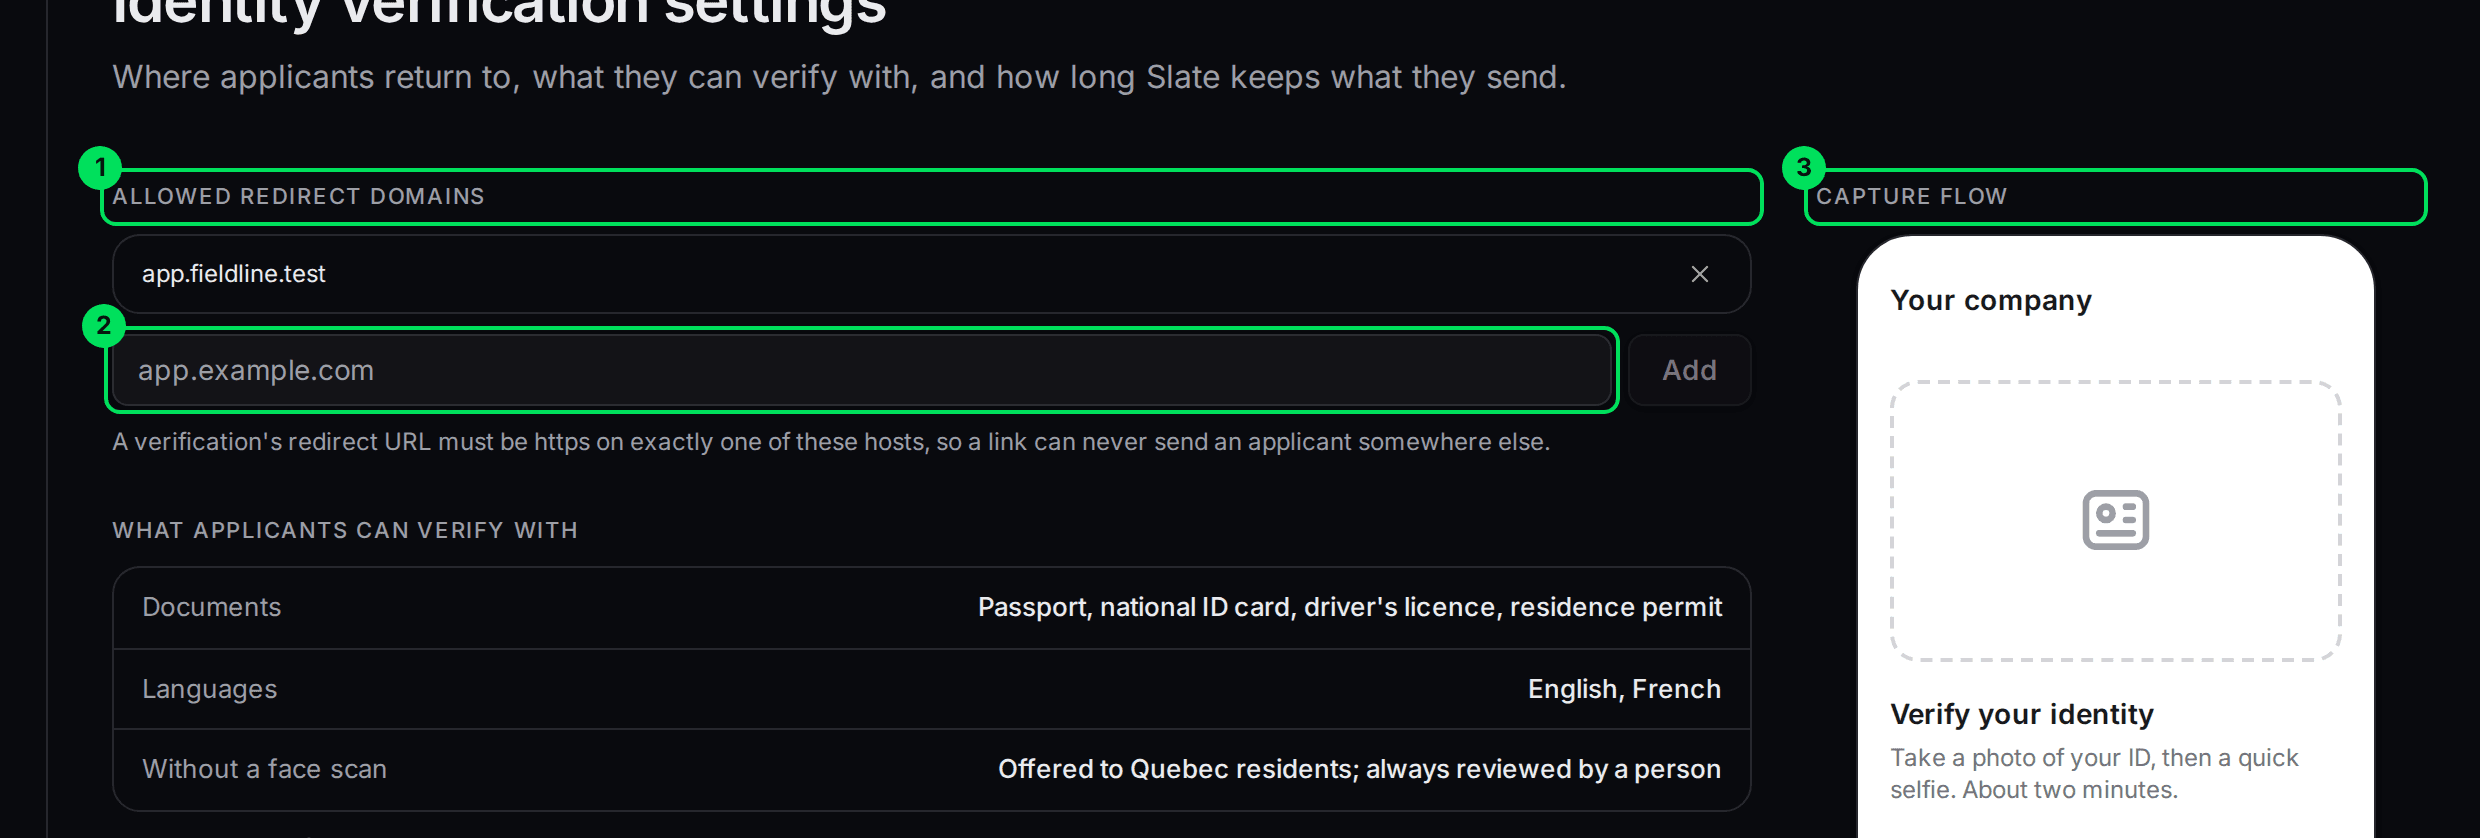
- Allowed redirect domains: the websites your customers may return to after verifying.
- app.example.com: type a domain and select Add. Select the X next to a domain to remove it.
- Capture flow: a preview of the first screen your customer sees, with your logo and colour.
When a verification has a redirect link, it must be https and on exactly one of these domains. A subdomain counts as a different domain. With no domains listed, customers stay on the final screen instead of returning to your product.
The page also lists what customers can verify with: a passport, national ID card, driver's licence or residence permit, in English or French. A face scan is the usual path. Quebec residents can verify without one, and a person always reviews those. To narrow the list for your program, ask your Slate contact.
To change the logo and colour, select Edit branding under the preview. See Set your brand colours.
Use Slate Verify from your own systems
Your developers can create and read verifications with the API, and get decisions by webhook. The page's top right has an API button that shows the calls.
- Create:
POST /identity-verifications. Read one:GET /identity-verifications/{id}. List:GET /identity-verifications. - Requests use your private API key in the
x-api-keyheader. See Create and manage API keys. - Webhooks tell you the moment a status changes:
identity-verification.created,.started,.in-review,.approved,.declined,.expired,.canceledand.redacted. See Set up webhooks. - Trust the webhook, not the redirect. The page your customer returns to is only for their experience.
If something goes wrong
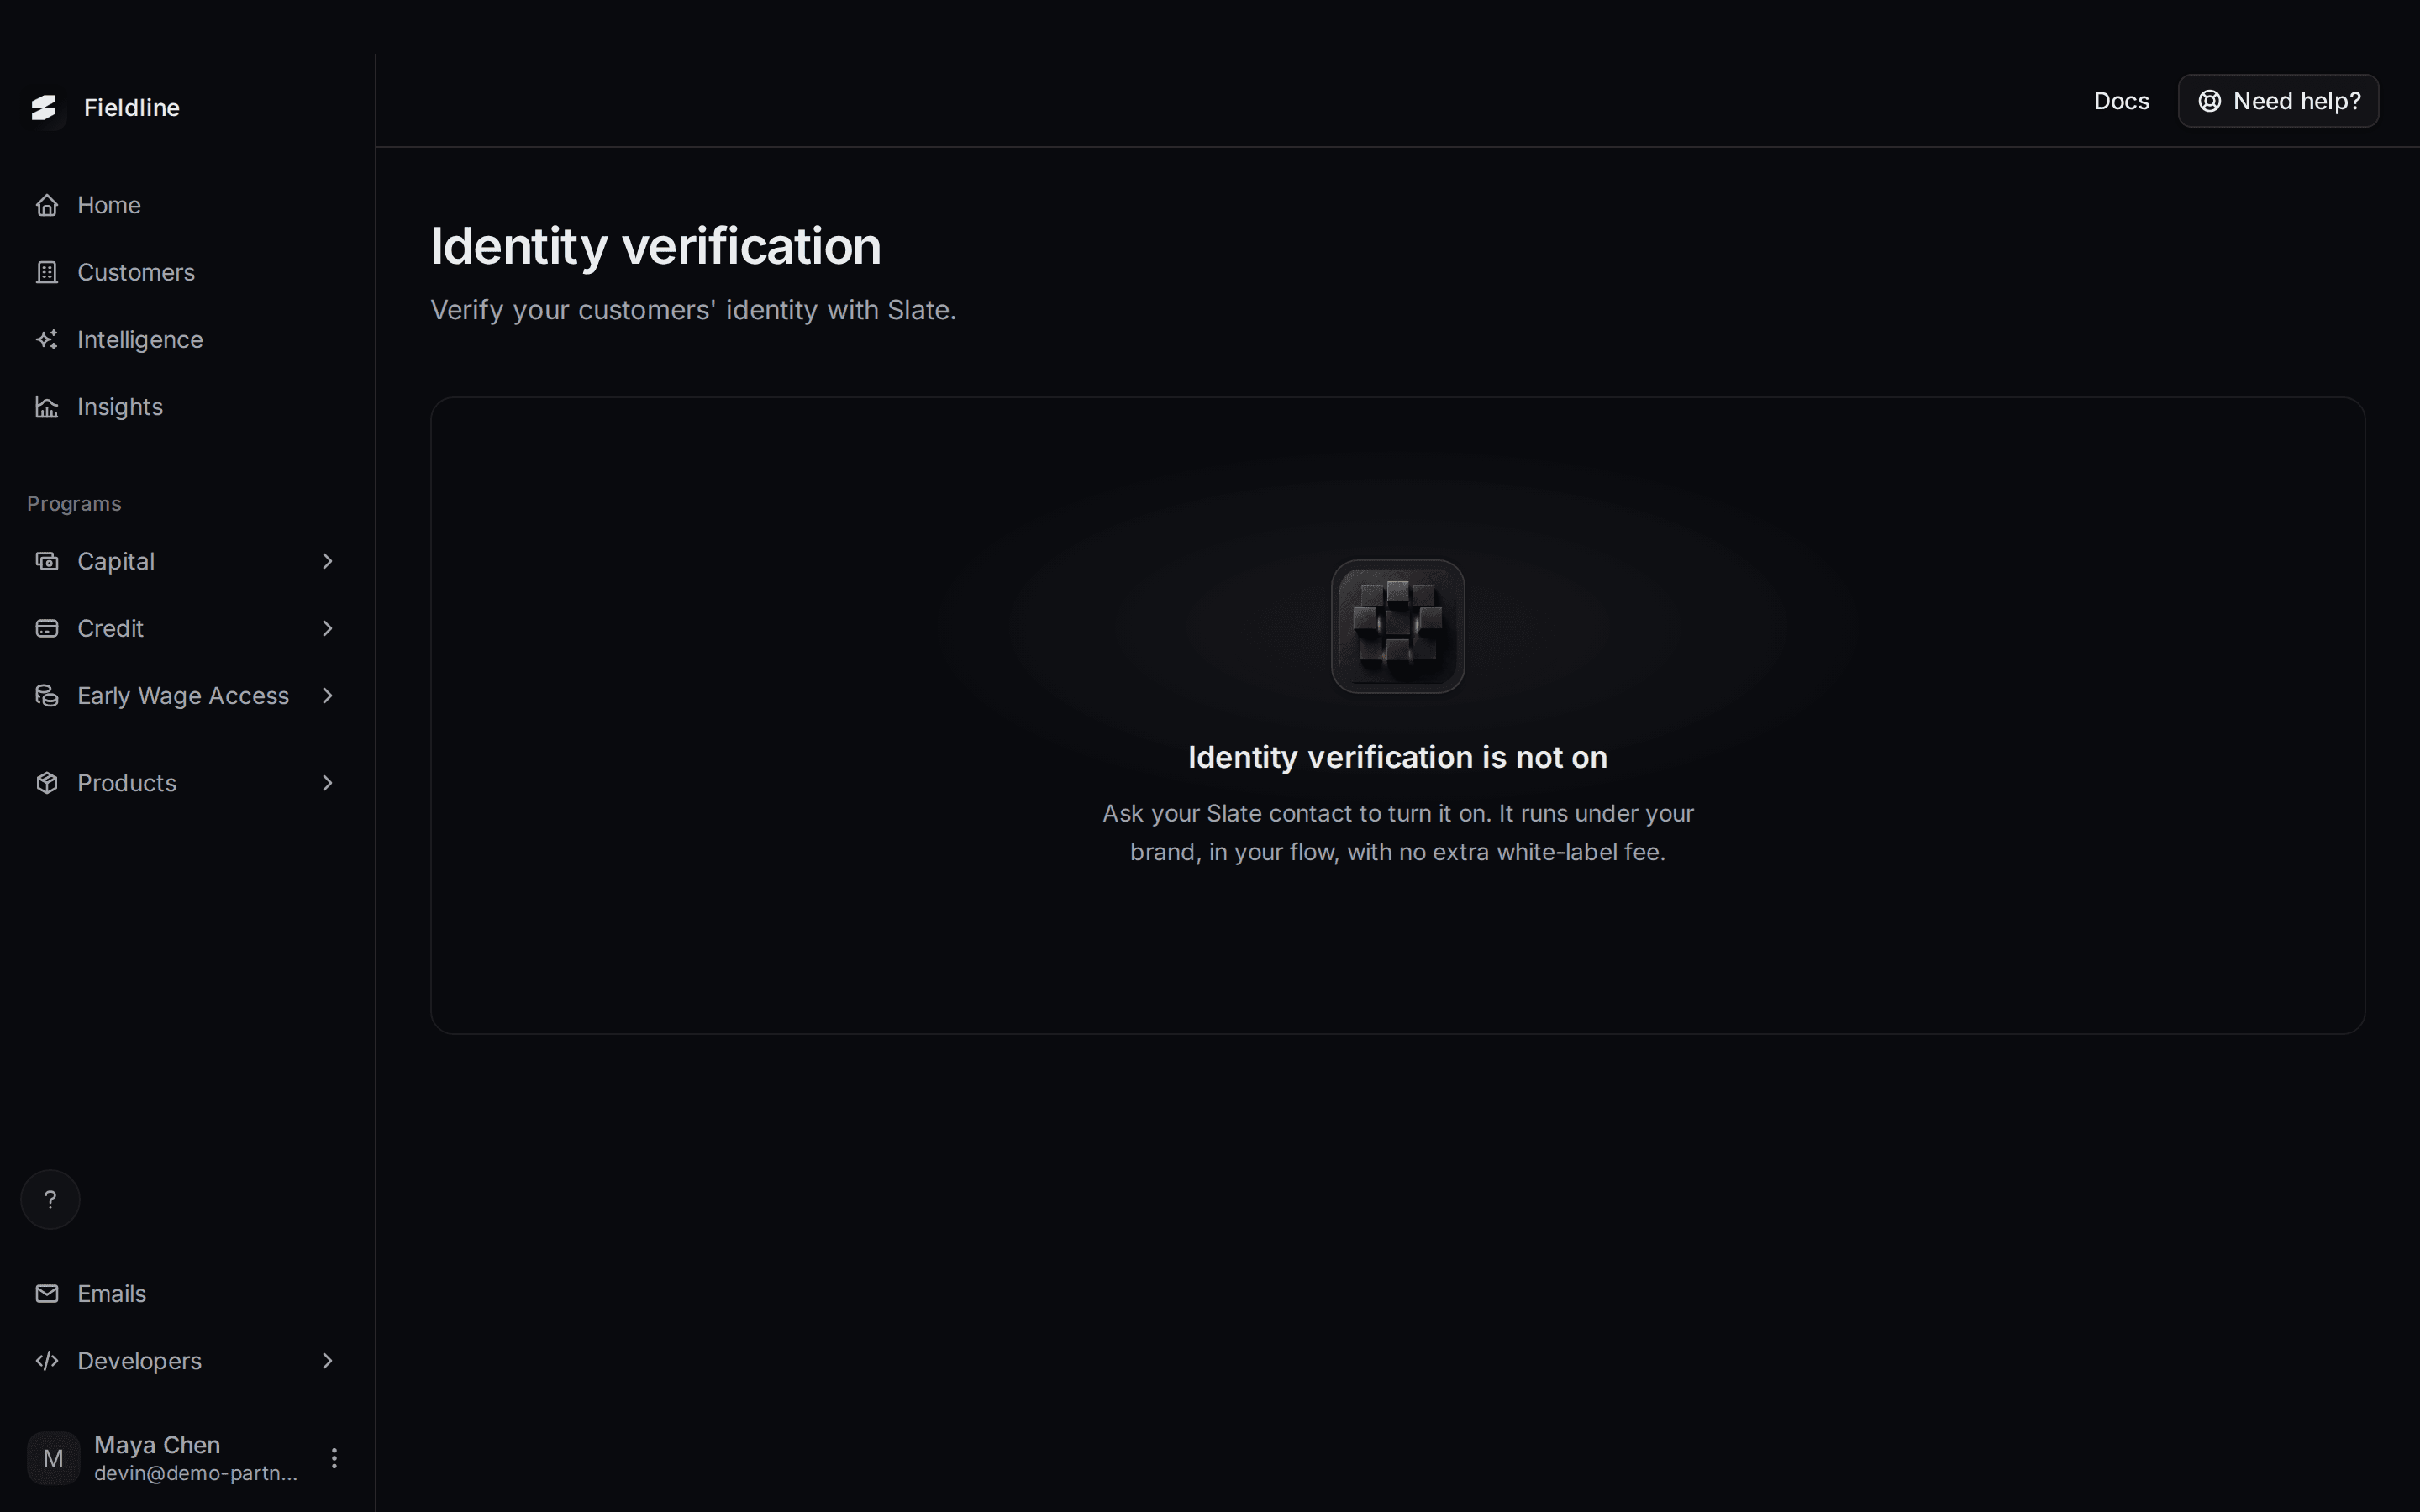
Why does it say "Identity verification is not on"?
Your account doesn't have Slate Verify yet. Ask your Slate contact to turn it on. If you open a Verify page by its web address, you'll see this message.
Why is "Email a new link" greyed out?
The customer has no email address. Use New link to copy and send it yourself.
The Link ready box looks cut off on the right
A long link can run past the edge of the box, so the copy icon or Open verification may be out of sight. Select the link text and copy it by hand. The new verification is at the top of the Verifications list.
The customer says the link doesn't work
Links last 24 hours, and a new link turns the old one off. Open the verification and select New link to copy or Email a new link. A verification itself expires after 7 days.
A customer can't use their camera
The capture screen shows Camera access is blocked, with steps for iPhone, Android and computer. It tells them to allow the camera for the page and reload. Customers can also move to a phone, or upload a photo if that option is shown.
The customer ran out of attempts
Each photo has a limited number of tries. The screen then says No attempts left for this photo. Please contact the company that sent you here. Create a new verification for them.
Why was a good ID sent to review?
Slate sends anything unsure to a person instead of declining. A blurry photo or a hard-to-read card is the usual cause. Nothing is wrong, and no action is needed.
Learn more about Slate Verify.
Still stuck? Email [email protected] with your account email and the screen you are on. We reply within 24 business hours.