Help Center / Getting started
Get started with the setup checklist
The ten steps on your Home page that take you from a new sandbox account to going live, one by one, and which ones tick on their own.
13 min read · Updated November 10, 2026
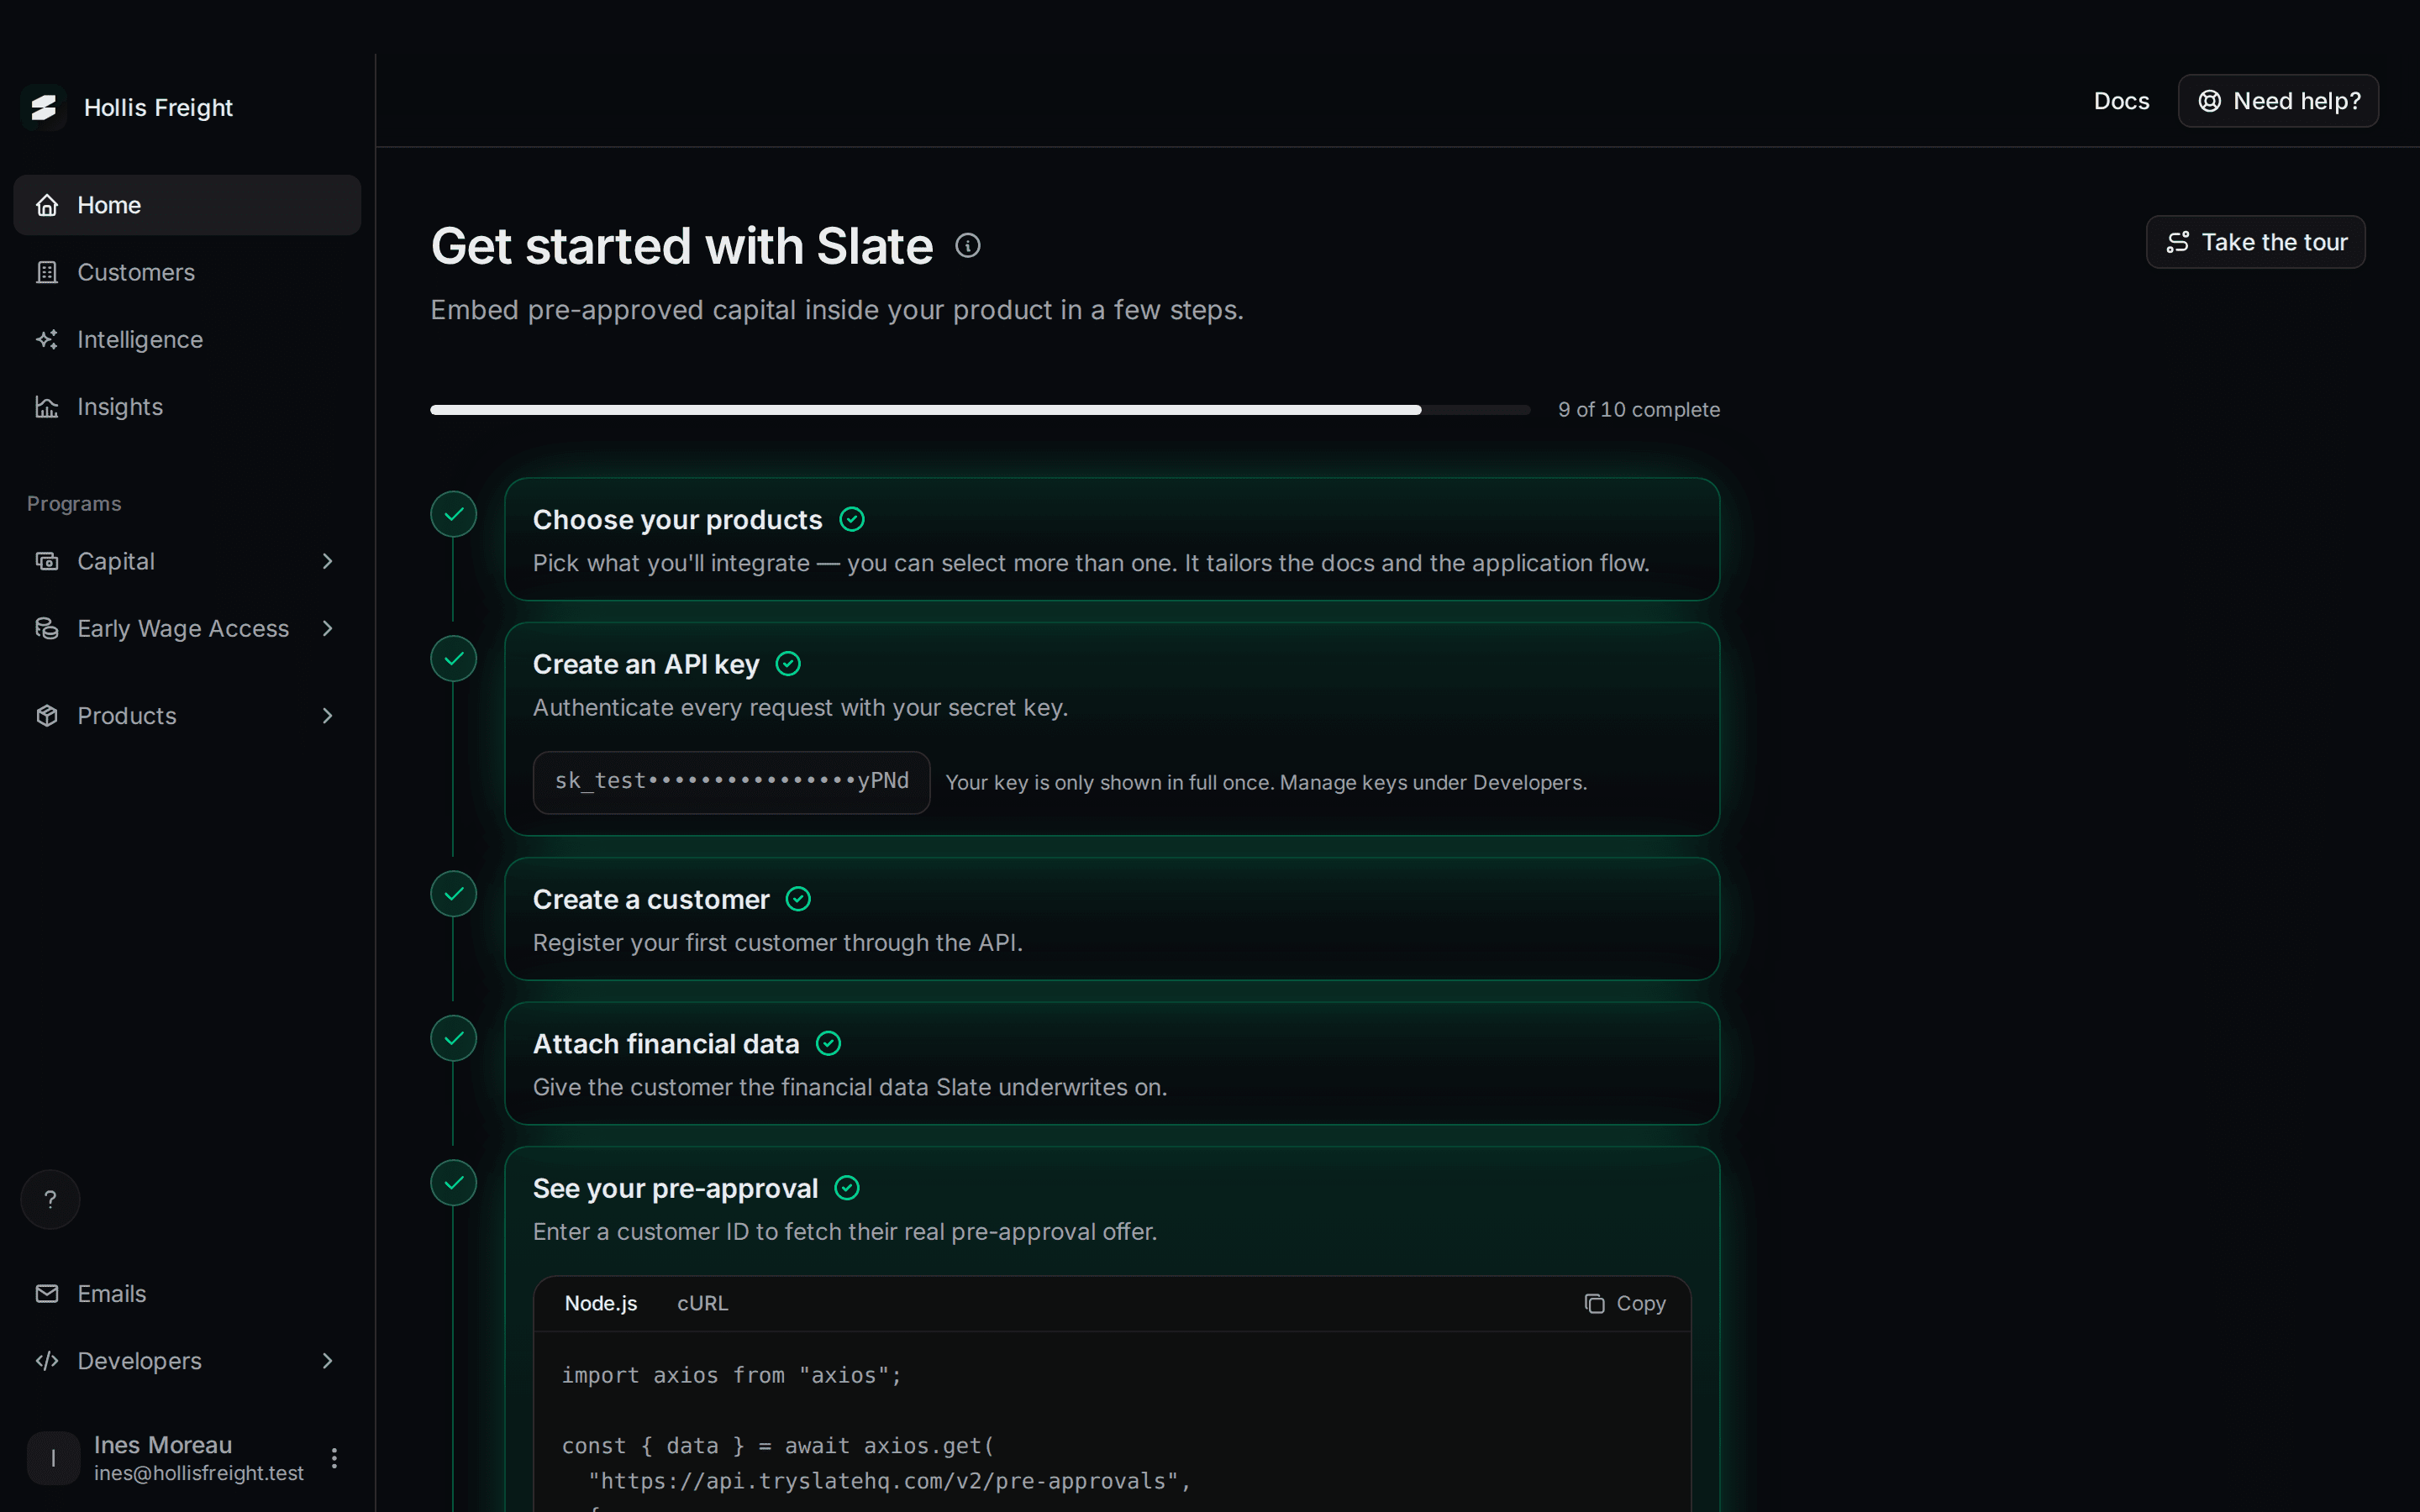
The Get started with Slate checklist on your Home page walks you from a new account to going live. It has ten steps. You tick some off yourself, and Slate ticks the rest when it sees you've done them.
Where to find it: select Home at the top of the left menu. Home only exists in the sandbox. See Sandbox and live.
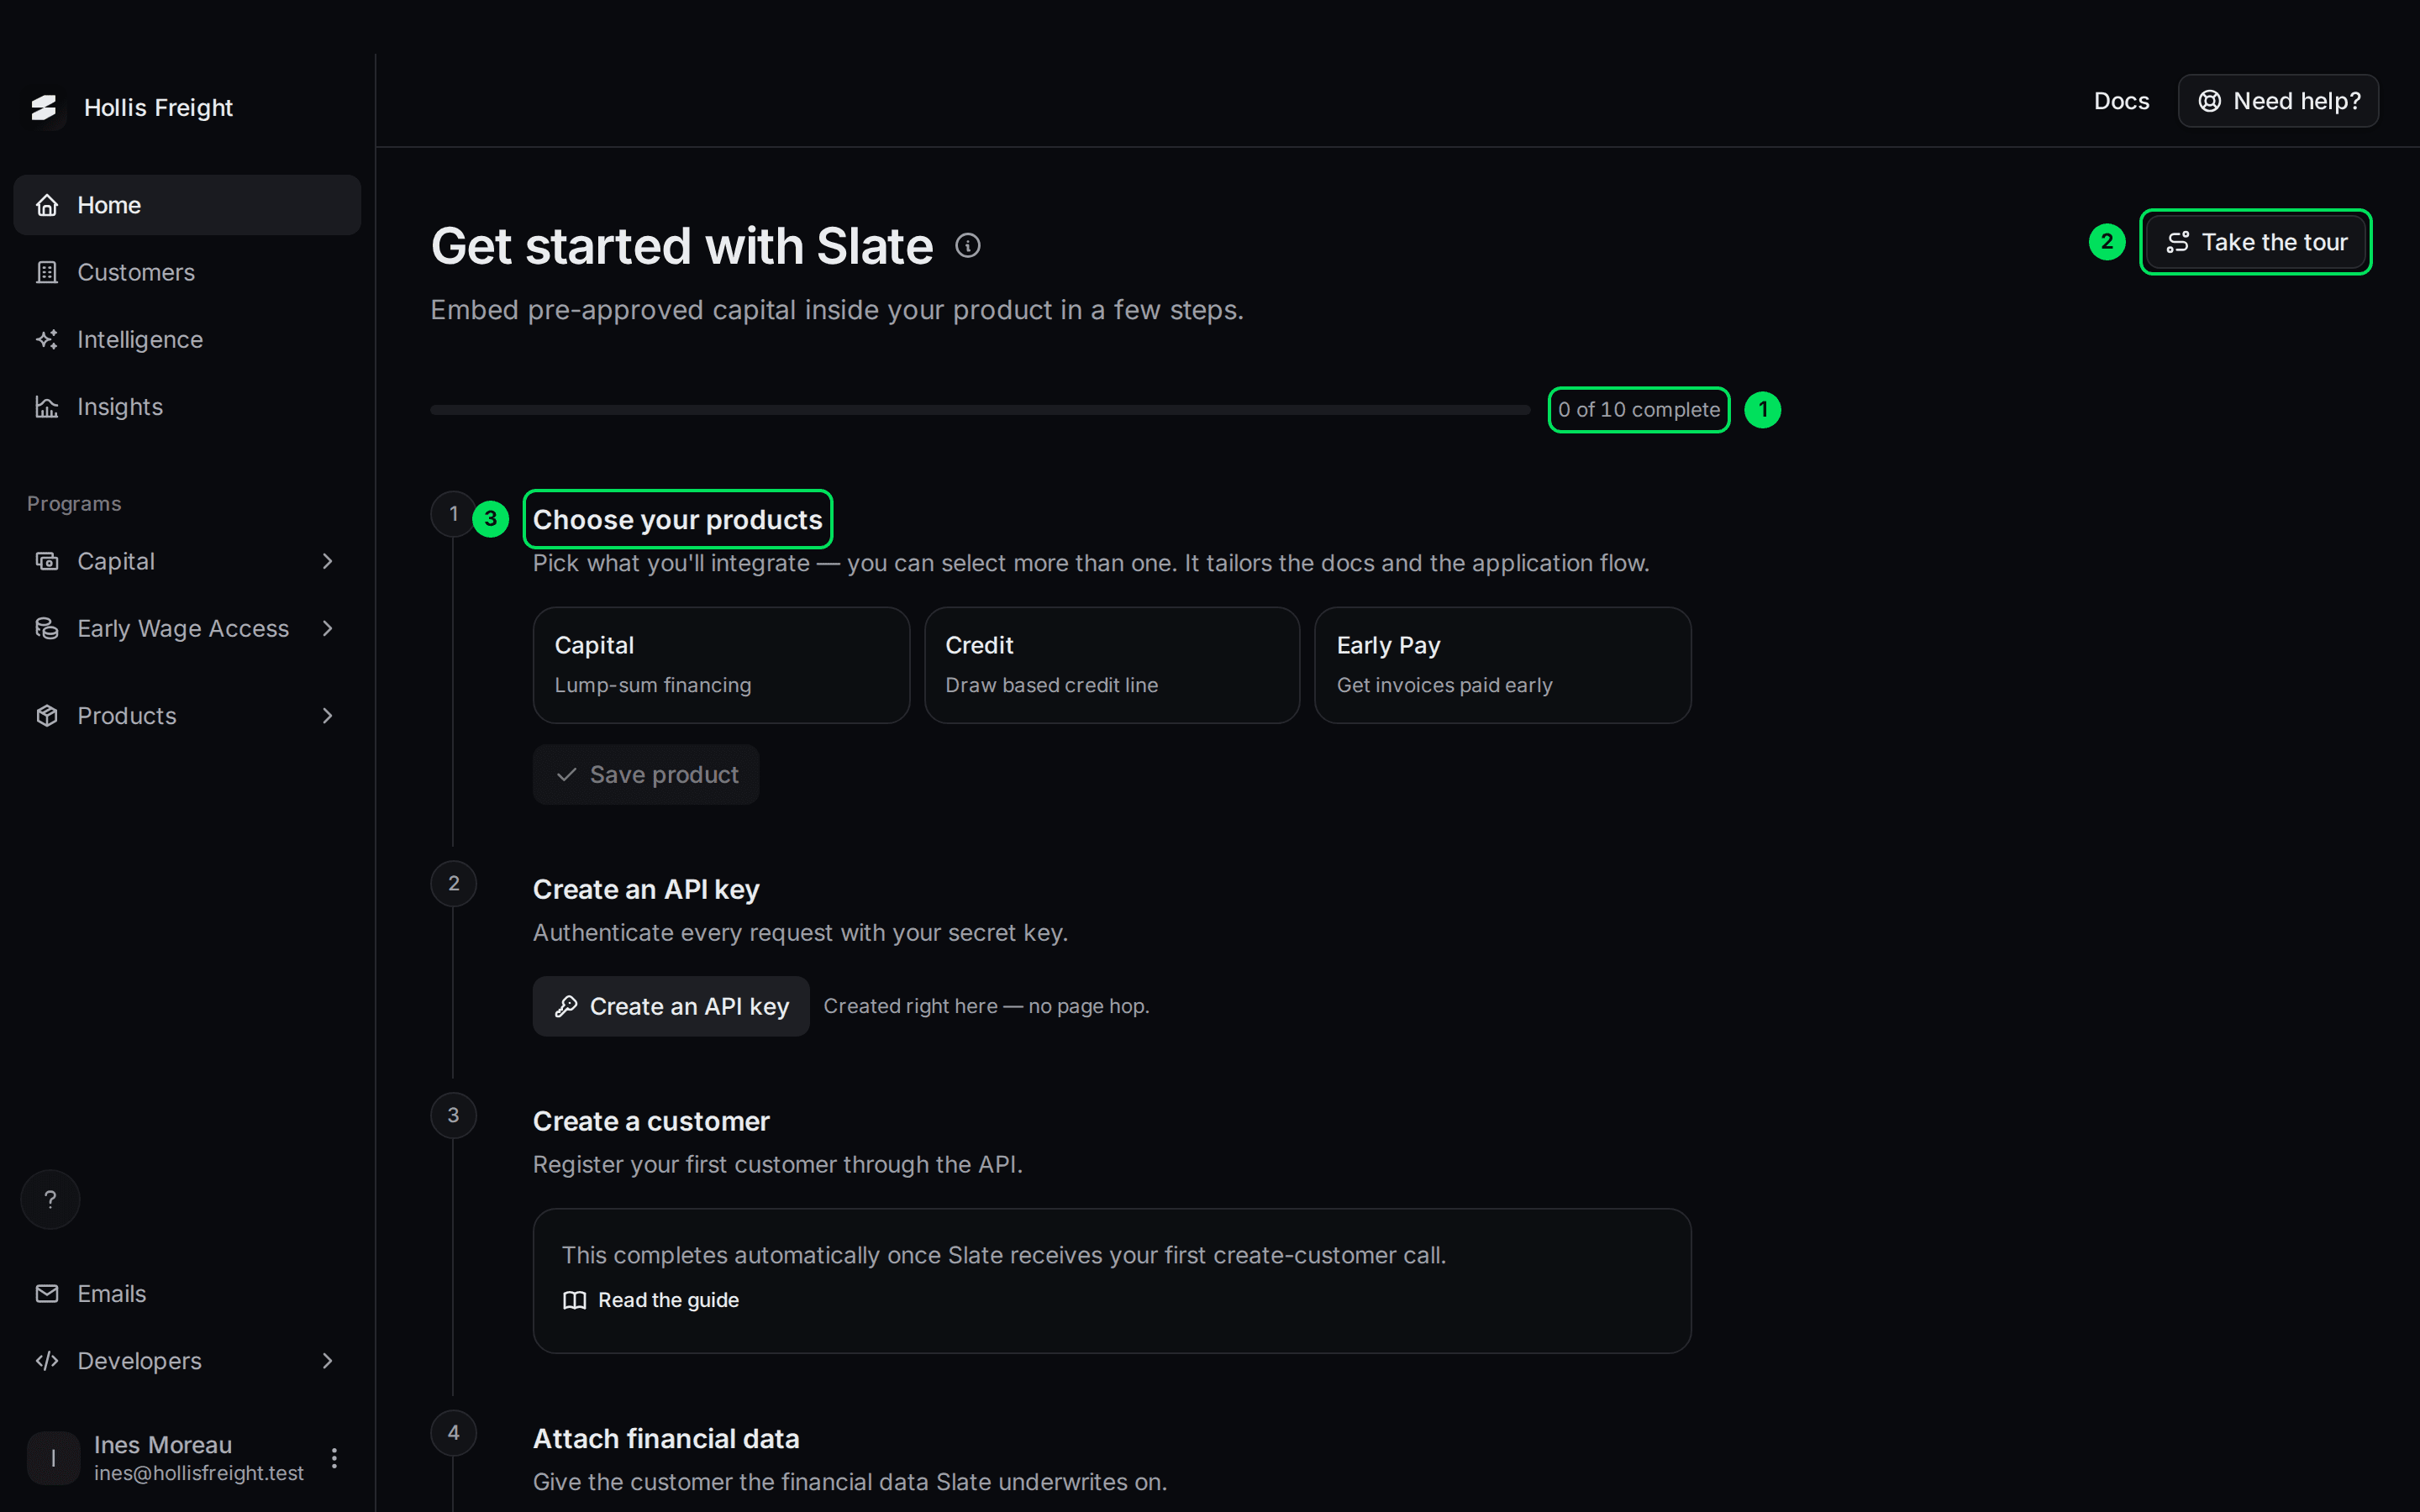
- 0 of 10 complete: your progress. It fills as steps turn green.
- Take the tour: a short walkthrough of the checklist.
- Choose your products: step 1. The steps run down the page in order.
How the checklist works
Each step has a number. When it's done, the number turns into a green tick and the step folds up. Three steps stay open after you finish them, so you can still see your key, your offer and your email choice.
- You do these on the page: steps 1, 2, 5, 8 and 9.
- Slate ticks these on its own: steps 3, 4, 6 and 7. Nothing to click. They tick when Slate sees the right call or screen load.
- Step 10 is the agreements and going live. See Go live.
The progress bar counts steps 1 to 9, plus the signed agreement from step 10. Once Slate grants live access, every step shows as done and the list folds behind a banner.
Take the tour first
The first time you open Home, a welcome card walks you through the checklist.
Close the pop-ups, or start the tour
You may see two cards at once: this welcome tour, and an offer for a narrated tour. Close the welcome card first with its × at the top right, or press Esc. Then answer the narrated tour offer. See Find your way around the dashboard.
Select Take the tour any time
It's the button at the top right of Home. Select Next to move through the six cards.
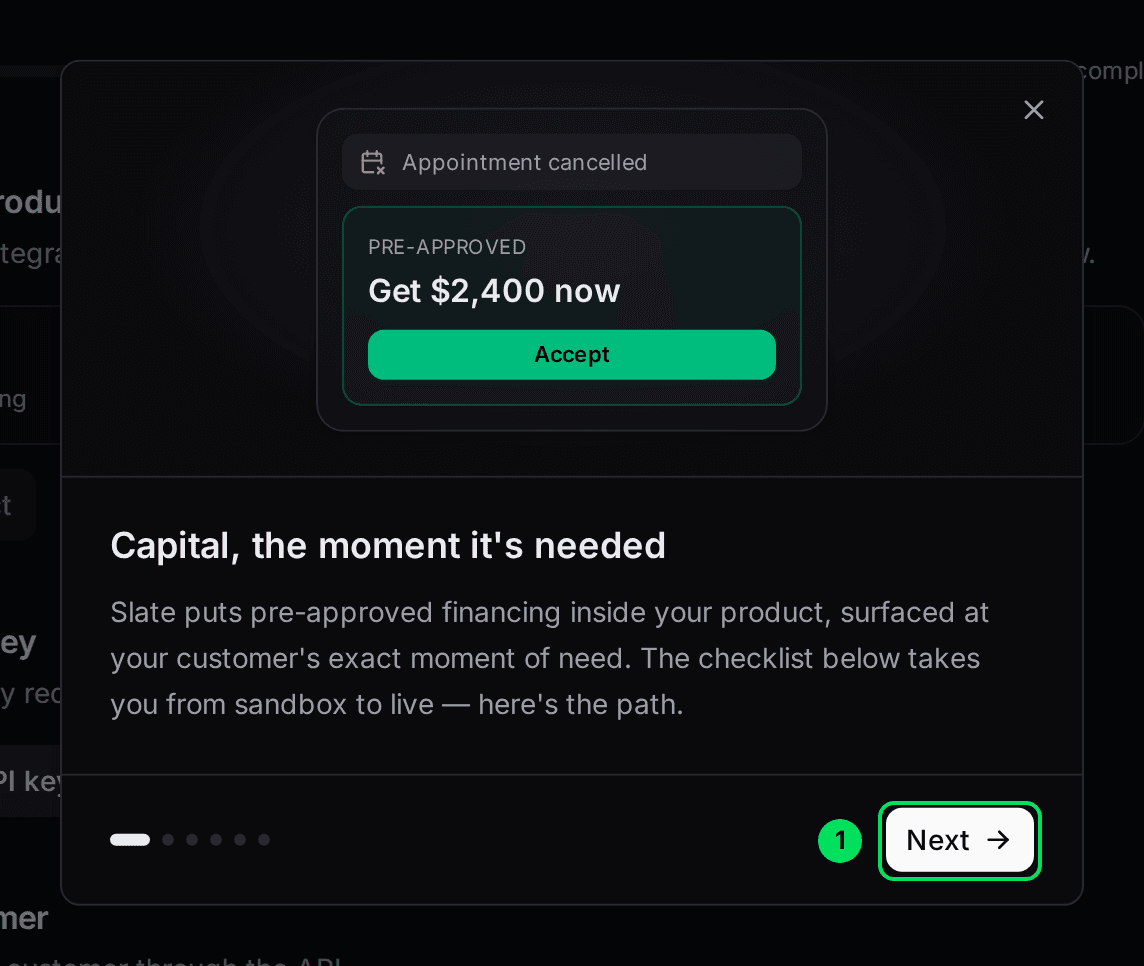
- Next: goes to the next card. On the last card it says Get started.
The six cards are:
- Capital, the moment it's needed: what Slate does and the path from sandbox to live.
- Choose your products: why you pick products first.
- Financials in, pre-approval out: create a customer, add their data, fetch their offer.
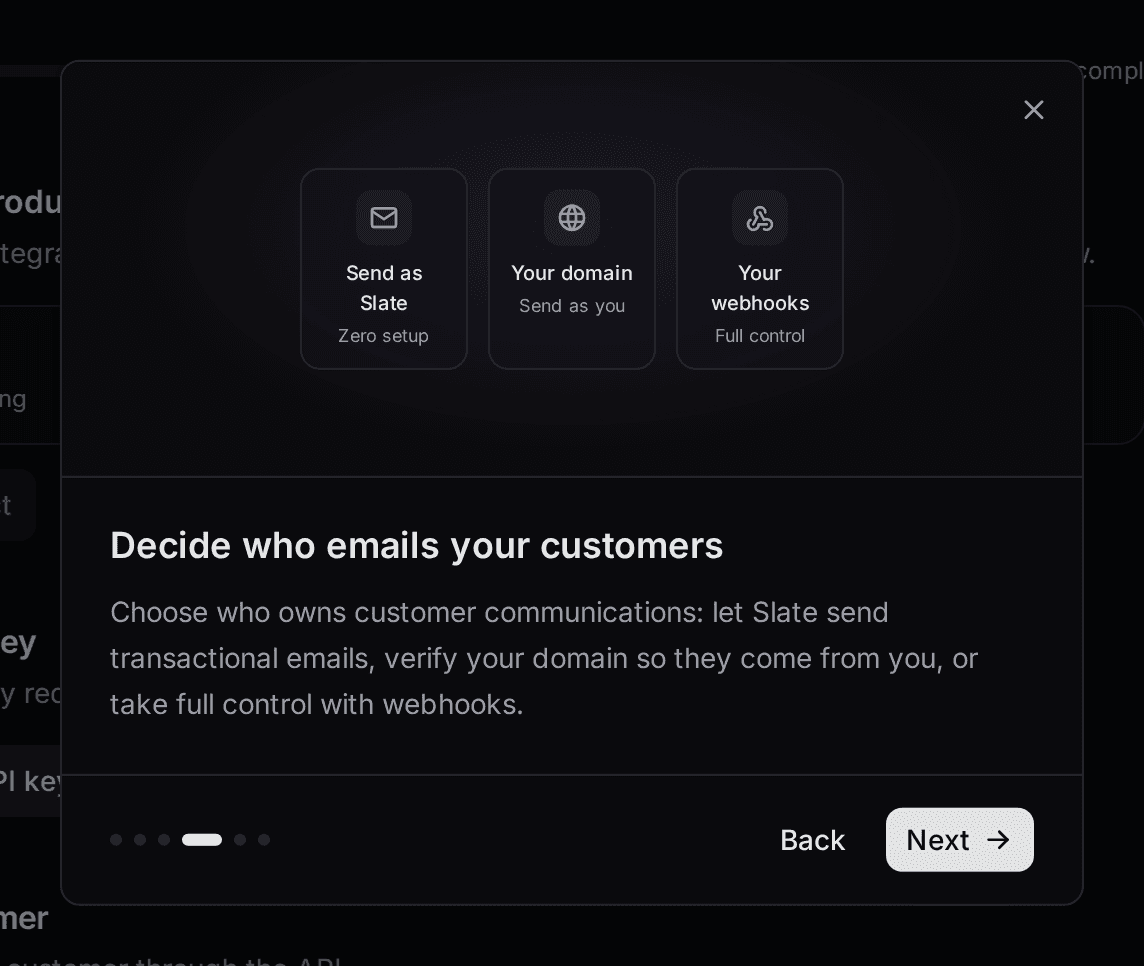
- Decide who emails your customers: Slate, your own domain, or you.
- You support, Slate has your back: your customers come to you first.
- Embed, submit, and go live: the last steps.
Step 1: Choose your products
Pick the kinds of financing you plan to offer. Your choice tailors the docs and the application flow.
Select a product
Select one or more tiles. A selected tile gets a green outline and a tick.
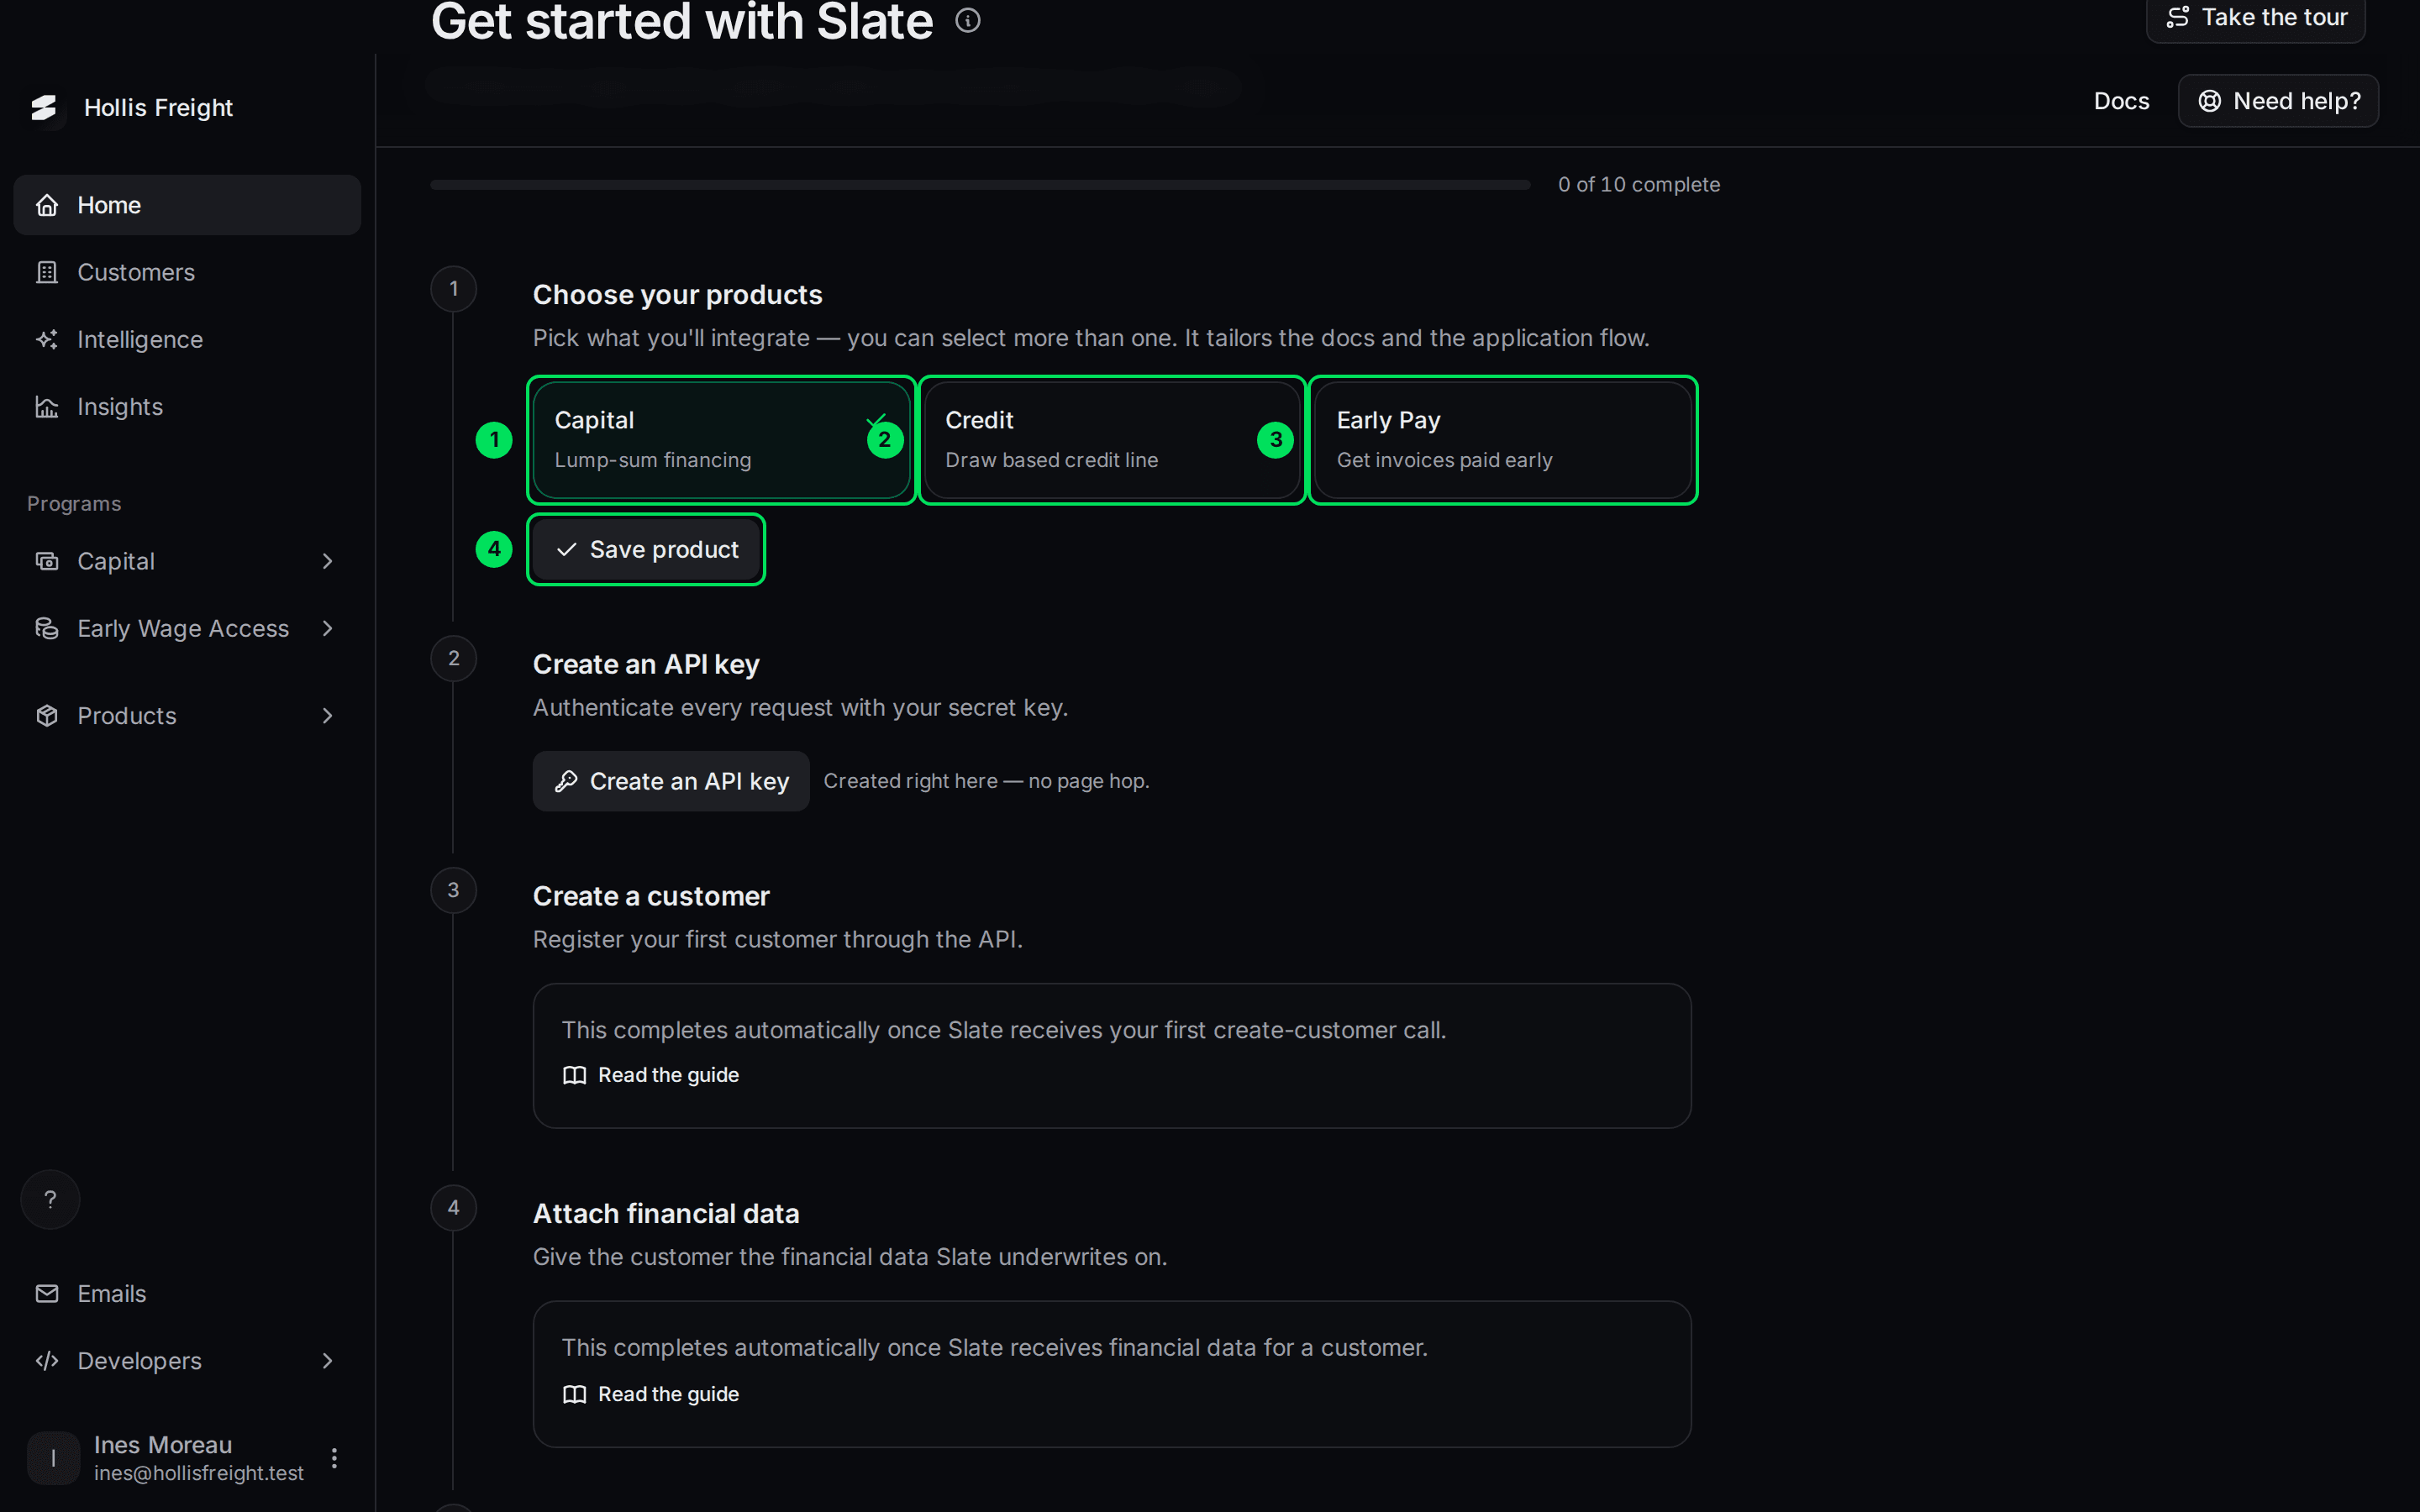
- Capital: lump-sum financing.
- Credit: a credit line your customers draw from.
- Early Pay: get invoices paid early.
- Save product: saves your choice. With more than one tile selected, it says Save products.
Select Save product
You'll see the message "Products saved". The step turns green.

Step 2: Create an API key
An API key is a password your developers use so your systems can talk to Slate. This button makes your first one.
Select Create an API key
It takes a second.
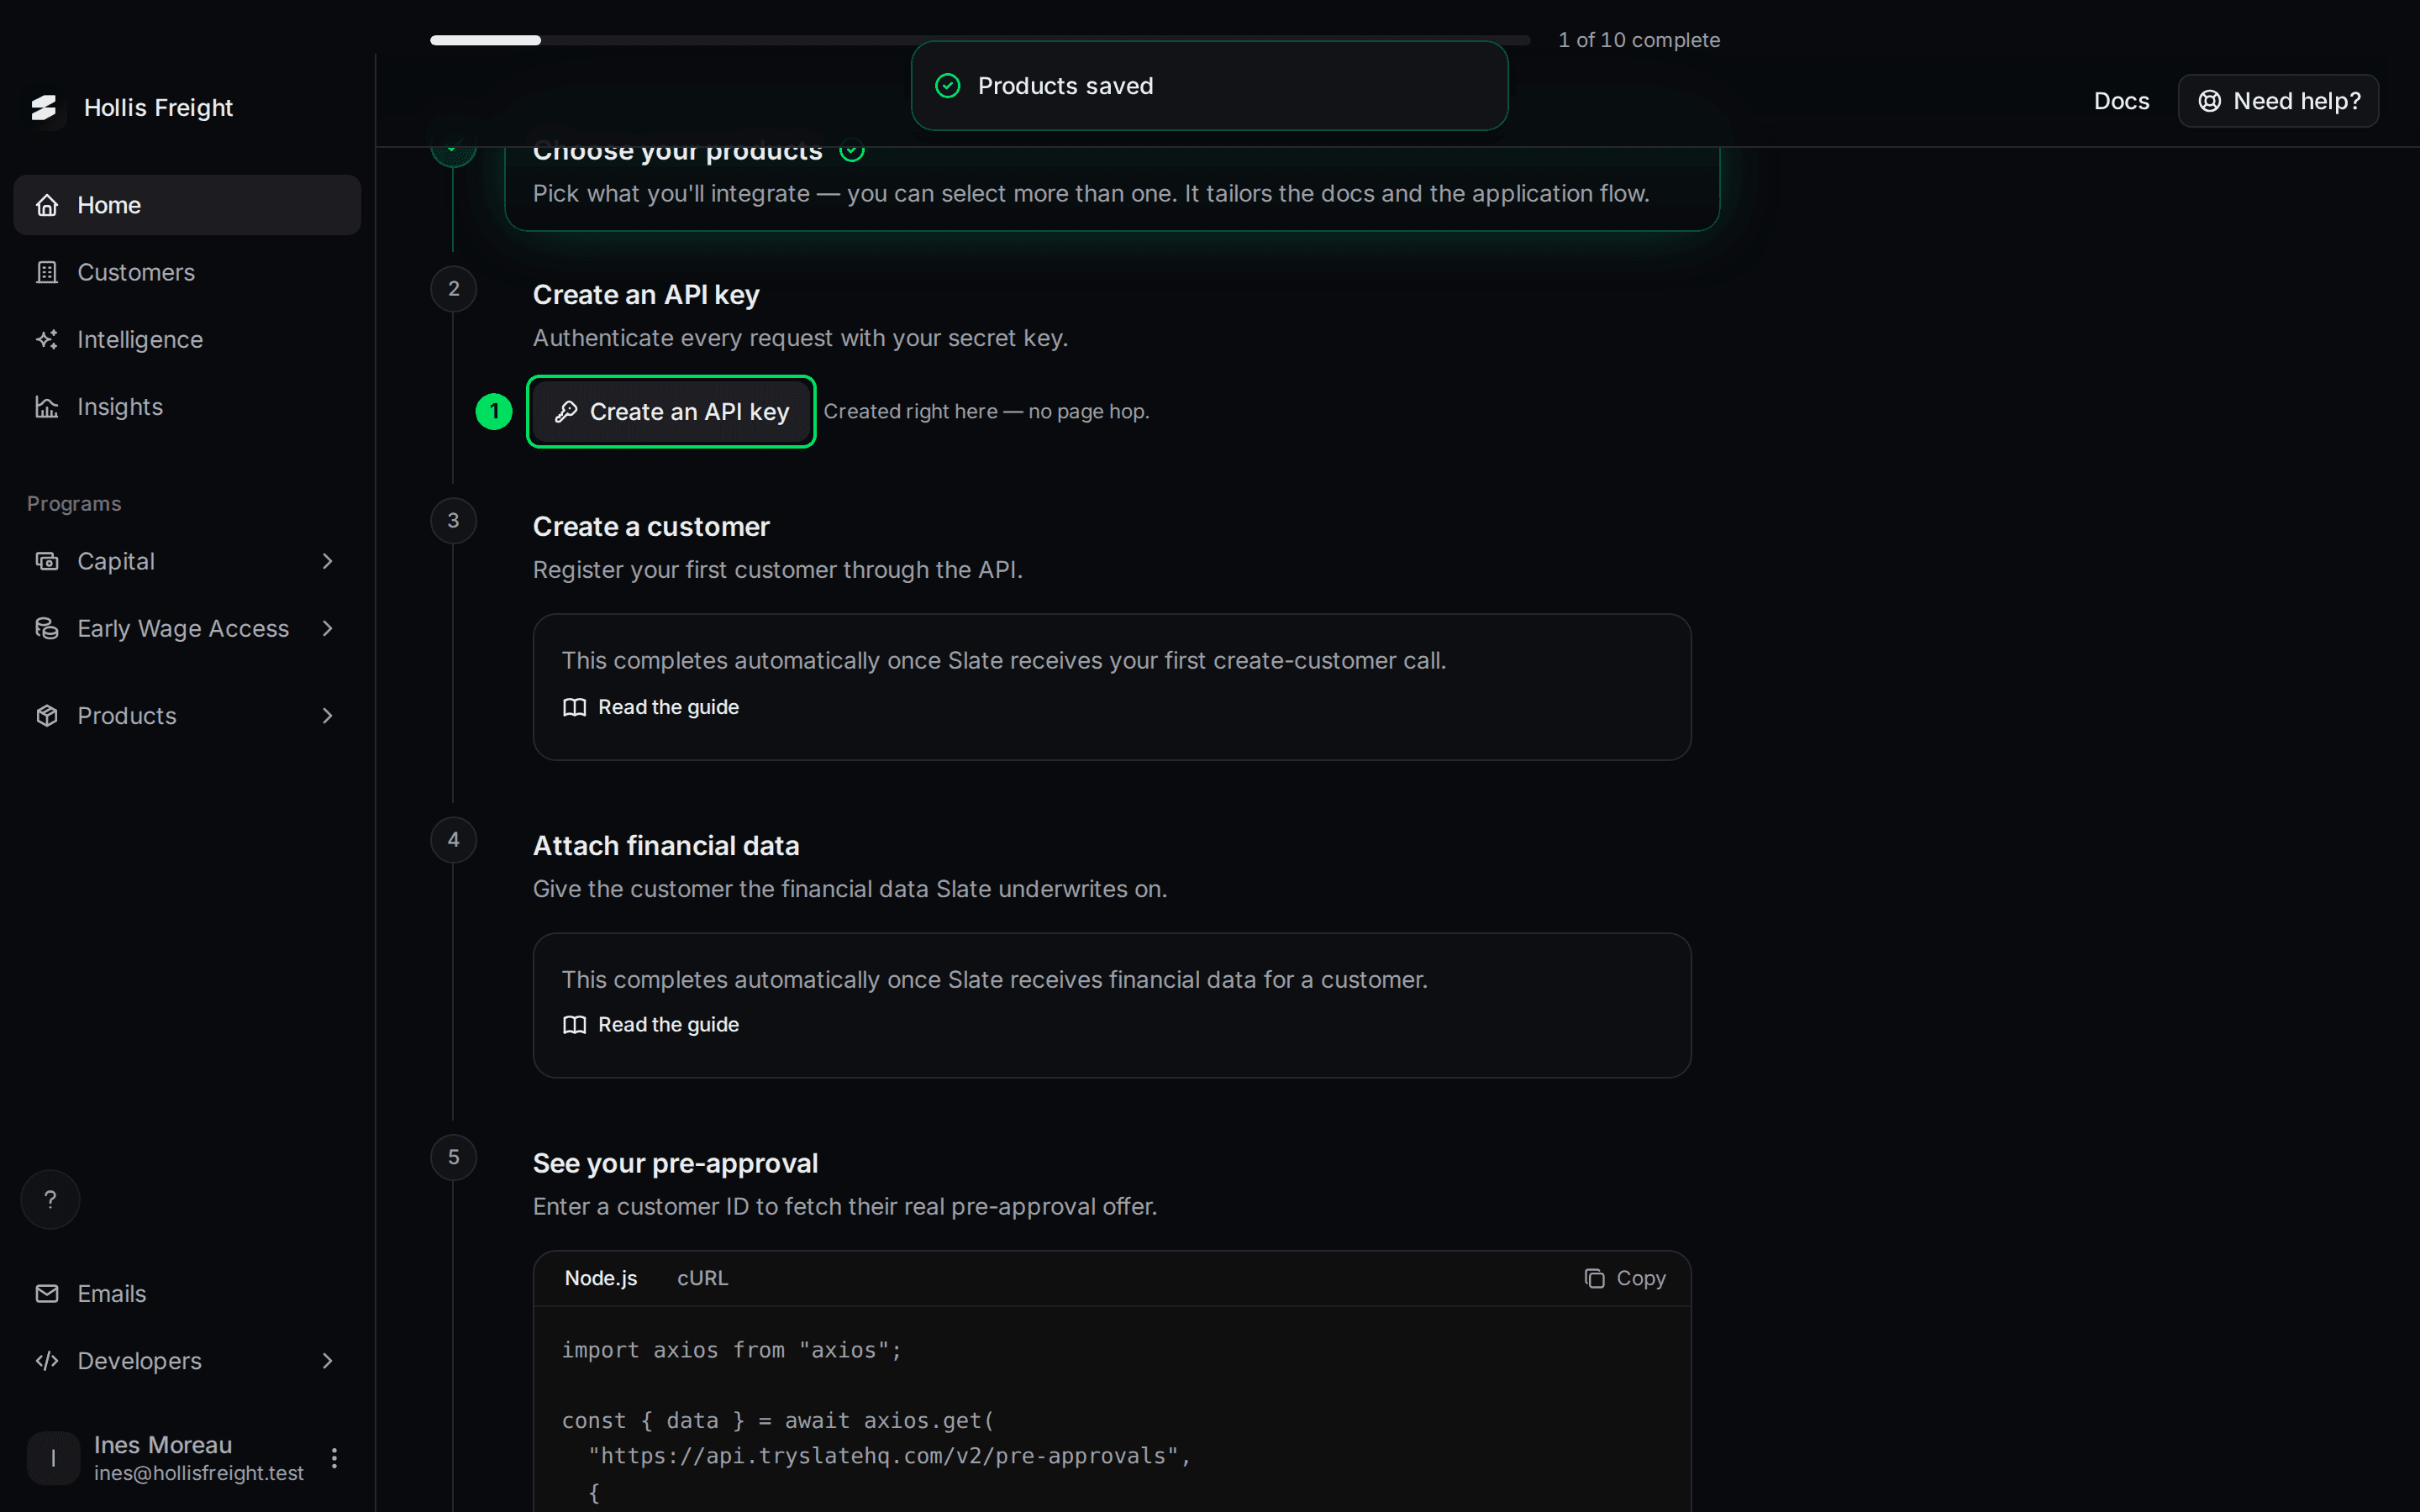
- Create an API key: makes a key right here. You don't need to visit another page.
Copy your key now
The page shows the first 12 characters of the key, then dots. Select Copy key. The button changes to Copied.
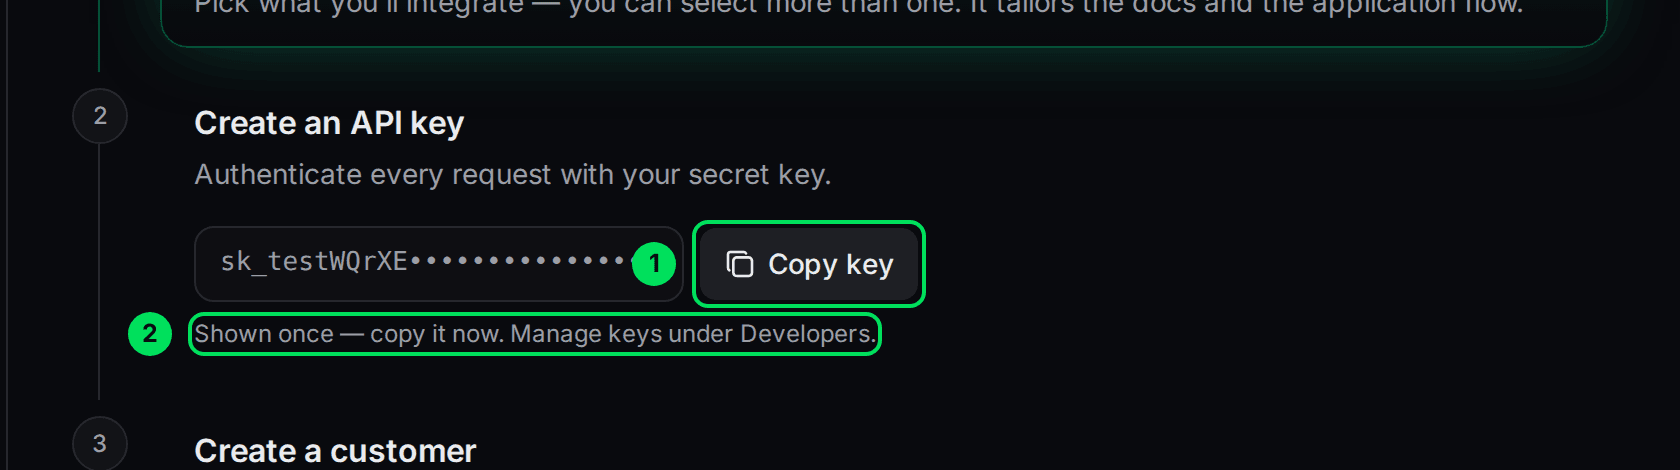
- Copy key: copies the full key to your clipboard.
- Shown once: the note that you can't see the full key again.
Store the key somewhere safe
Paste it into your password manager or send it to your developer through a secure channel.
The key made here can read and write everything. Create more keys, or read-only keys, under Developers.
Step 3: Create a customer
A customer is a business you bring to Slate. Your developer creates it through the API using your key. You give each customer your own ID, called an externalId, so you can find them later.
This step ticks on its own the first time Slate receives a "create customer" request.
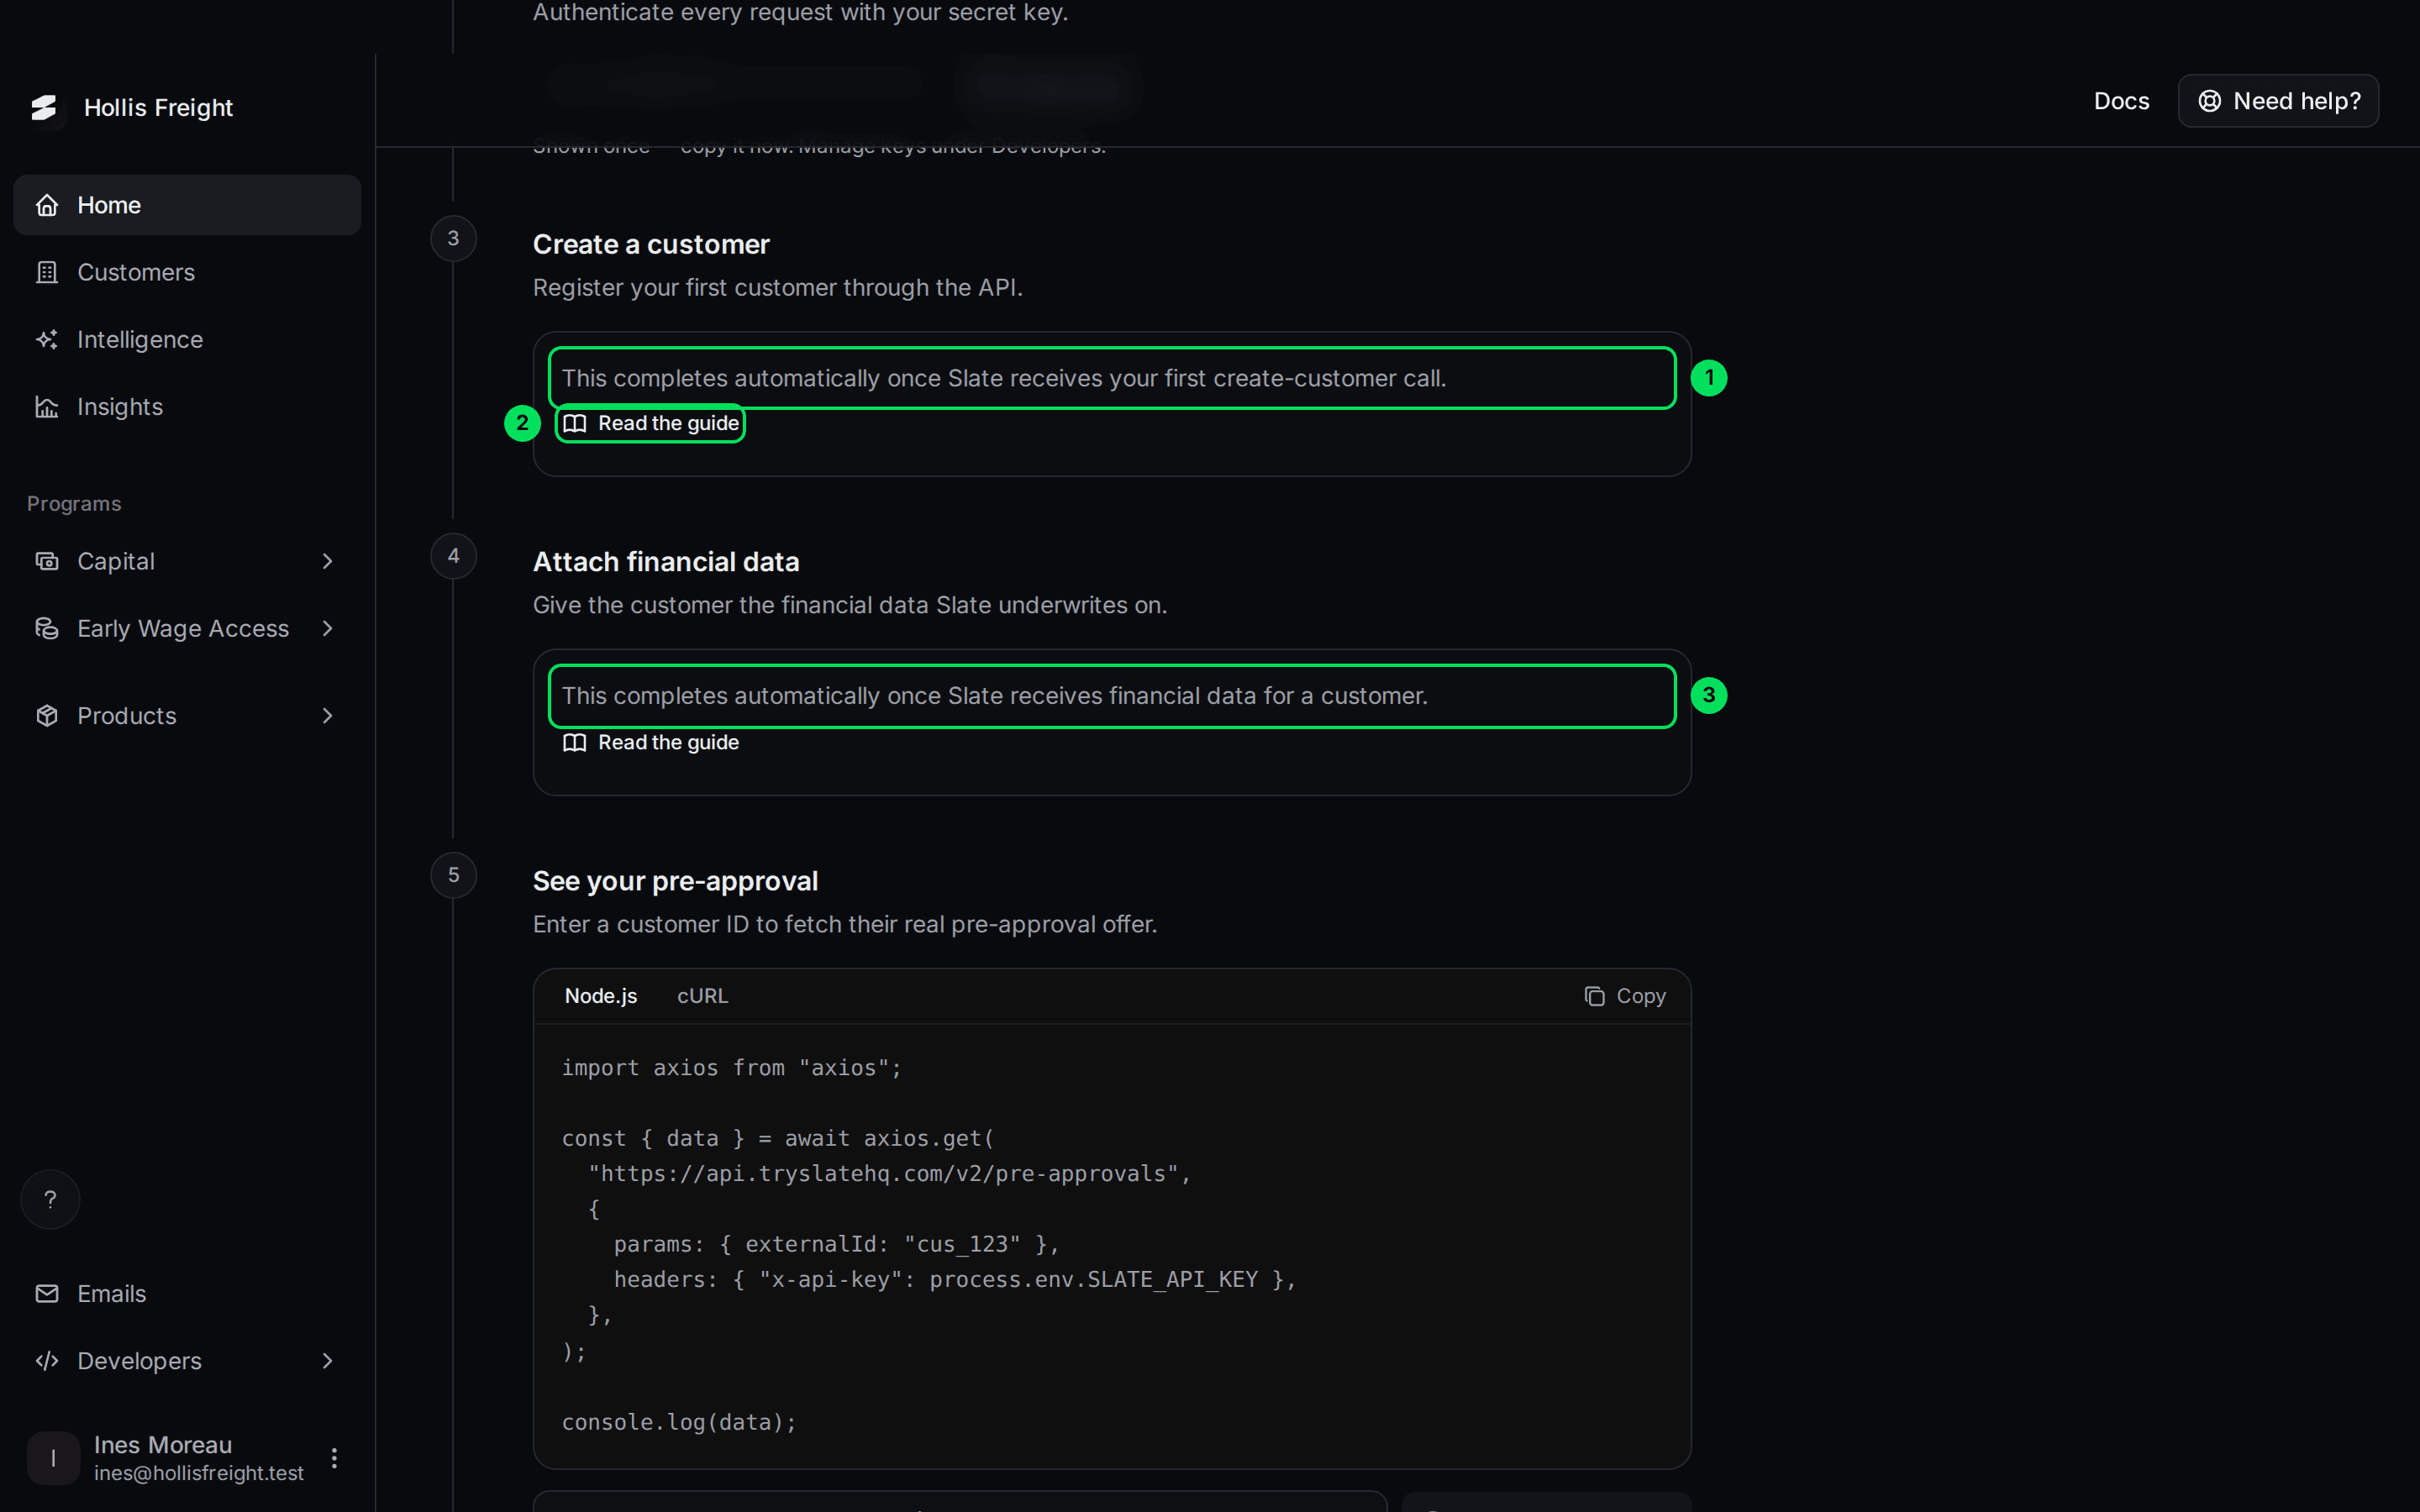
- This completes automatically…: nothing to click. It ticks when Slate gets your first create-customer call.
- Read the guide: opens the API guide for this call.
- Step 4's note: the same for financial data.
Here's a sandbox example your developer can adapt:
curl -X POST https://api-sandbox.tryslatehq.com/customers \
  -H "x-api-key: YOUR_API_KEY" \
  -H "Content-Type: application/json" \
  -d '{
    "type": "BUSINESS",
    "externalId": "cus_123",
    "productType": "capital",
    "business": { "legalName": "Prairie Line Haulage Ltd", "type": "CORPORATION" }
  }'
Your key goes in a header called x-api-key.
Step 4: Attach financial data
Financial data is the numbers Slate uses to decide what to offer a customer, such as monthly revenue. Your developer sends it for a customer you already created.
This step ticks on its own when Slate receives financial data for any customer.
curl -X POST https://api-sandbox.tryslatehq.com/attach-financial-data \
  -H "x-api-key: YOUR_API_KEY" \
  -H "Content-Type: application/json" \
  -d '{
    "externalId": "cus_123",
    "timeseries": [
      { "date": "2026-01-01", "data": { "revenue": 43800, "expenses": 31900 } },
      { "date": "2026-02-01", "data": { "revenue": 45600, "expenses": 32800 } }
    ]
  }'
In the sandbox, an offer appears for the customer within moments. You don't wait for Slate to review. You can also add data from a spreadsheet. See Import financial data.
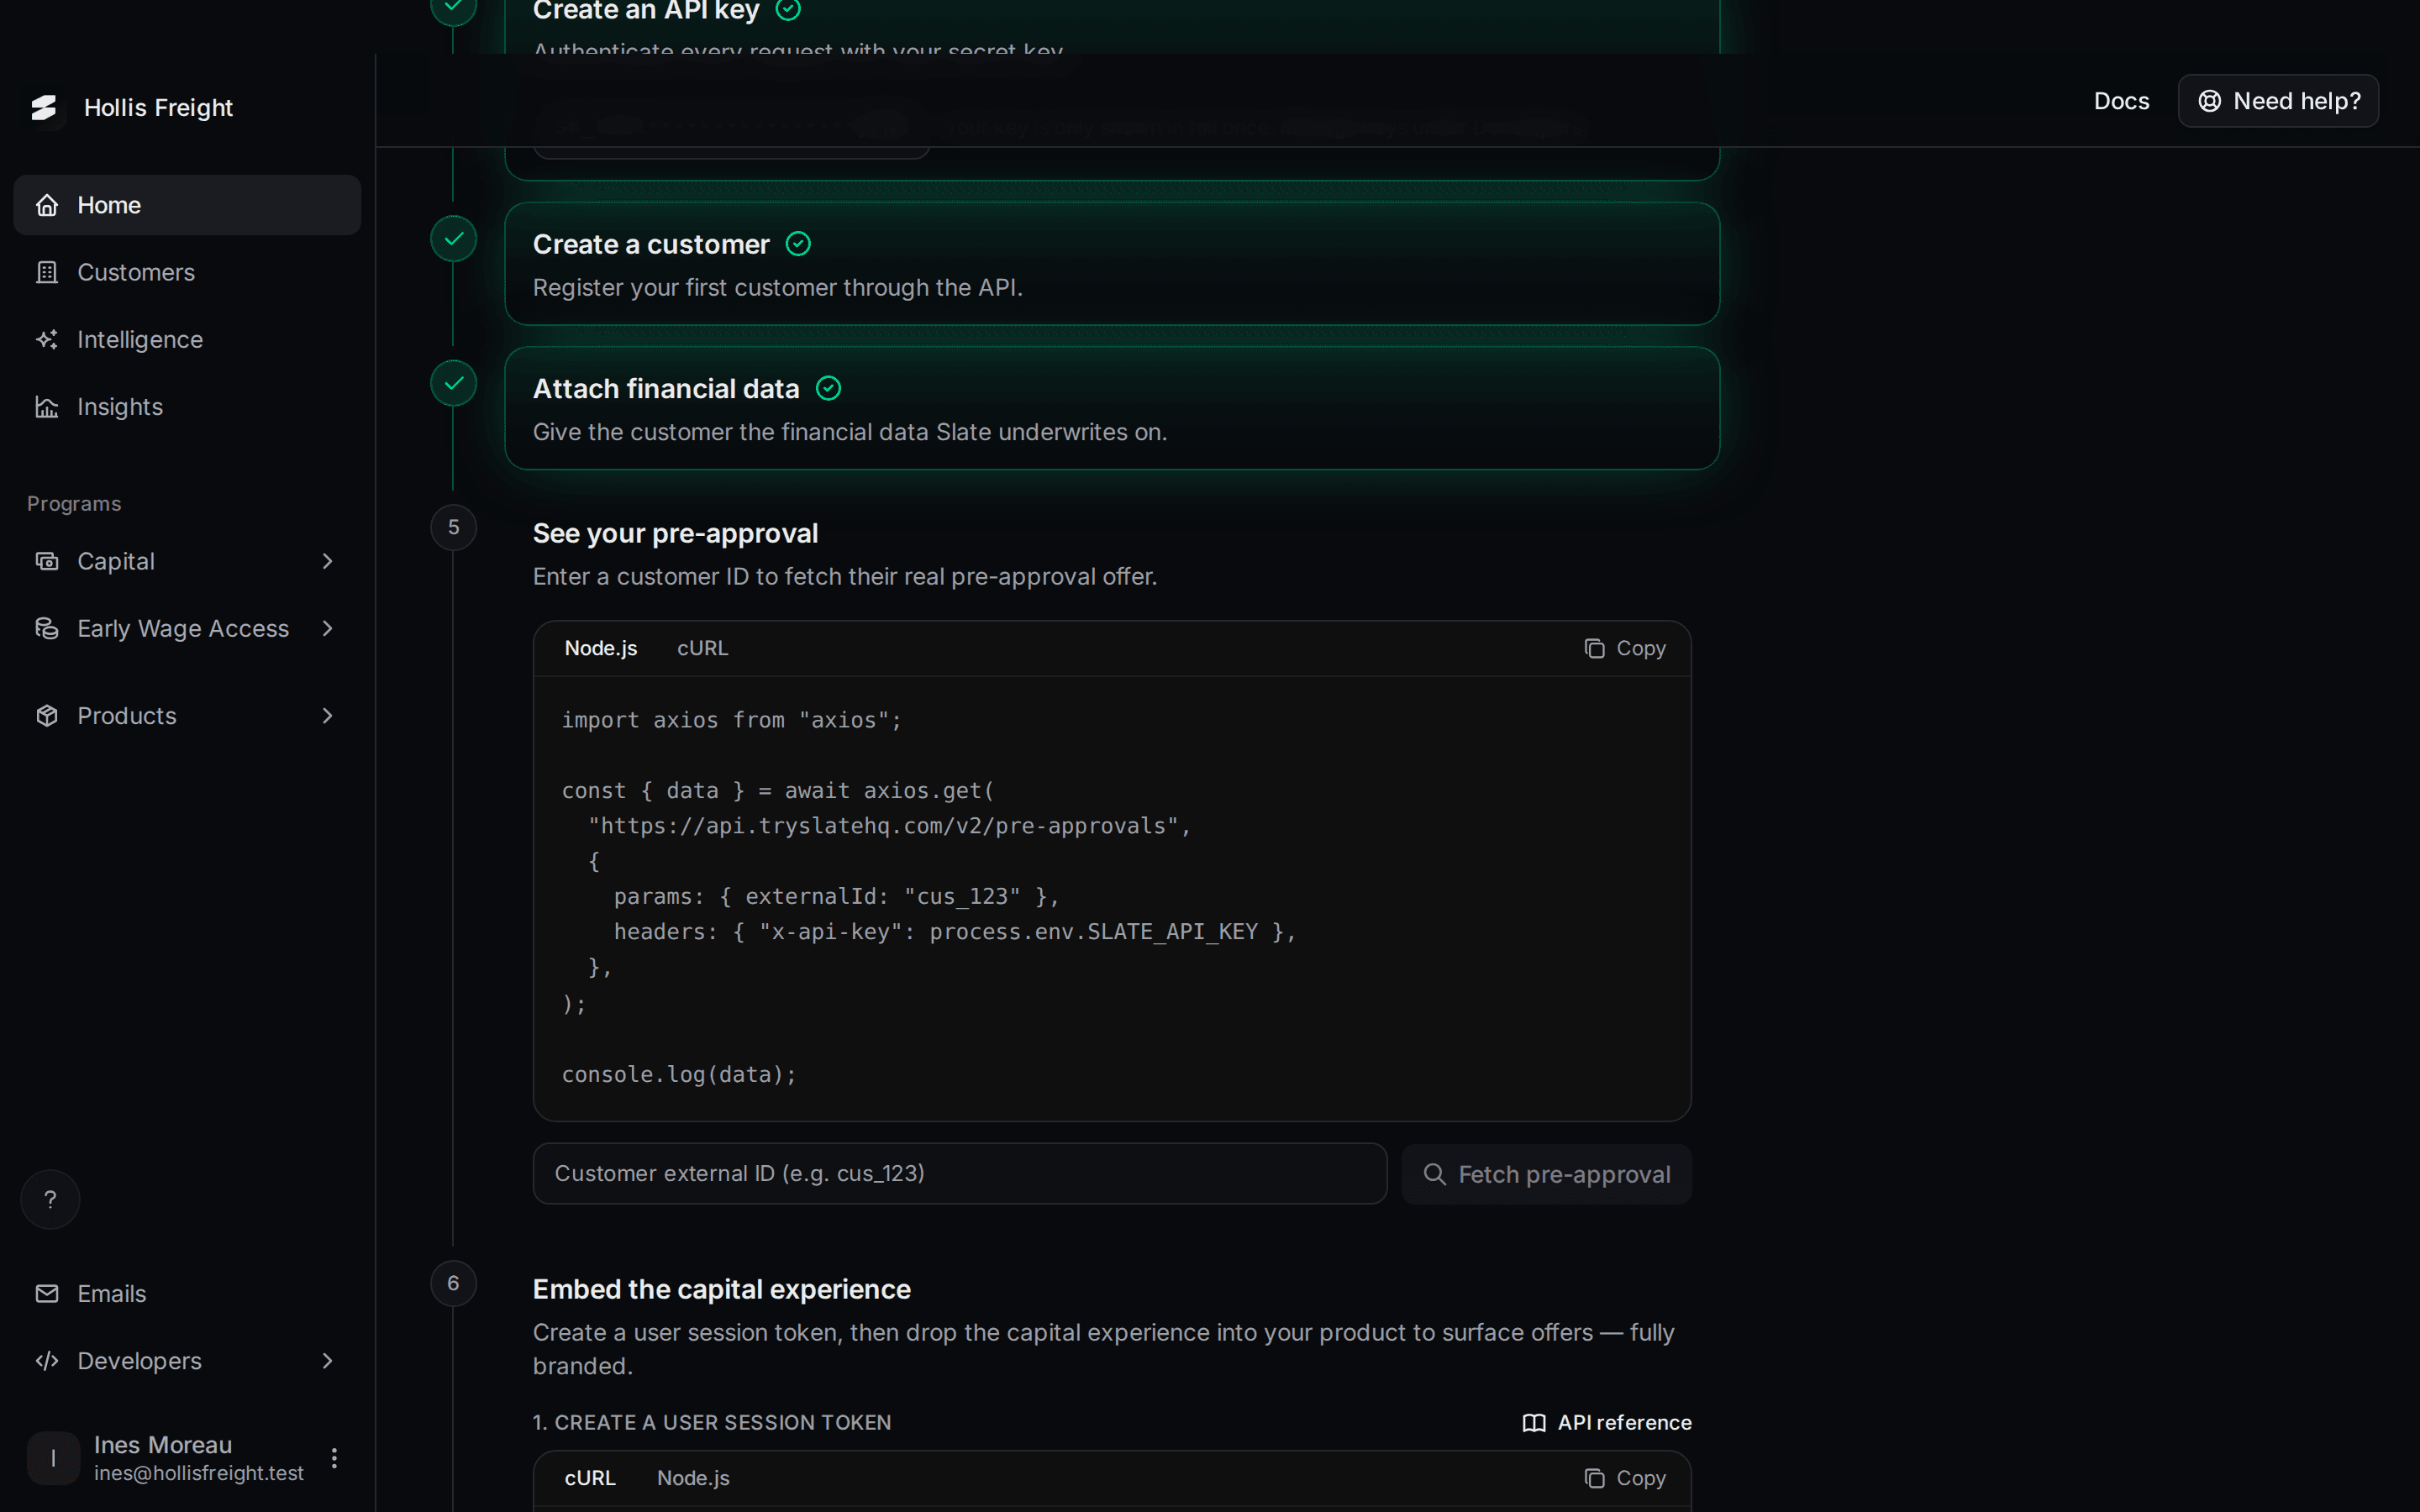
Once steps 3 and 4 are done, they look like this:
Step 5: See your pre-approval
A pre-approval is an offer Slate has approved ahead of time for a customer. Here you fetch one for real.
Type the customer's ID
Use the externalId you gave the customer in step 3, such as cus_123.
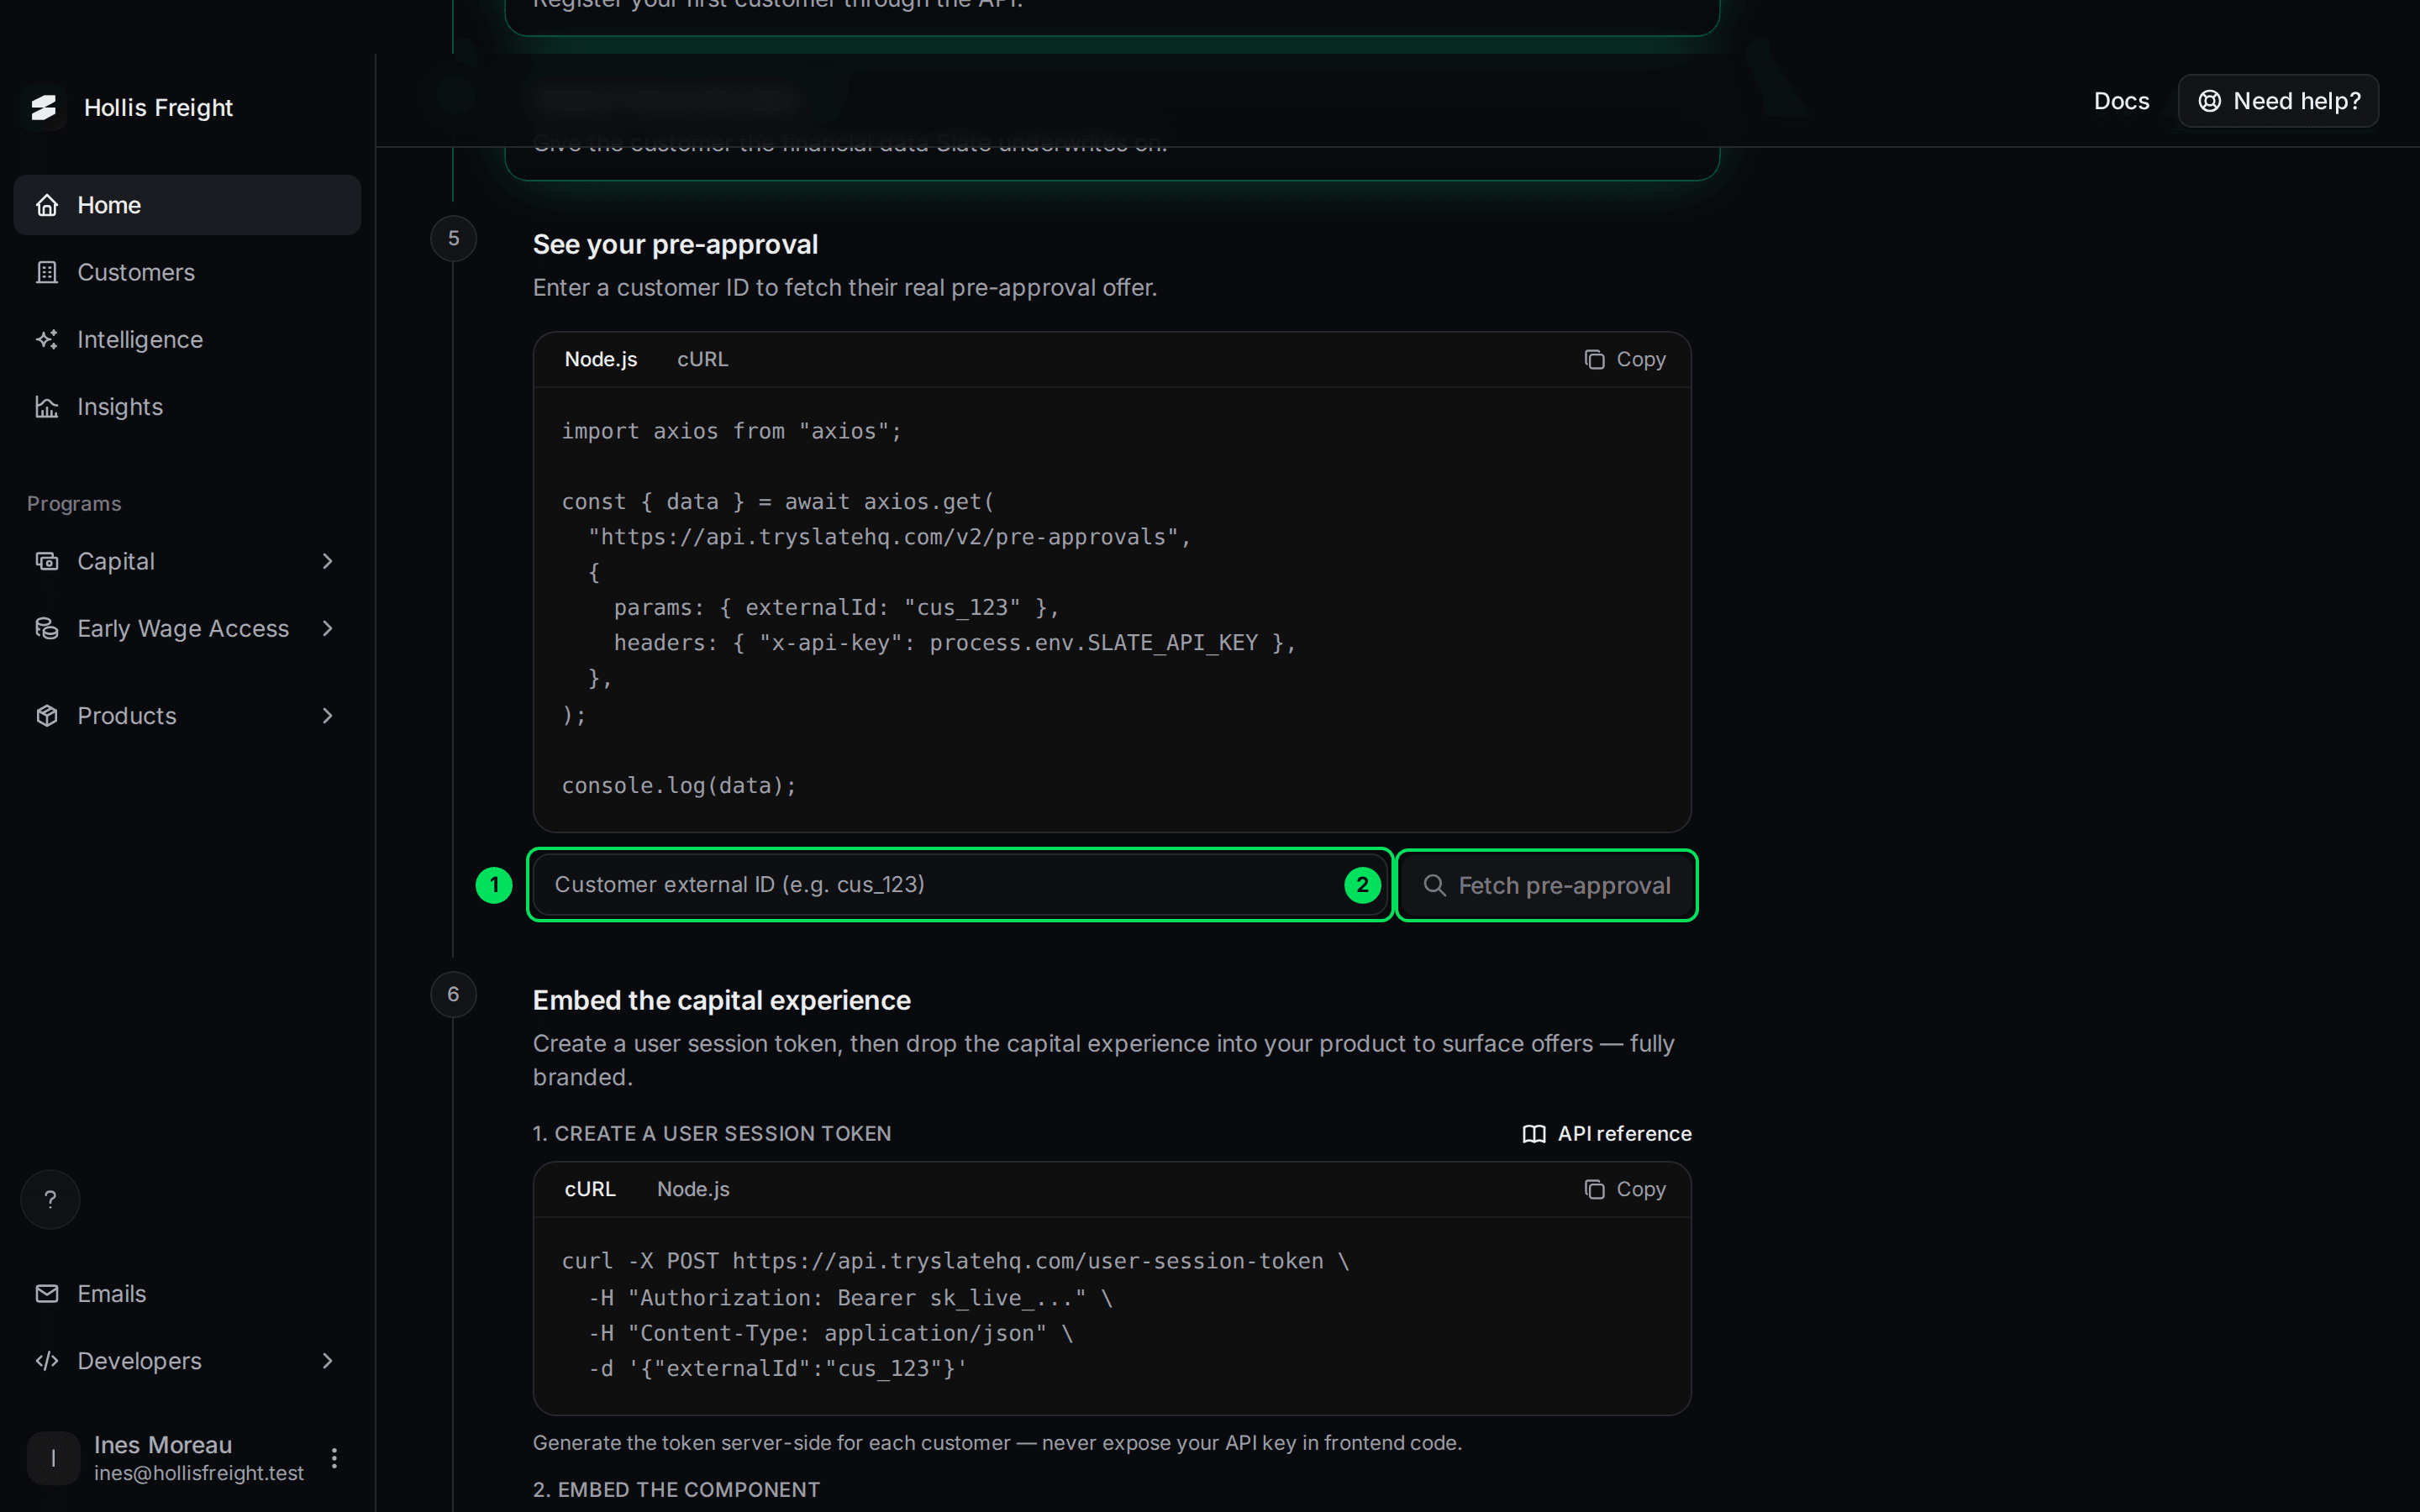
- Customer external ID: the box for your customer's ID.
- Fetch pre-approval: asks Slate for that customer's offer. It's greyed out until you type an ID.
Select Fetch pre-approval
The offer appears below as data. The step turns green.
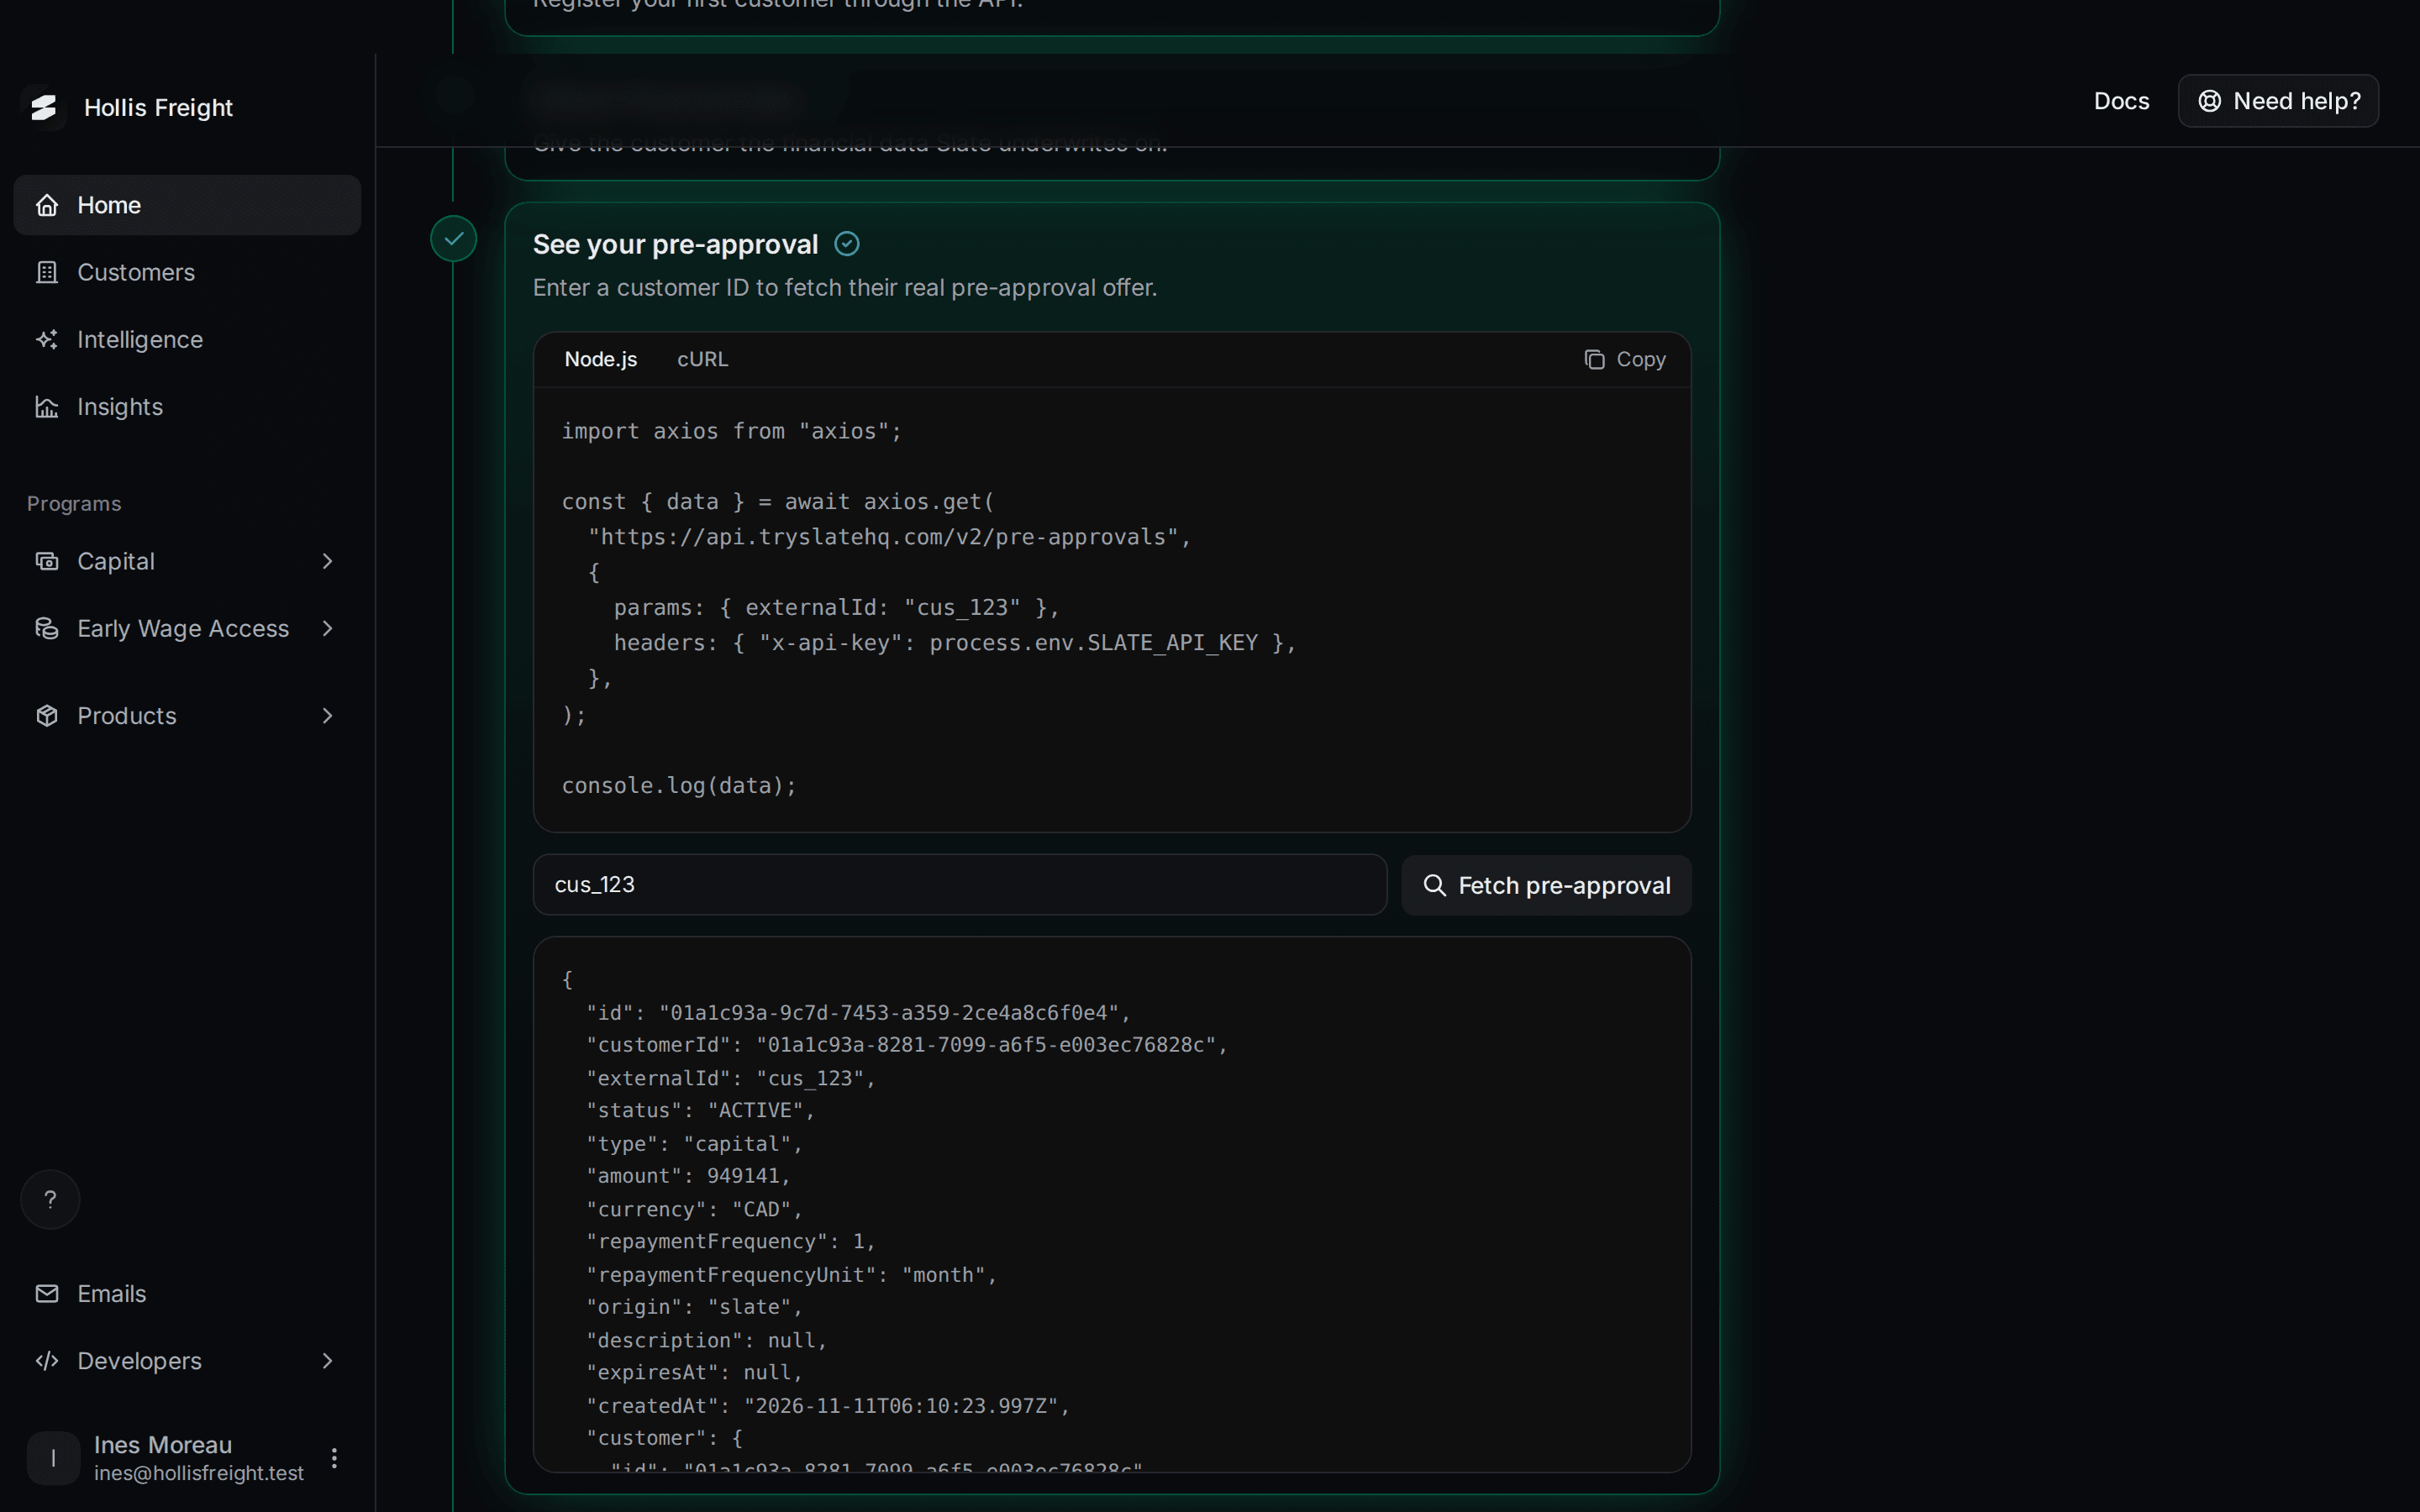
Look for "status": "ACTIVE". That means the customer can still apply. The amount is in cents, so 949141 is $9,491.41. The step stays open so you can keep reading the response.
The code samples above the box call the live address. The Fetch button runs in your sandbox for you.
You can also read your offers on the Offers page. Slate creates offers. Partners can't create them through the API.
Step 6: Embed the capital experience
Embedding means putting Slate's screens inside your own product, so your customers see offers without leaving it. This step shows the two bits of code your developer needs.
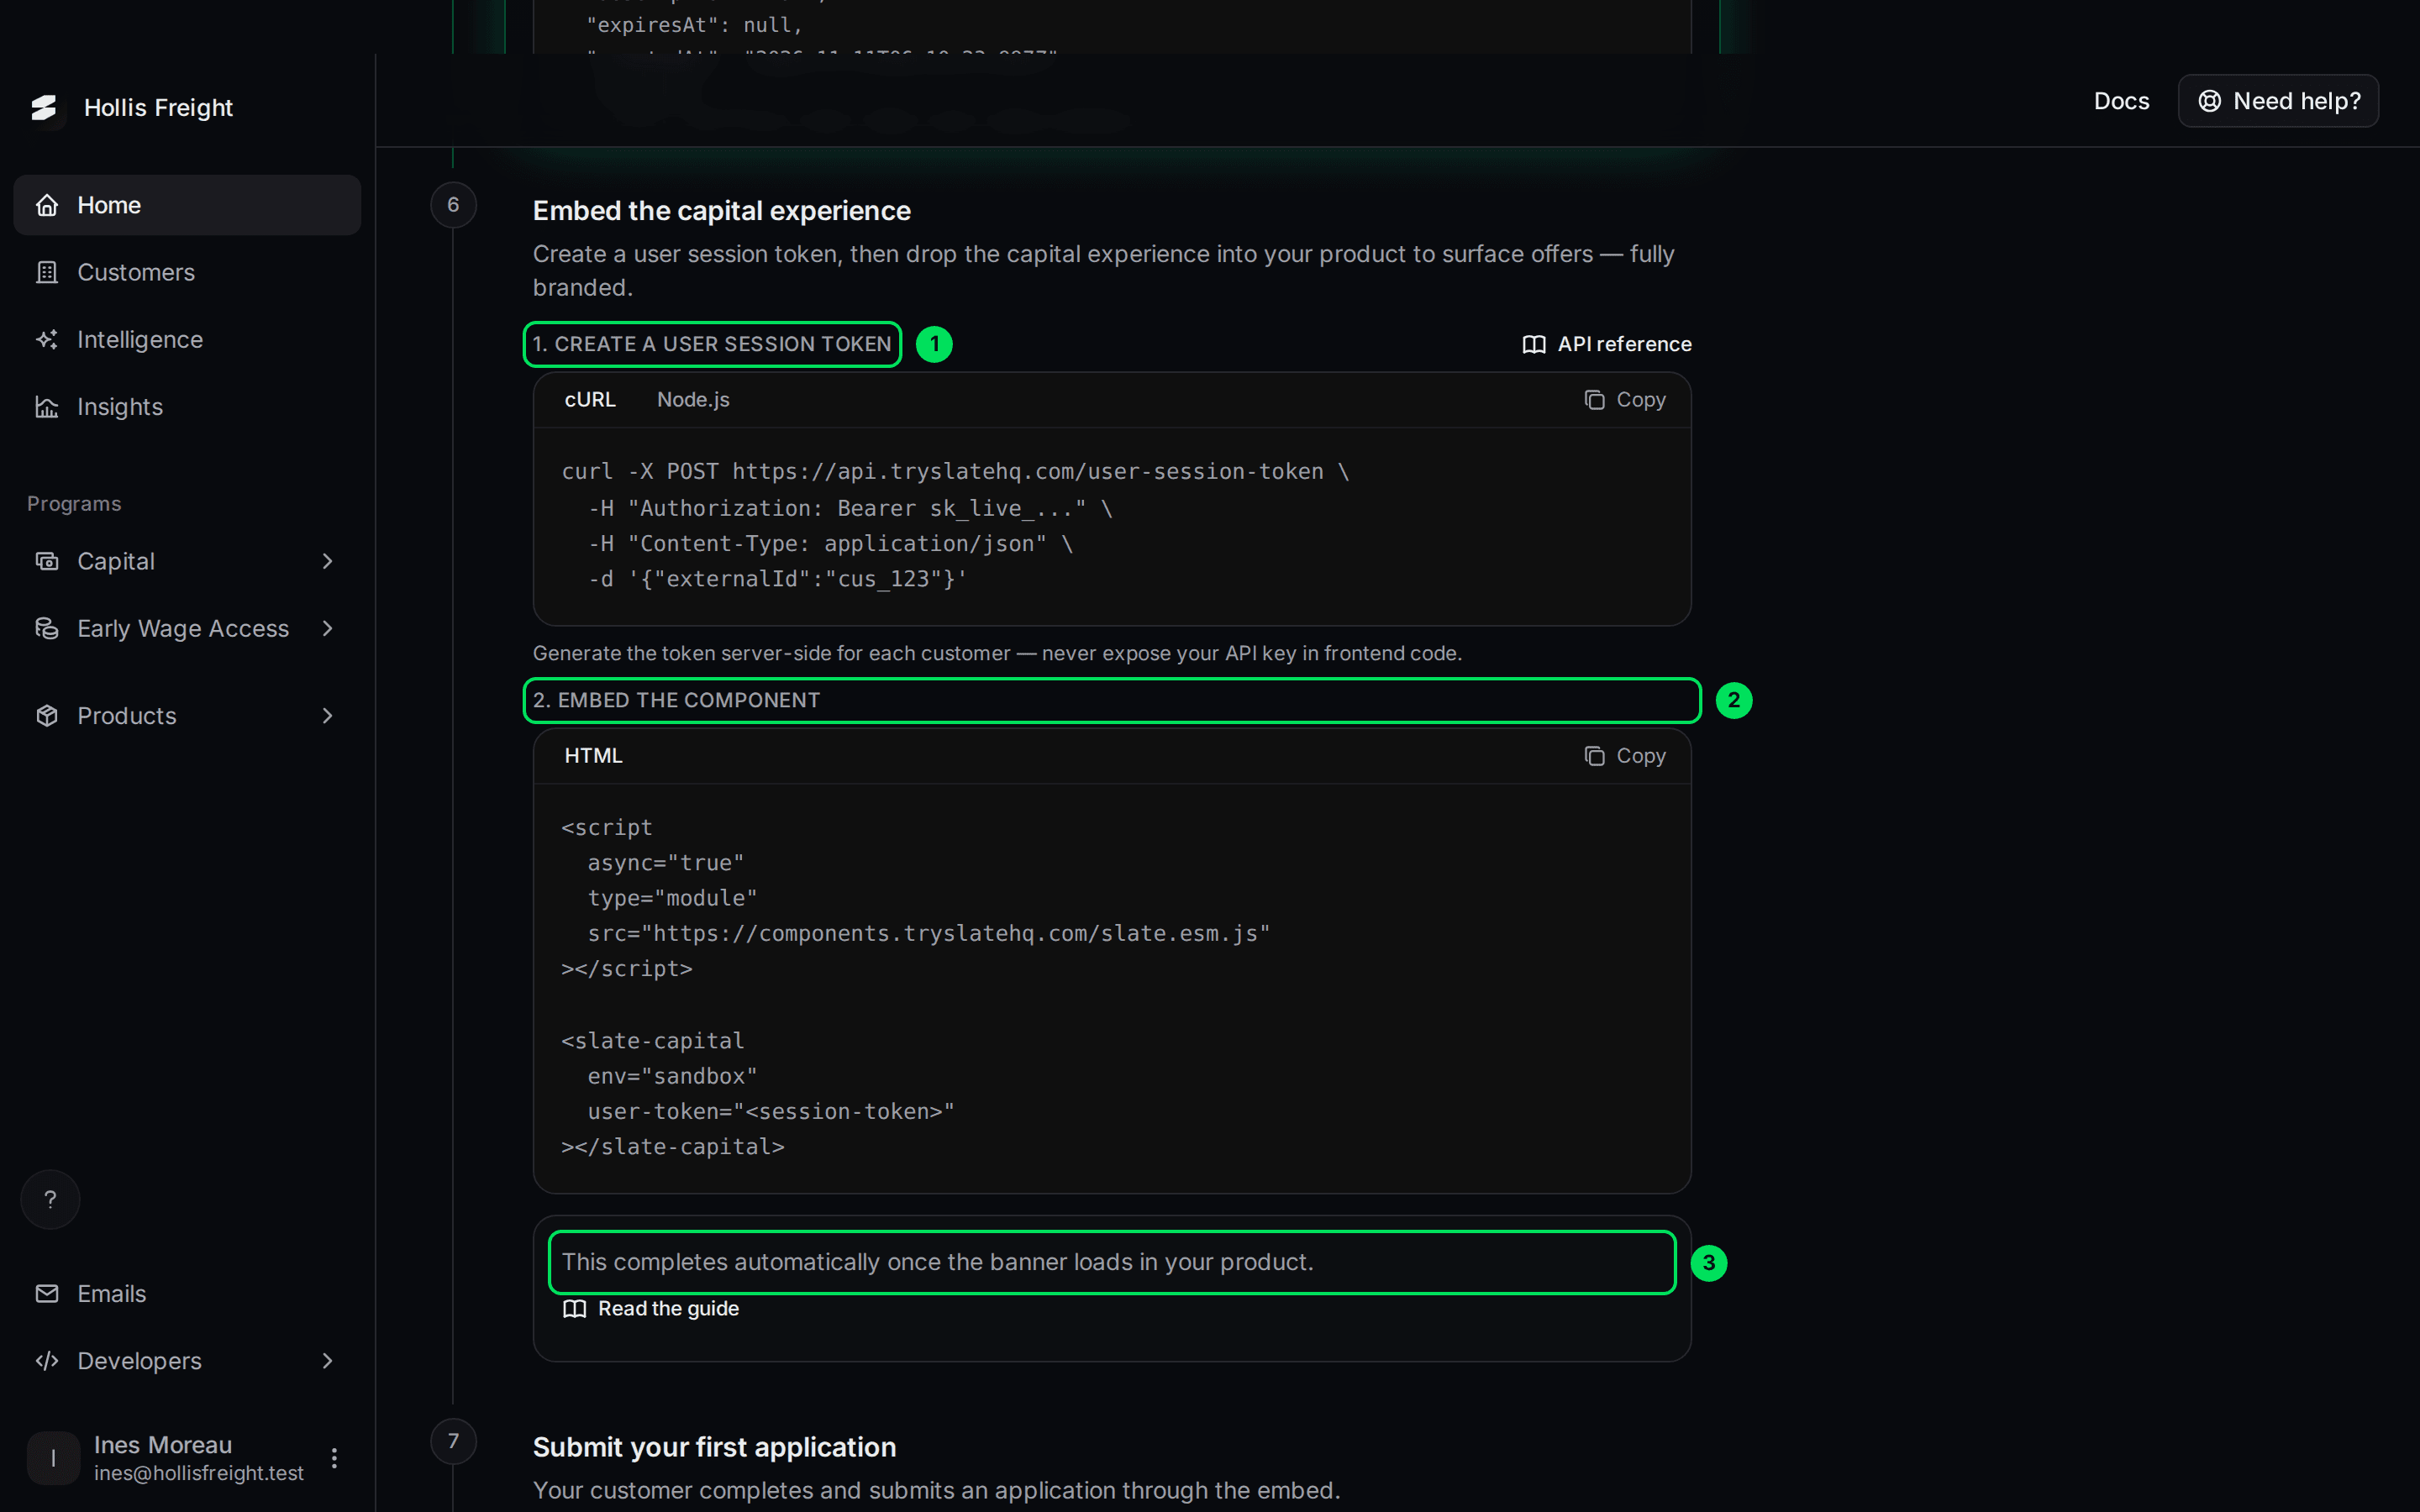
- Create a user session token: your server asks Slate for a short-lived pass for one customer. The customer's browser uses it, so your API key never reaches the browser.
- Embed the component: the HTML you add to your page. It loads Slate's screens.
- This completes automatically…: it ticks when the screen loads in your product.
For the full guide, see Embed Slate in your product.
Step 7: Submit your first application
When your customer accepts an offer, they fill in an application. This step ticks on its own the first time an application is submitted through your embed.
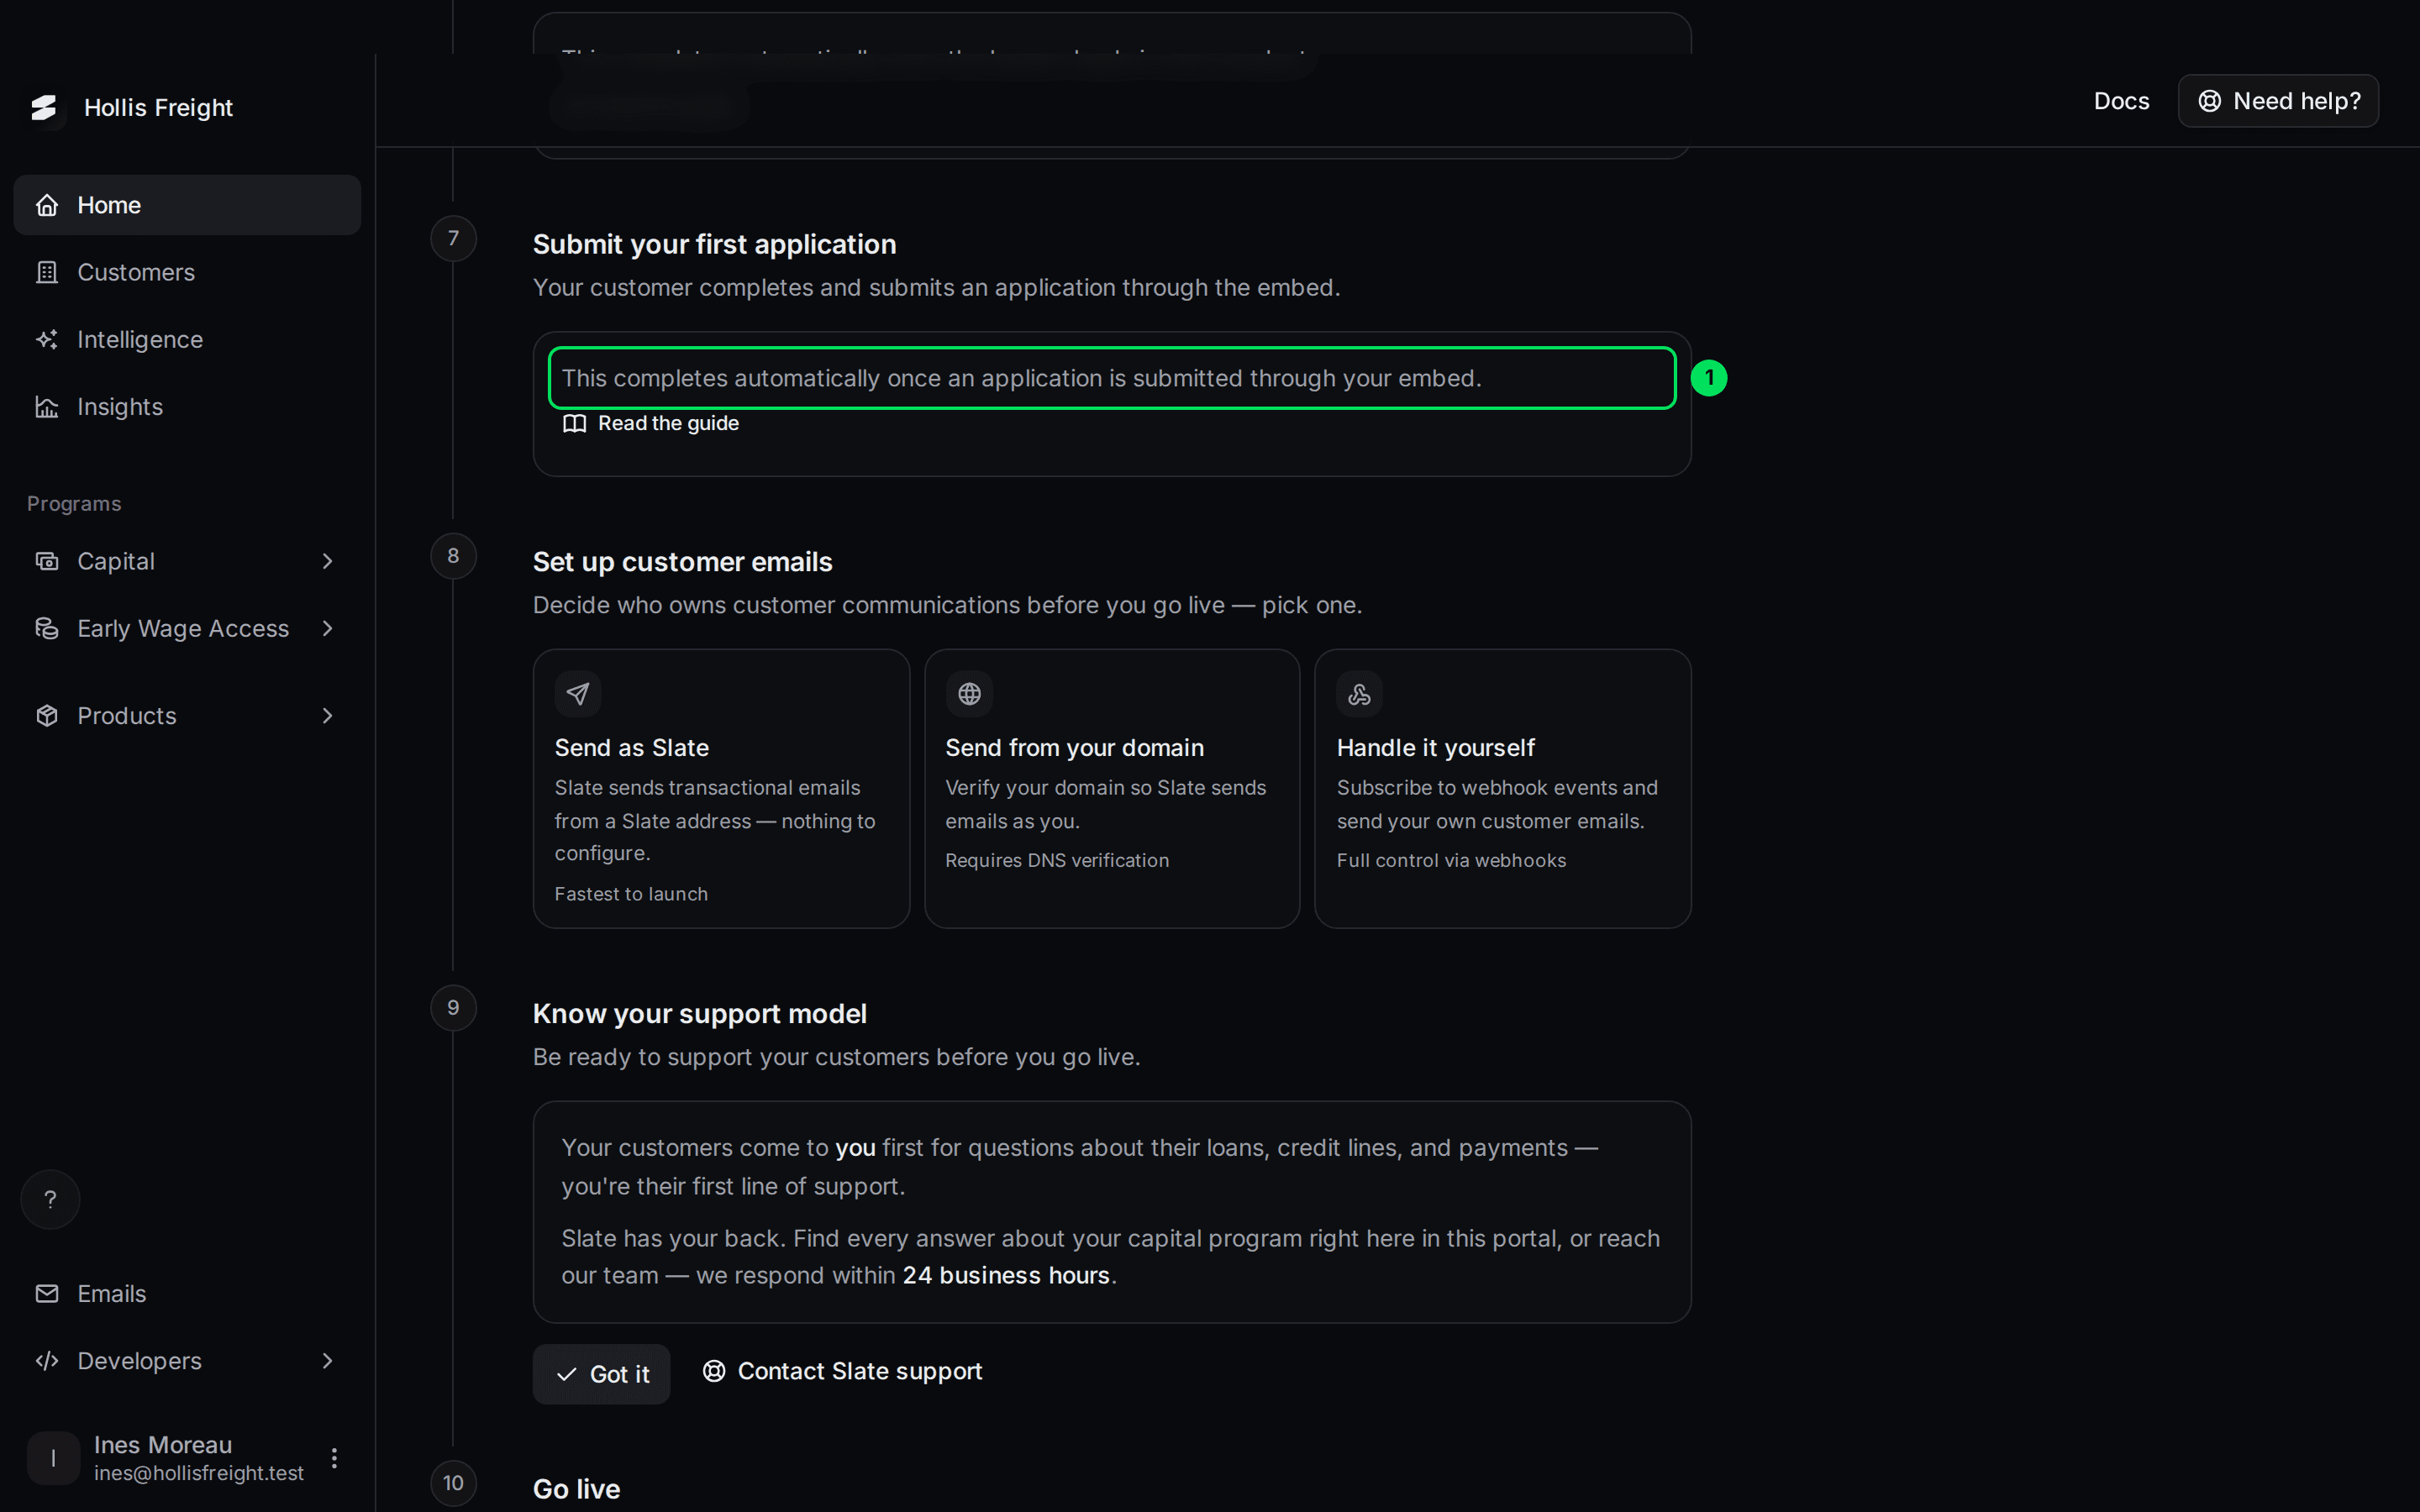
- This completes automatically…: nothing to click. Submit a test application as one of your test customers.
To try it yourself, open the embed for a test customer and finish the application. The sandbox has buttons that let you skip slow steps, such as Skip (Sandbox). See Applicant overview.
Step 8: Set up customer emails
Decide who sends emails to your customers, such as "You have an offer" and "Sign your agreement". Pick one option.
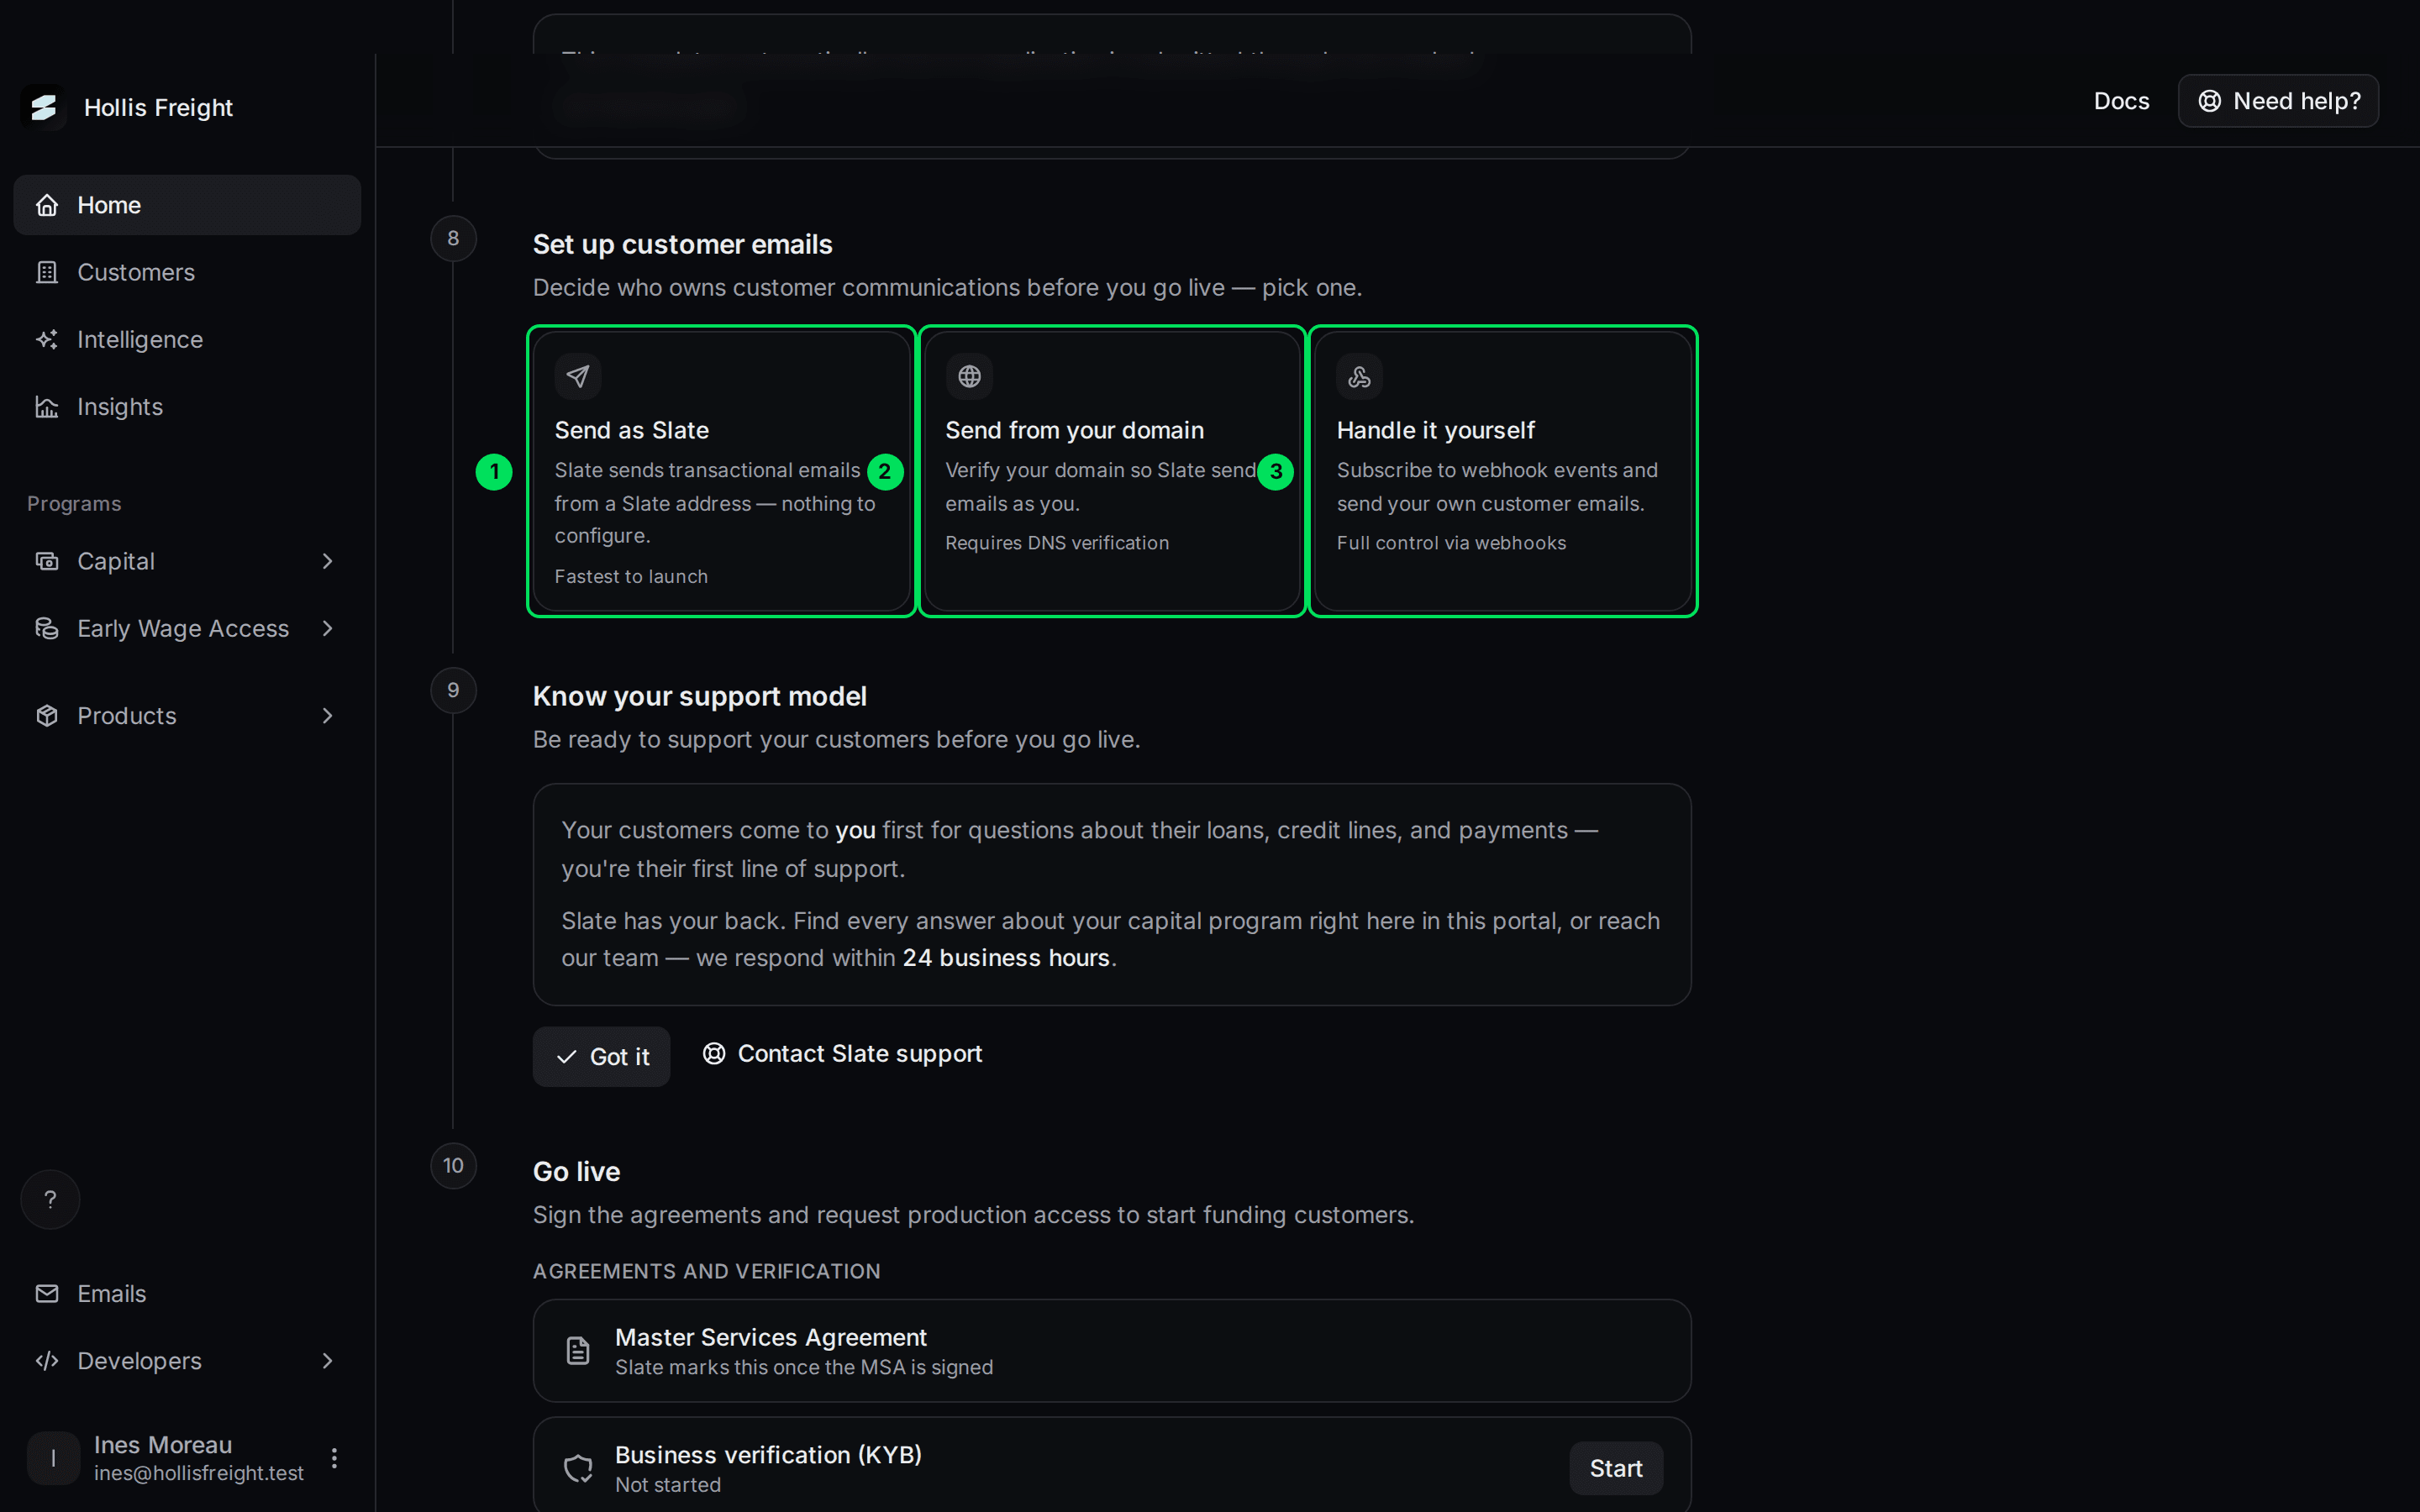
- Send as Slate: Slate sends emails from a Slate address. Nothing to set up. It's the fastest to launch.
- Send from your domain: emails come from your own address. You prove you own the domain with DNS records.
- Handle it yourself: Slate sends nothing. You listen for webhooks and send your own emails.
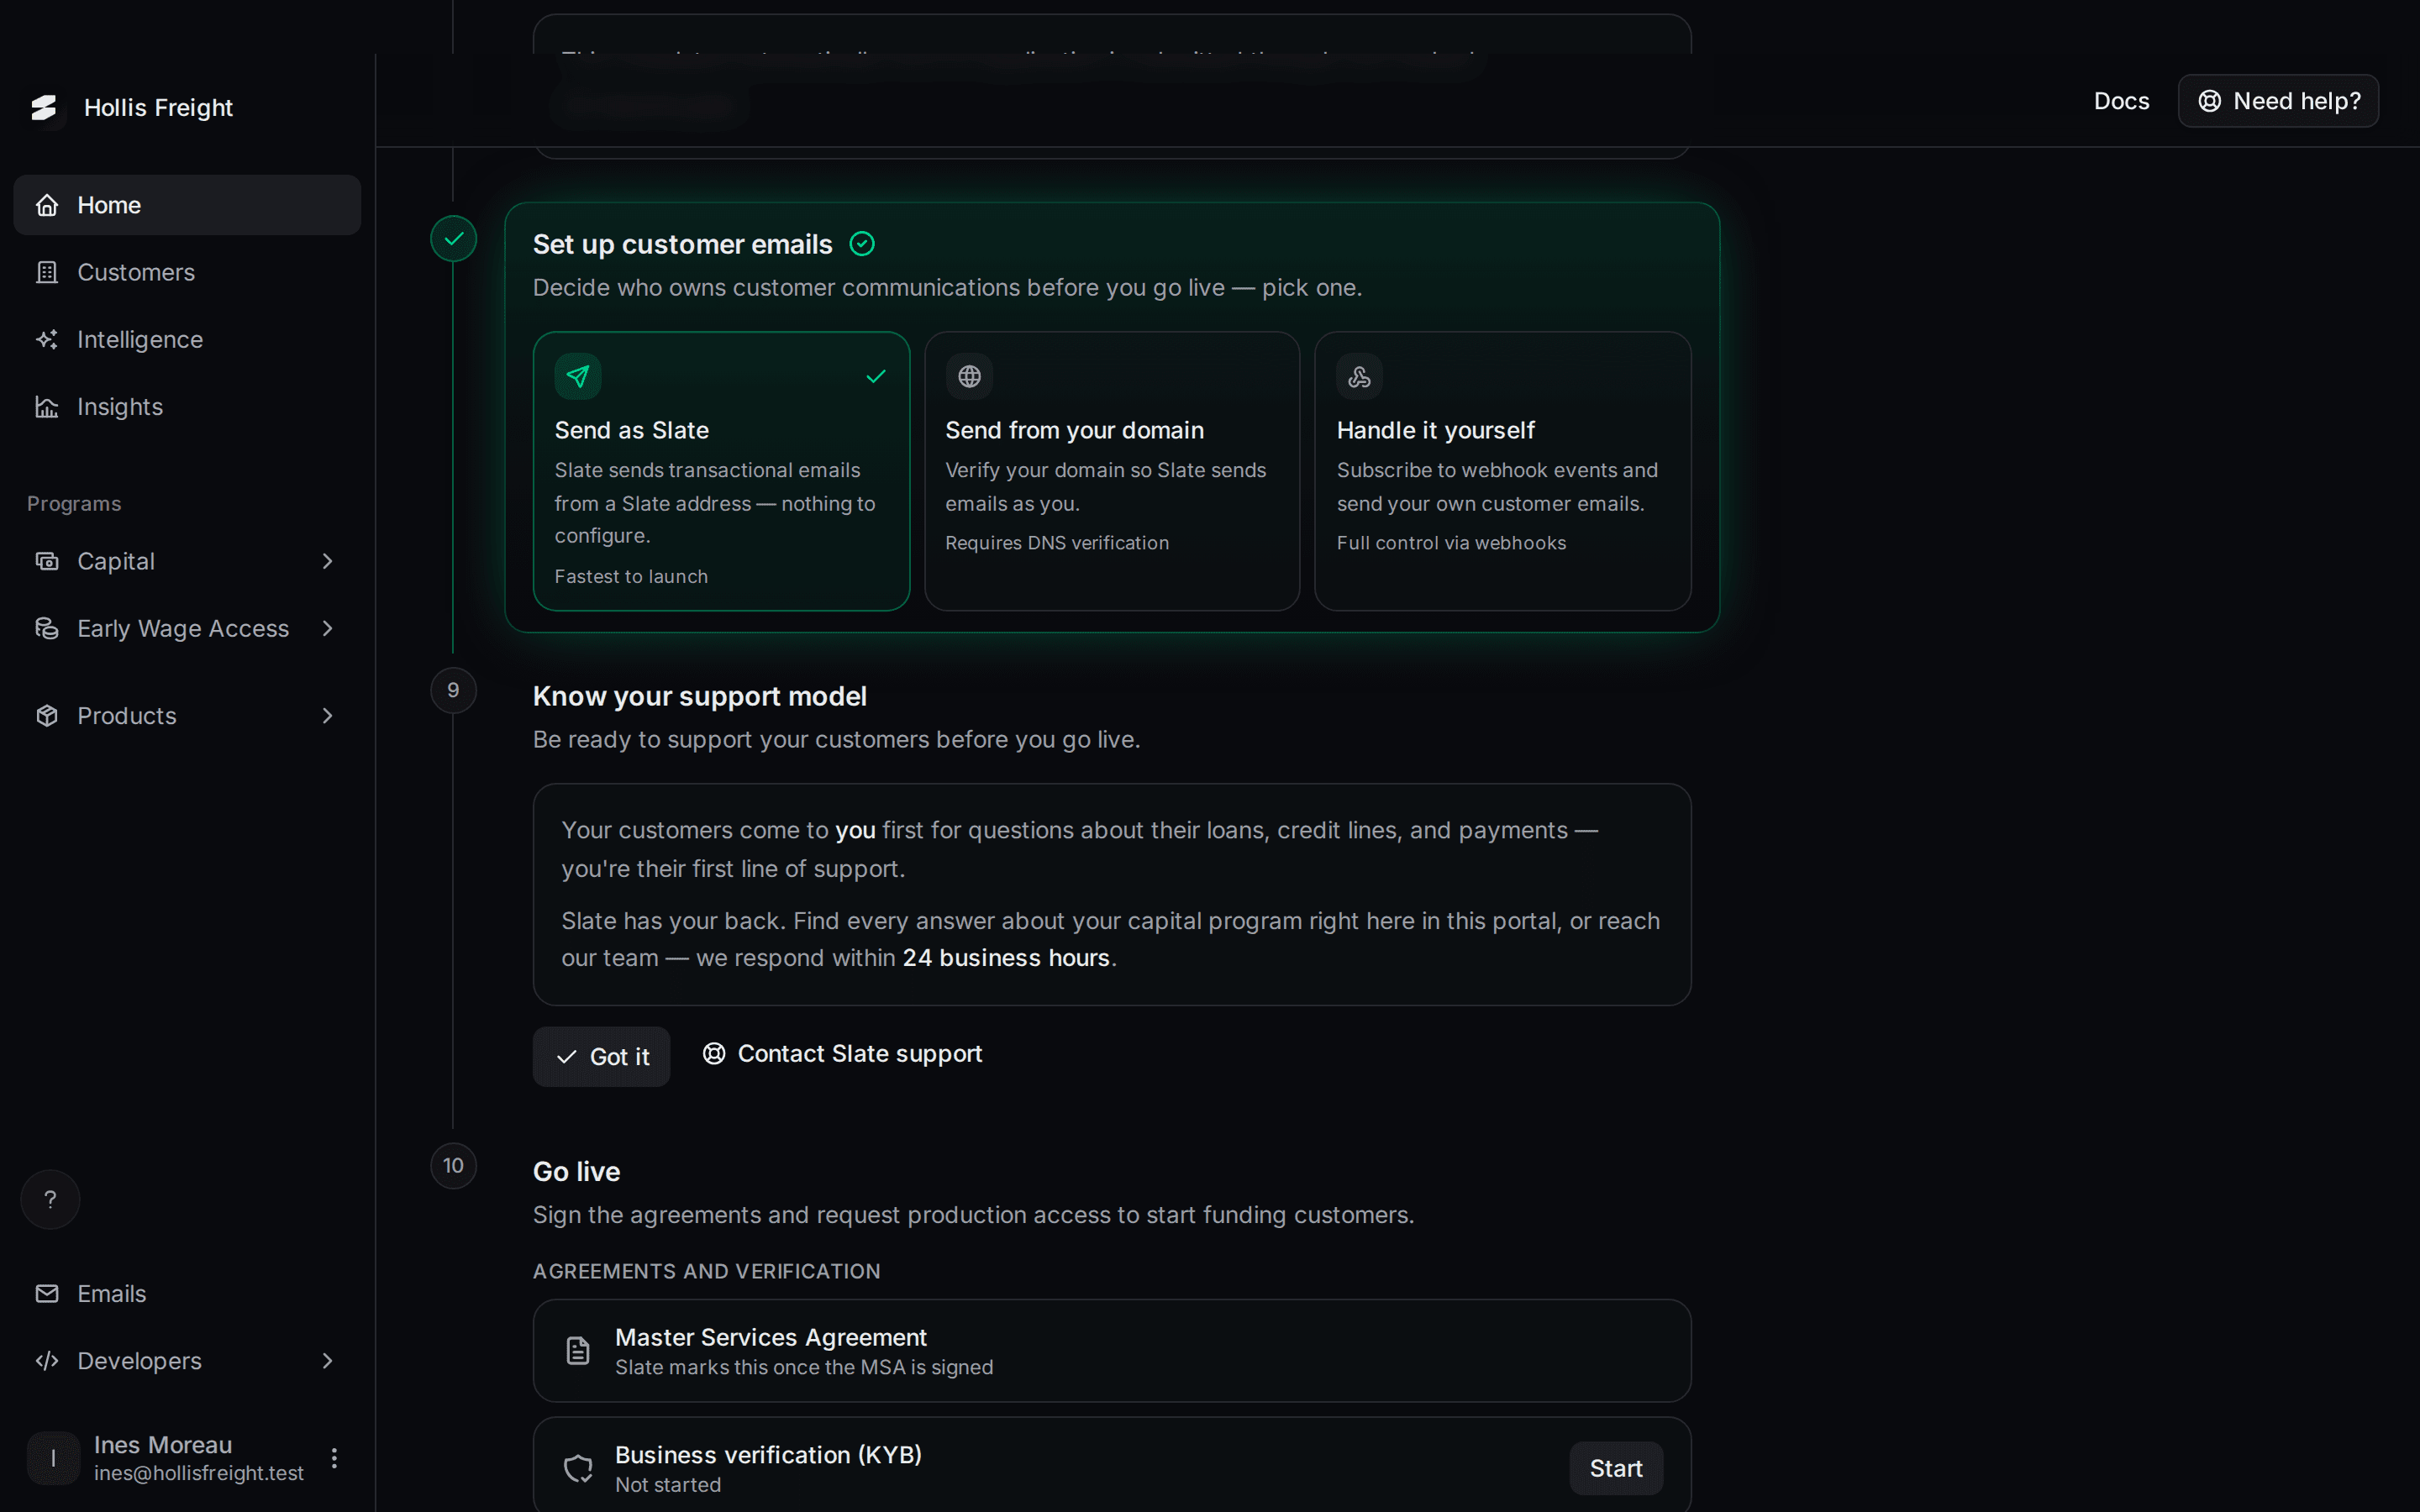
Select a tile
Send as Slate and Handle it yourself are saved straight away. You'll see "Customer emails will be sent as Slate" or "You'll send customer emails via webhooks".
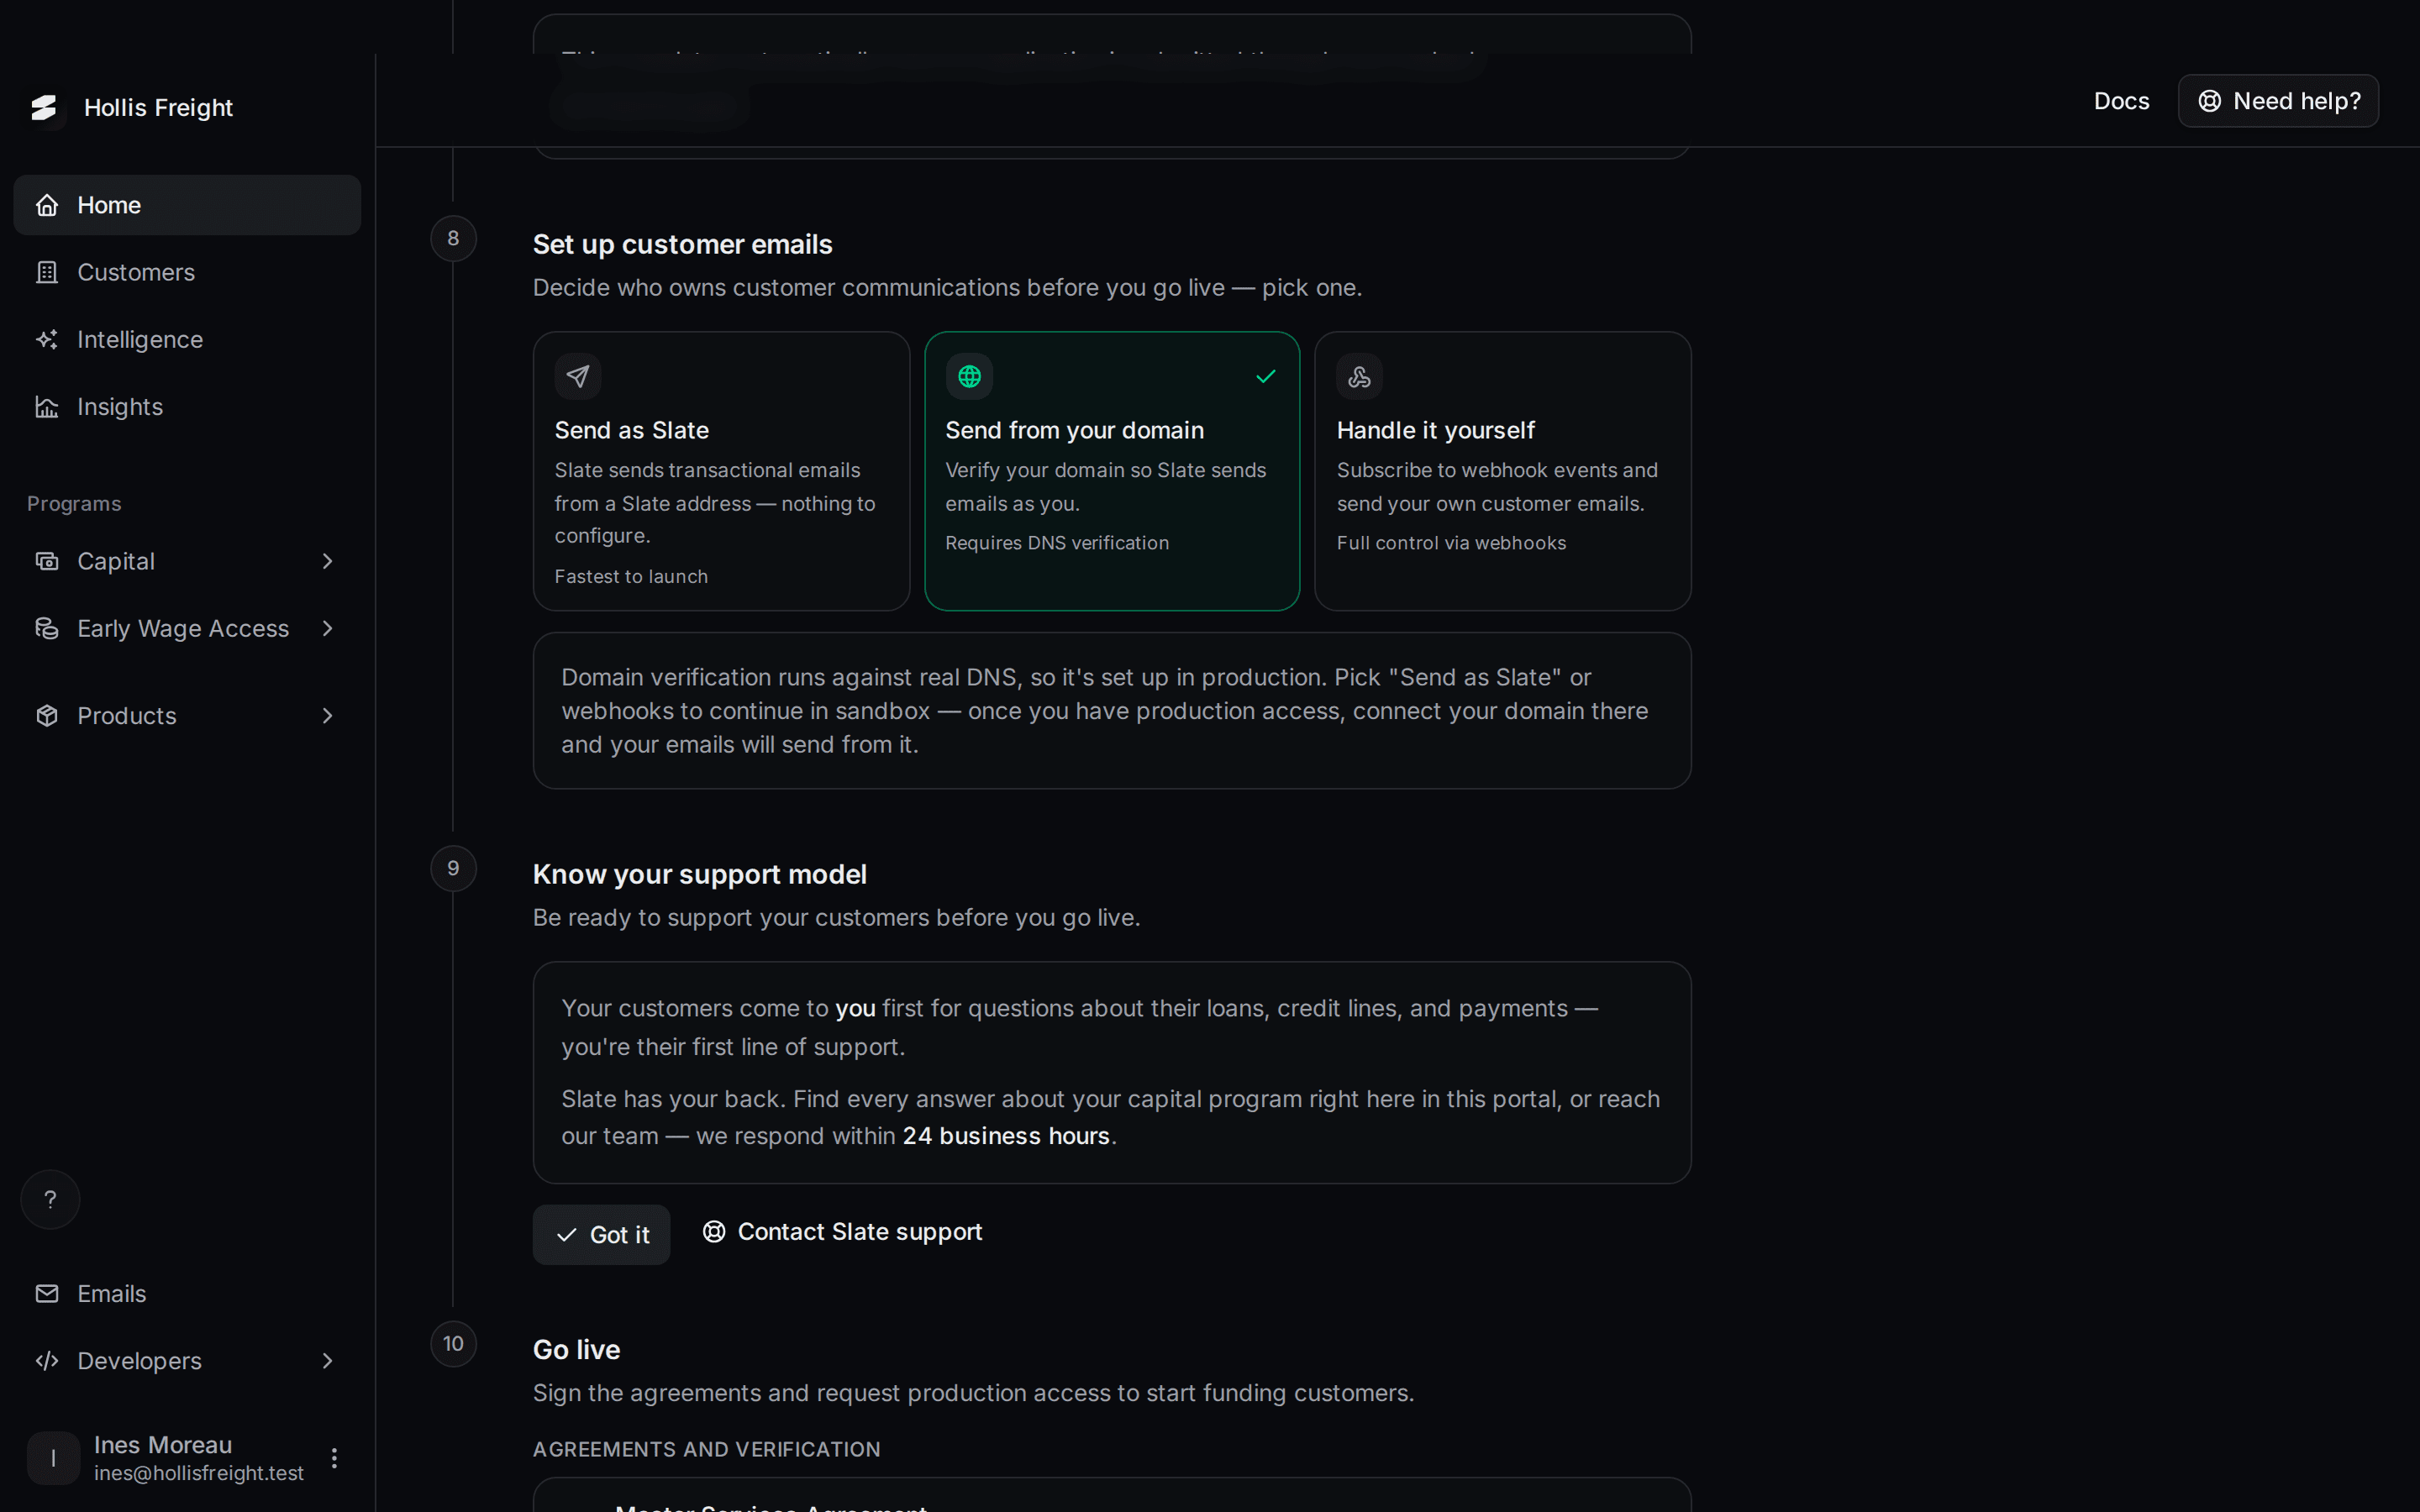
Or pick Send from your domain, in live
In the sandbox this tile doesn't work. It shows a note that domain checks use real DNS, so you set it up in live. Pick one of the other two to carry on.
You can change your mind later. See Customer emails and Email domain.
Step 9: Know your support model
Your customers contact you first about their financing and payments. Slate backs you up. We answer within 24 business hours.
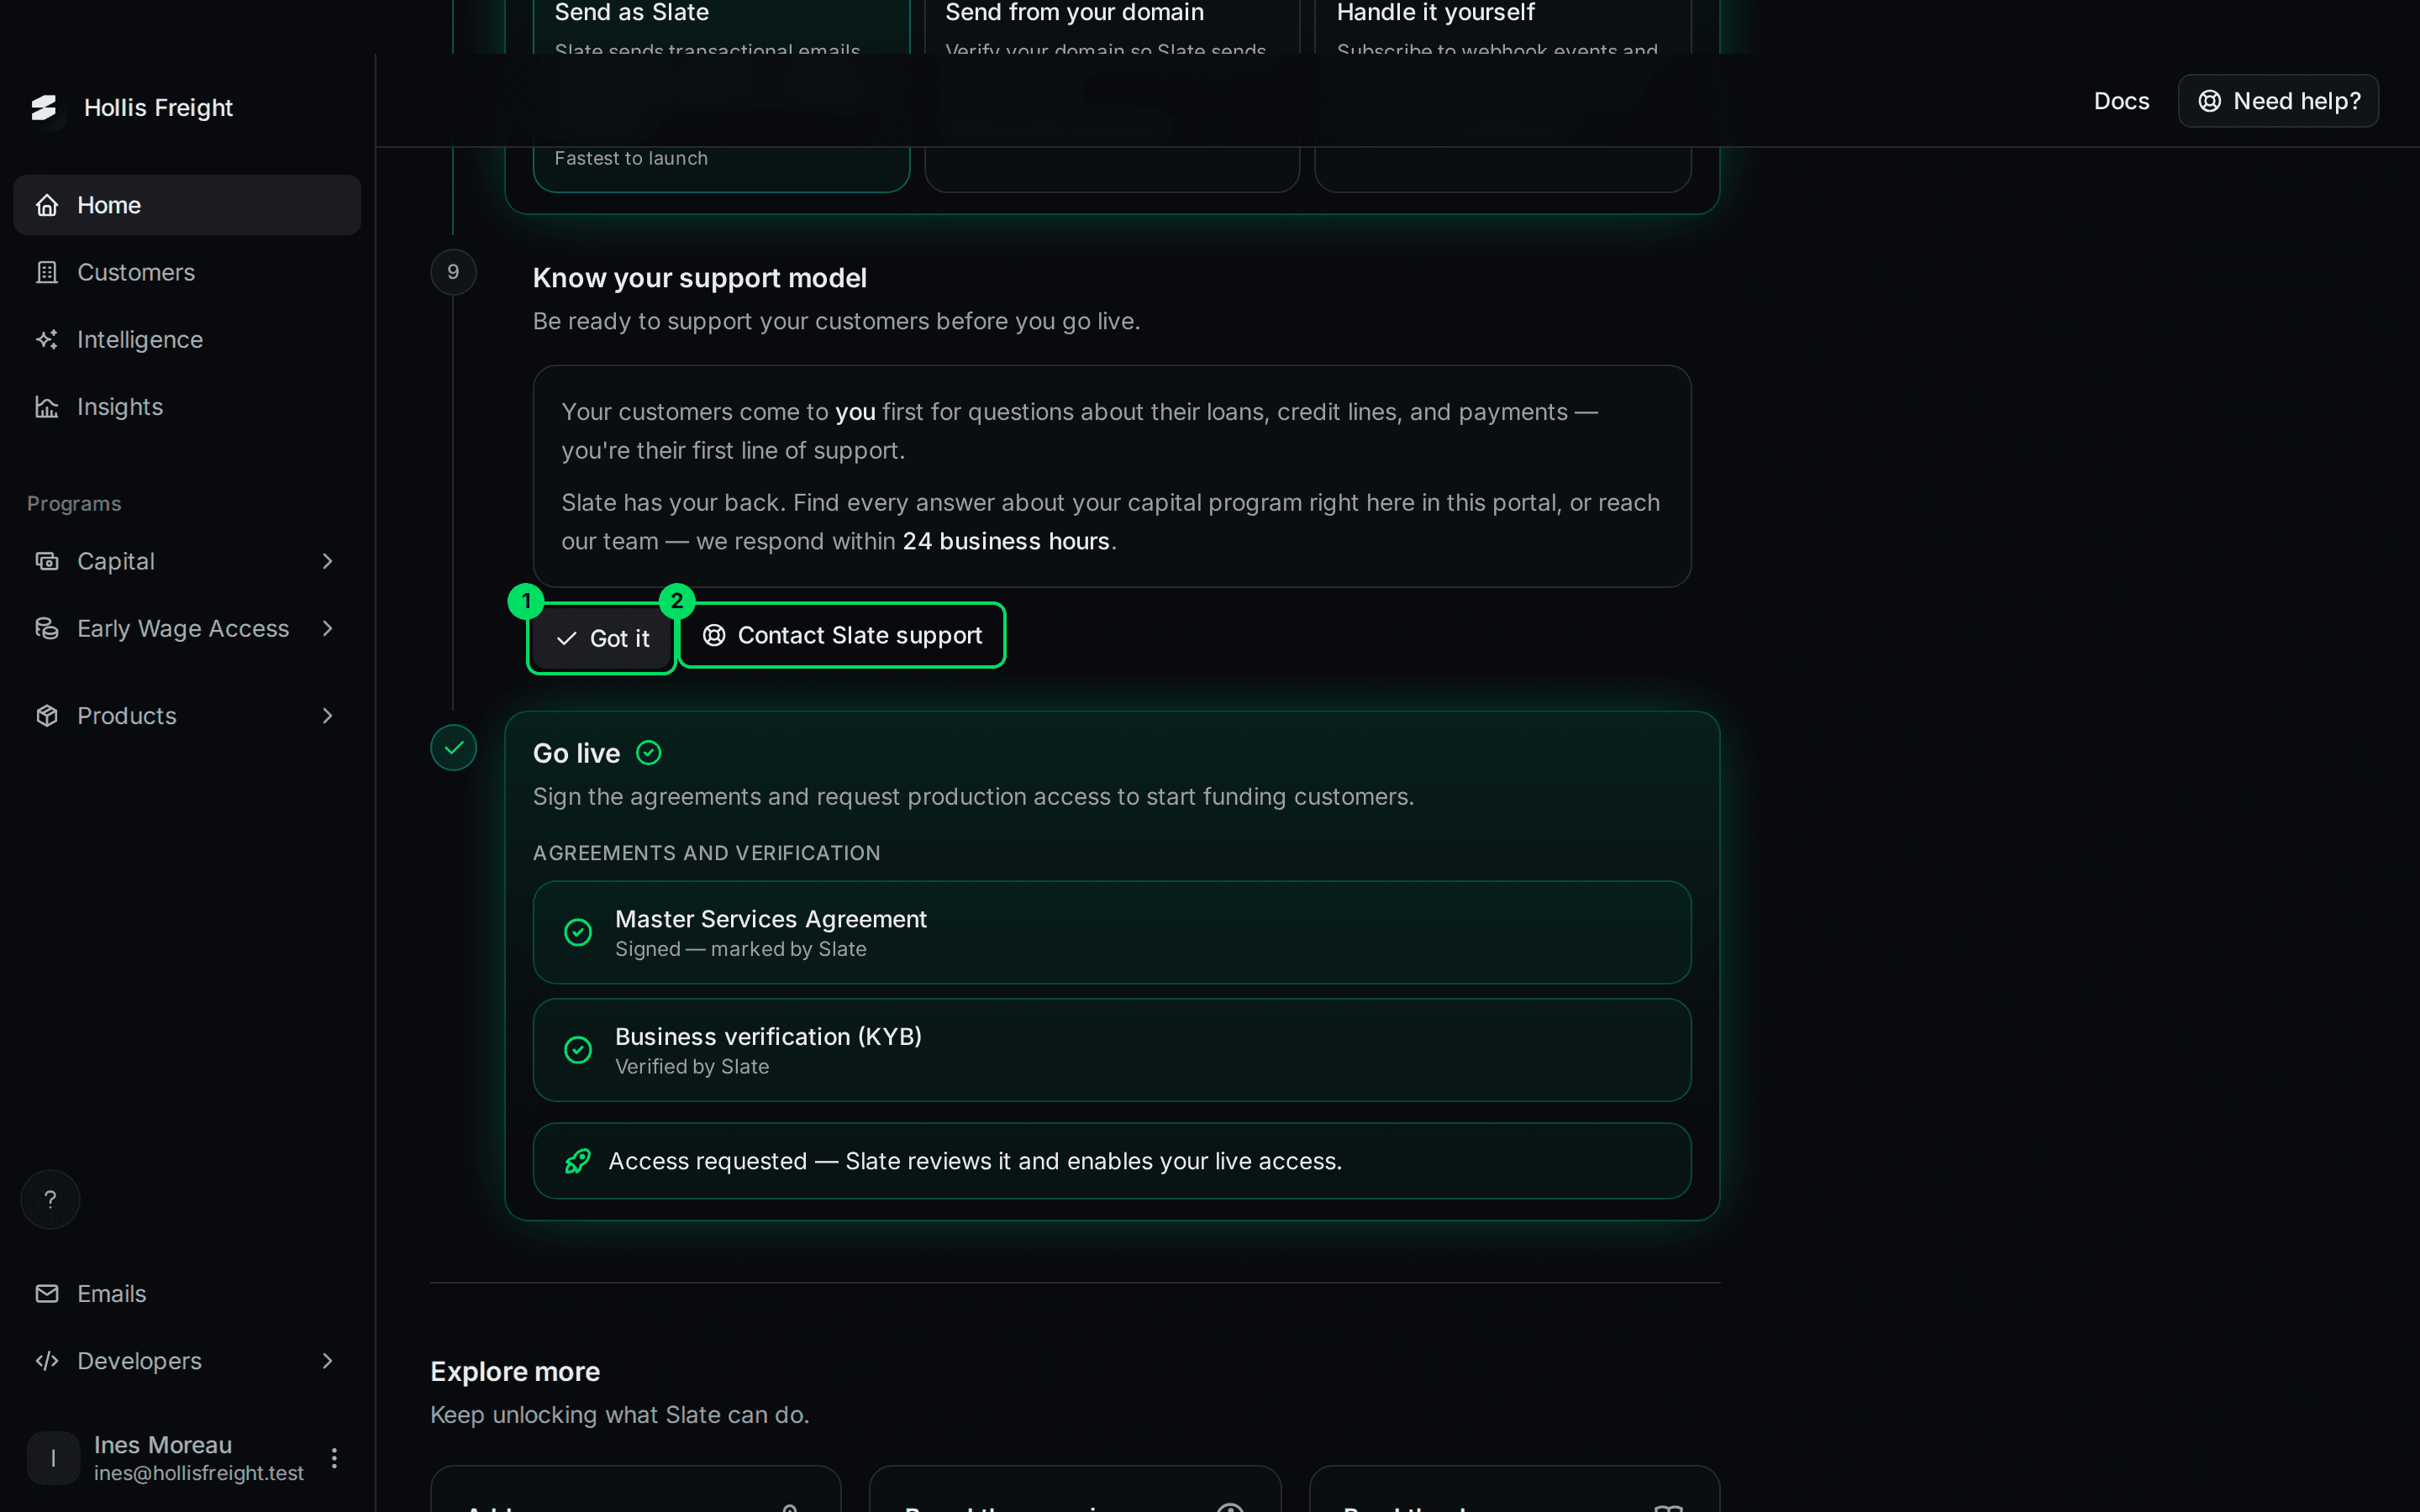
- Got it: confirms you've read it. You'll see "Support model confirmed".
- Contact Slate support: opens an email to Slate.
Step 10: Go live
The last step is where you sign the agreements and ask for live access. It has its own page: Go live. In short:
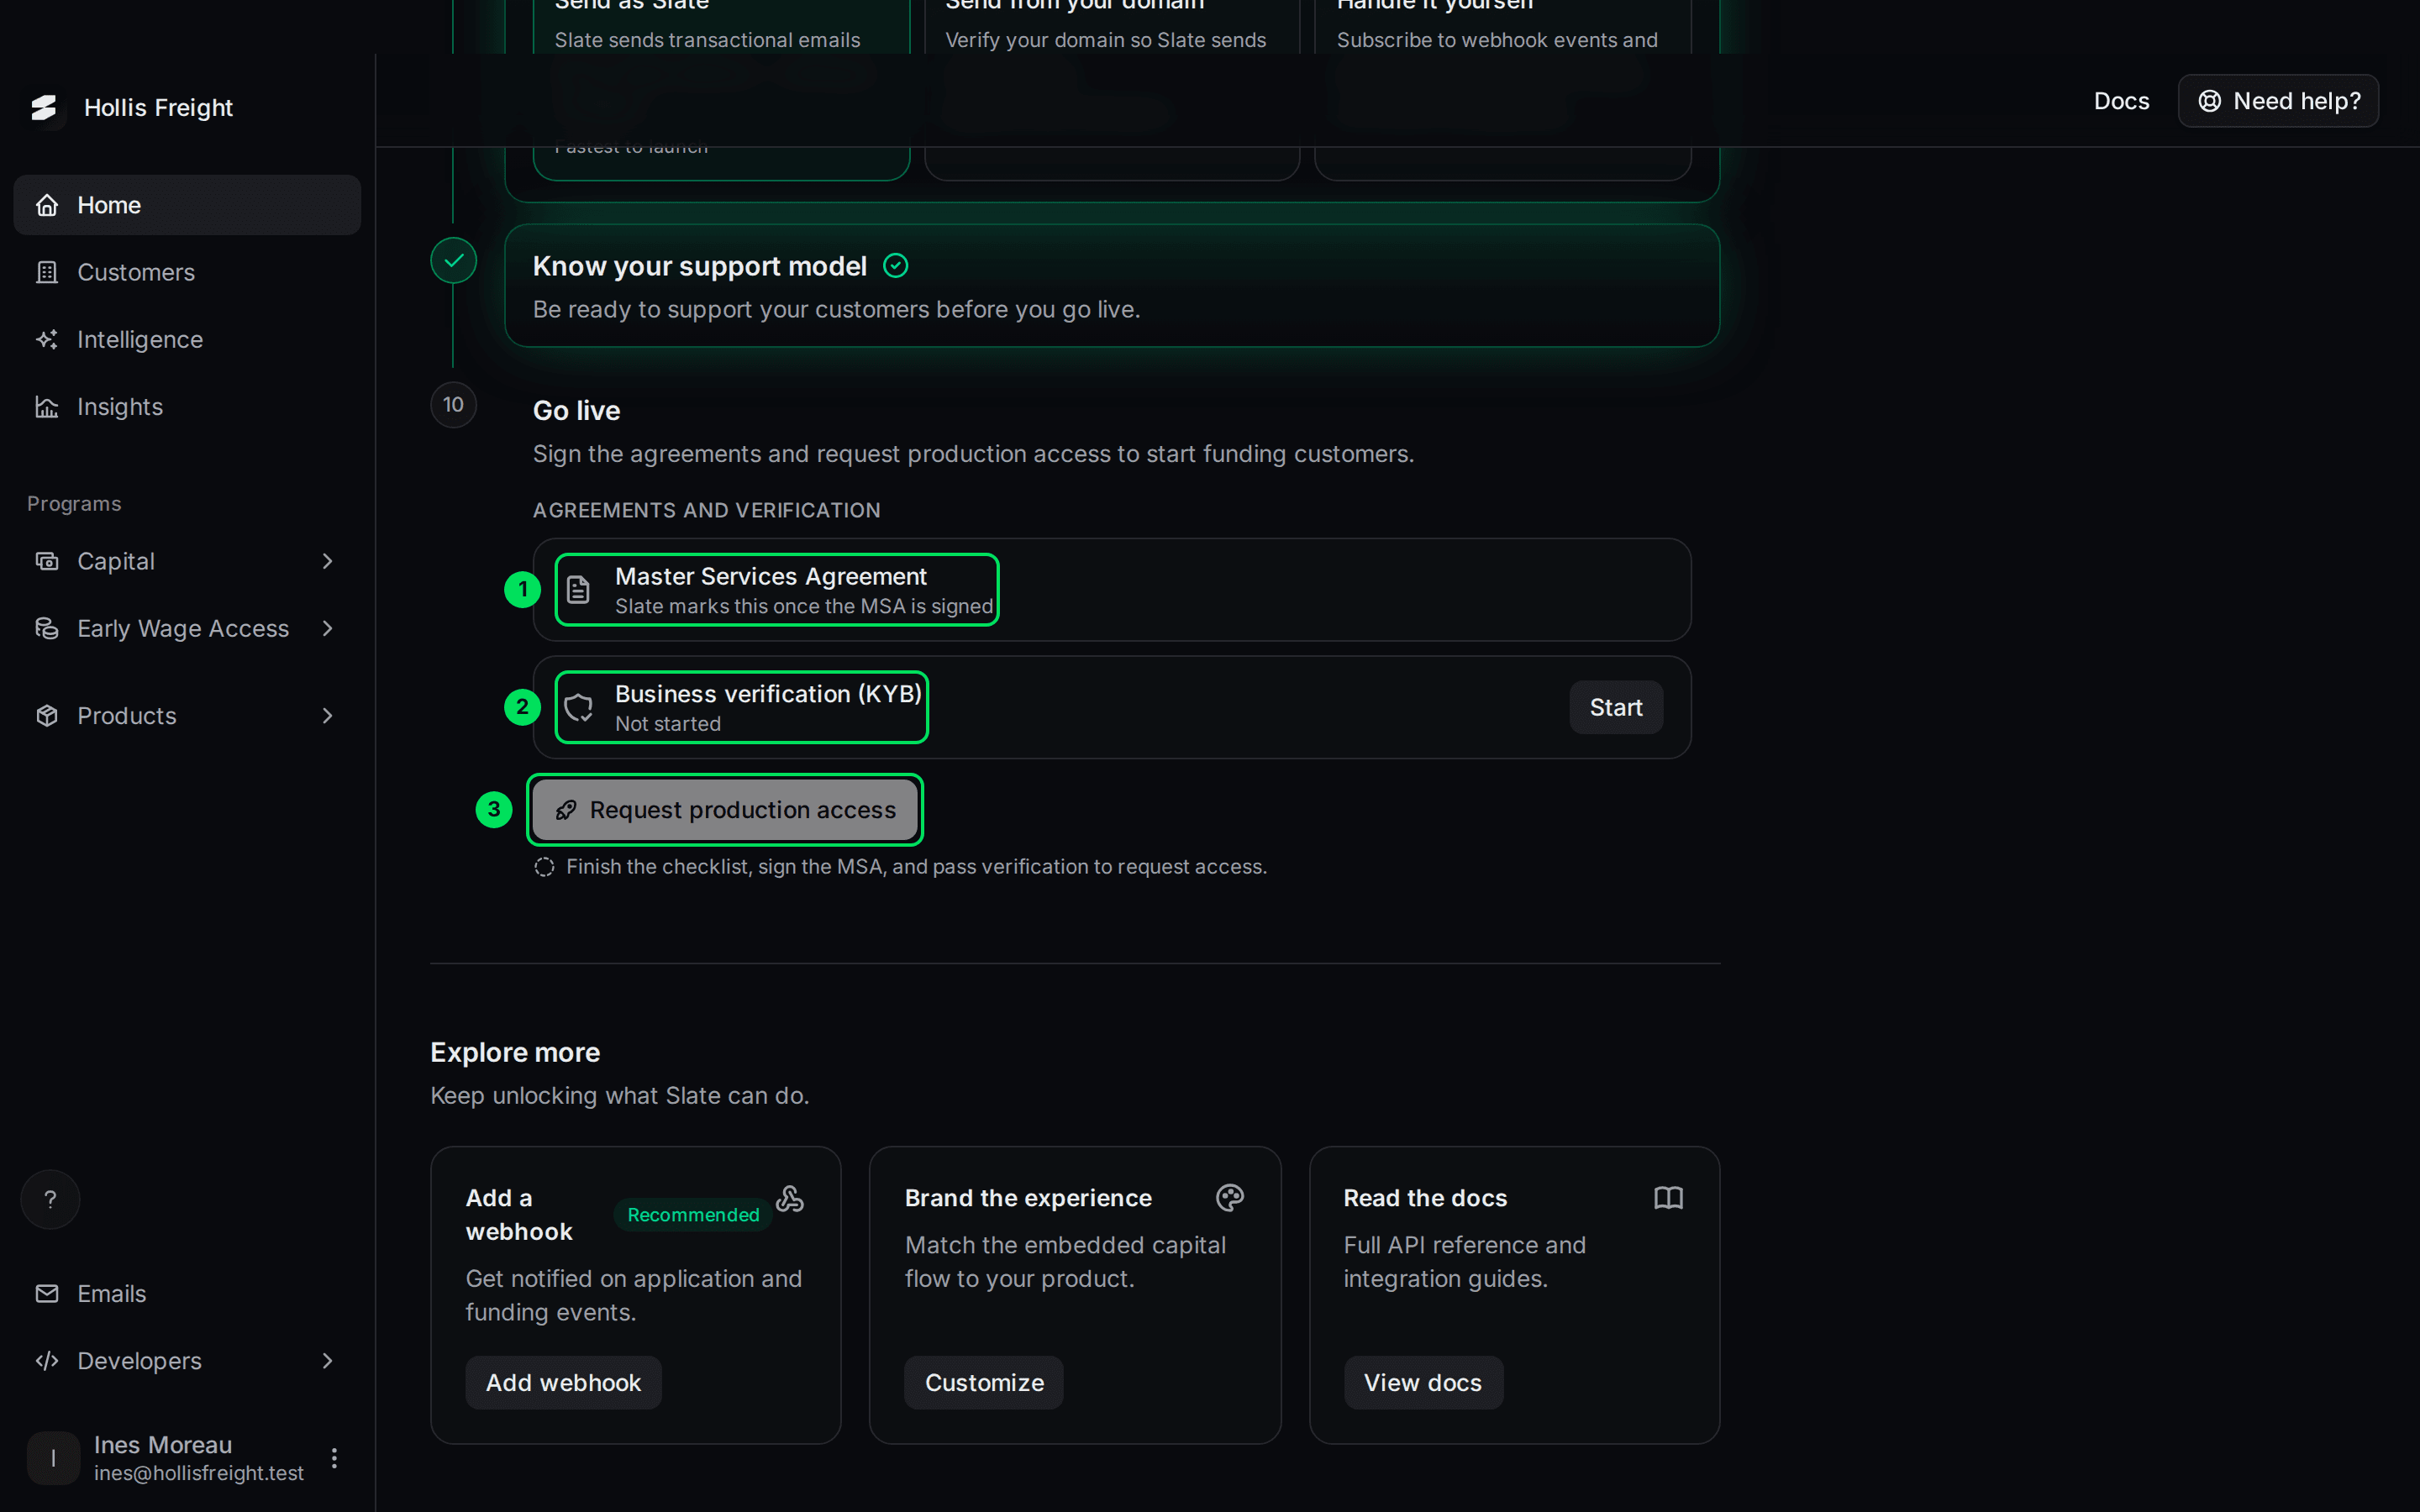
- Master Services Agreement: Slate marks this once the agreement is signed. You can't sign it here.
- Business verification (KYB): your company check. Select Start to fill it in. See Verify your business.
- Request production access: greyed out until steps 1 to 9, the agreement and the verification are all done.
Explore more
Under the checklist are three shortcuts:
- Add a webhook: get notified about application and funding events. Marked Recommended. See Webhooks.
- Brand the experience: match the capital screens to your product. Customize opens Application Flow. See Brand colours.
- Read the docs: the full API reference and guides.
Which steps tick on their own, and why?
Slate watches what happens in your account.
- Step 2: ticks when a key exists.
- Step 3: ticks when Slate receives a create-customer call.
- Step 4: ticks when Slate receives financial data.
- Step 6: ticks when a Slate screen loads in your product with a session token.
- Step 7: ticks when an application is submitted through your embed.
Steps 1, 5, 8 and 9 tick when you act on the page.
If something goes wrong
A step won't tick
Steps 3, 4, 6 and 7 only tick after a real call. Check you're using a sandbox key and the sandbox address. A call to live doesn't count here. Then reload Home.
Fetch pre-approval says "No pre-approval found for that customer ID"
The page adds: "Create a customer and attach financial data first." Check the ID matches your externalId exactly. Then check steps 3 and 4 are done.
Fetch pre-approval says "Could not fetch the pre-approval"
Check the customer ID and try again.
I lost my API key
Go to Developers, then API keys, and make a new one. See API keys.
Request production access is greyed out
It needs all nine steps, the signed agreement and an approved verification. See Go live.
Learn more about the Slate platform.
Still stuck? Email [email protected] with your account email and the screen you are on. We reply within 24 business hours.